One Room Challenge Spring 2020 – Guest Bedroom – REVEAL!
If you have clicked over from the One Room Challenge Website, welcome! I’m glad you are here! I am an interior designer and serial DIY’er based in Red Deer, Alberta, Canada! You can catch up on my One Room Challenge project in the last week’s posts here:
Week 1/ Week 2/ Week 3/ Week 4/ Week5&6/ Week 7
Today is the day we have all been waiting on for oh so long, the Spring 2020 One Room Challenge Reveal day! Personally, I have been planning and working on this space in one form or another since about January, so I am very happy to have it totally complete and to be able to share it with you today.
Before I get to the photos, I would like to thank Linda, the founder of the One Room Challenge and the mastermind behind this amazing event. I’d also like to thank my generous brand sponsors who helped me create a space that is even more beautiful than I would have been able to create otherwise. Thank you to my family – my husband and kids who helped when they could and put up with me and my design obsessions, and to my seamstress (Mom!) and potter (Sister!). And last but not least, thank you to all of the supporters of my blog and on Instagram that felt like a cheering squad, including all the other designers, guest designers and featured, that were renovating and designing right alongside me. It feels like we are all in this together – that is the reason I love this community so much – we are all united by our love of all things design!
This post may contain affiliate links. That means if you purchase anything from these links I earn a small commission, at no extra cost to you! This helps support my blog, so thank you!
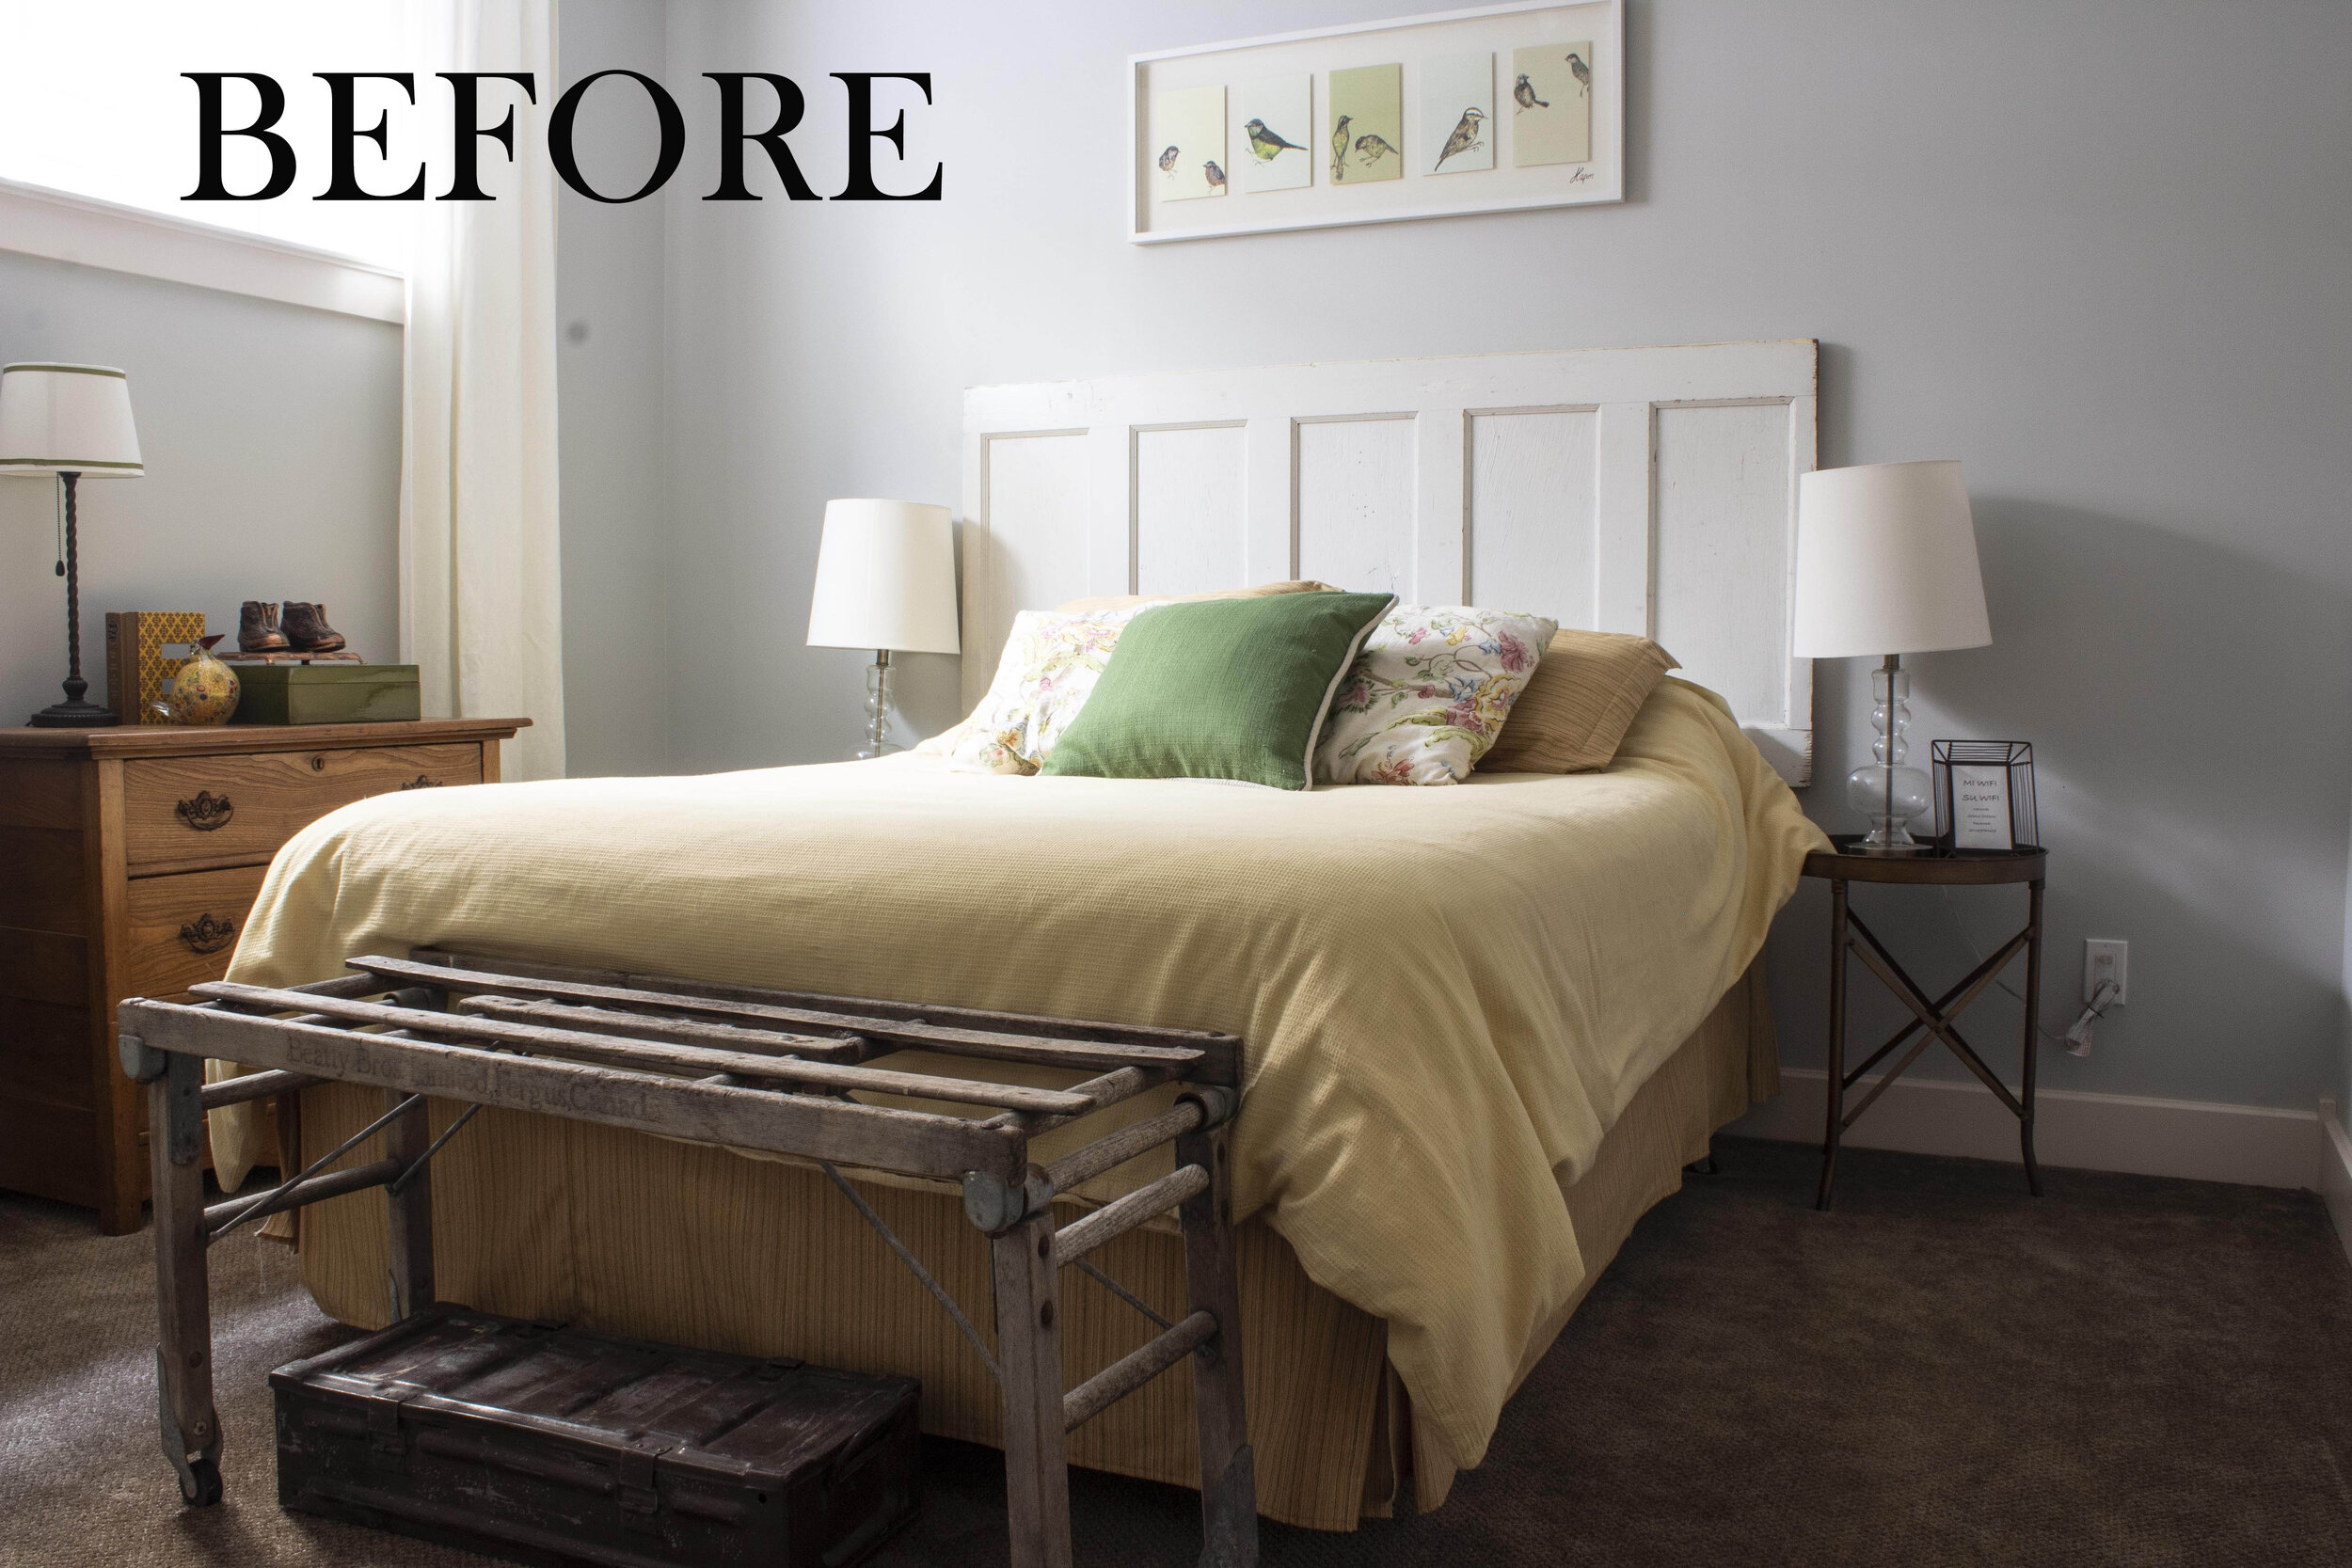
Looking Back on the BEFORE
Okay okay, I know you want to see the after photos, but before we go there – let’s remind ourselves of how it looked before! Although it’s not a terrible room by any means, it was a place where leftover furniture was dumped and little thought went into it. I sold the bed and “headboard” (aka old door) on Facebook marketplace and re-homed the “nightstands” to my deck, which is where they really should have been all along given that they are outdoor tables. The dresser stayed in the room and the curtains were repurposed. And that’s the only clearing that was required because this room had been left so minimal before.
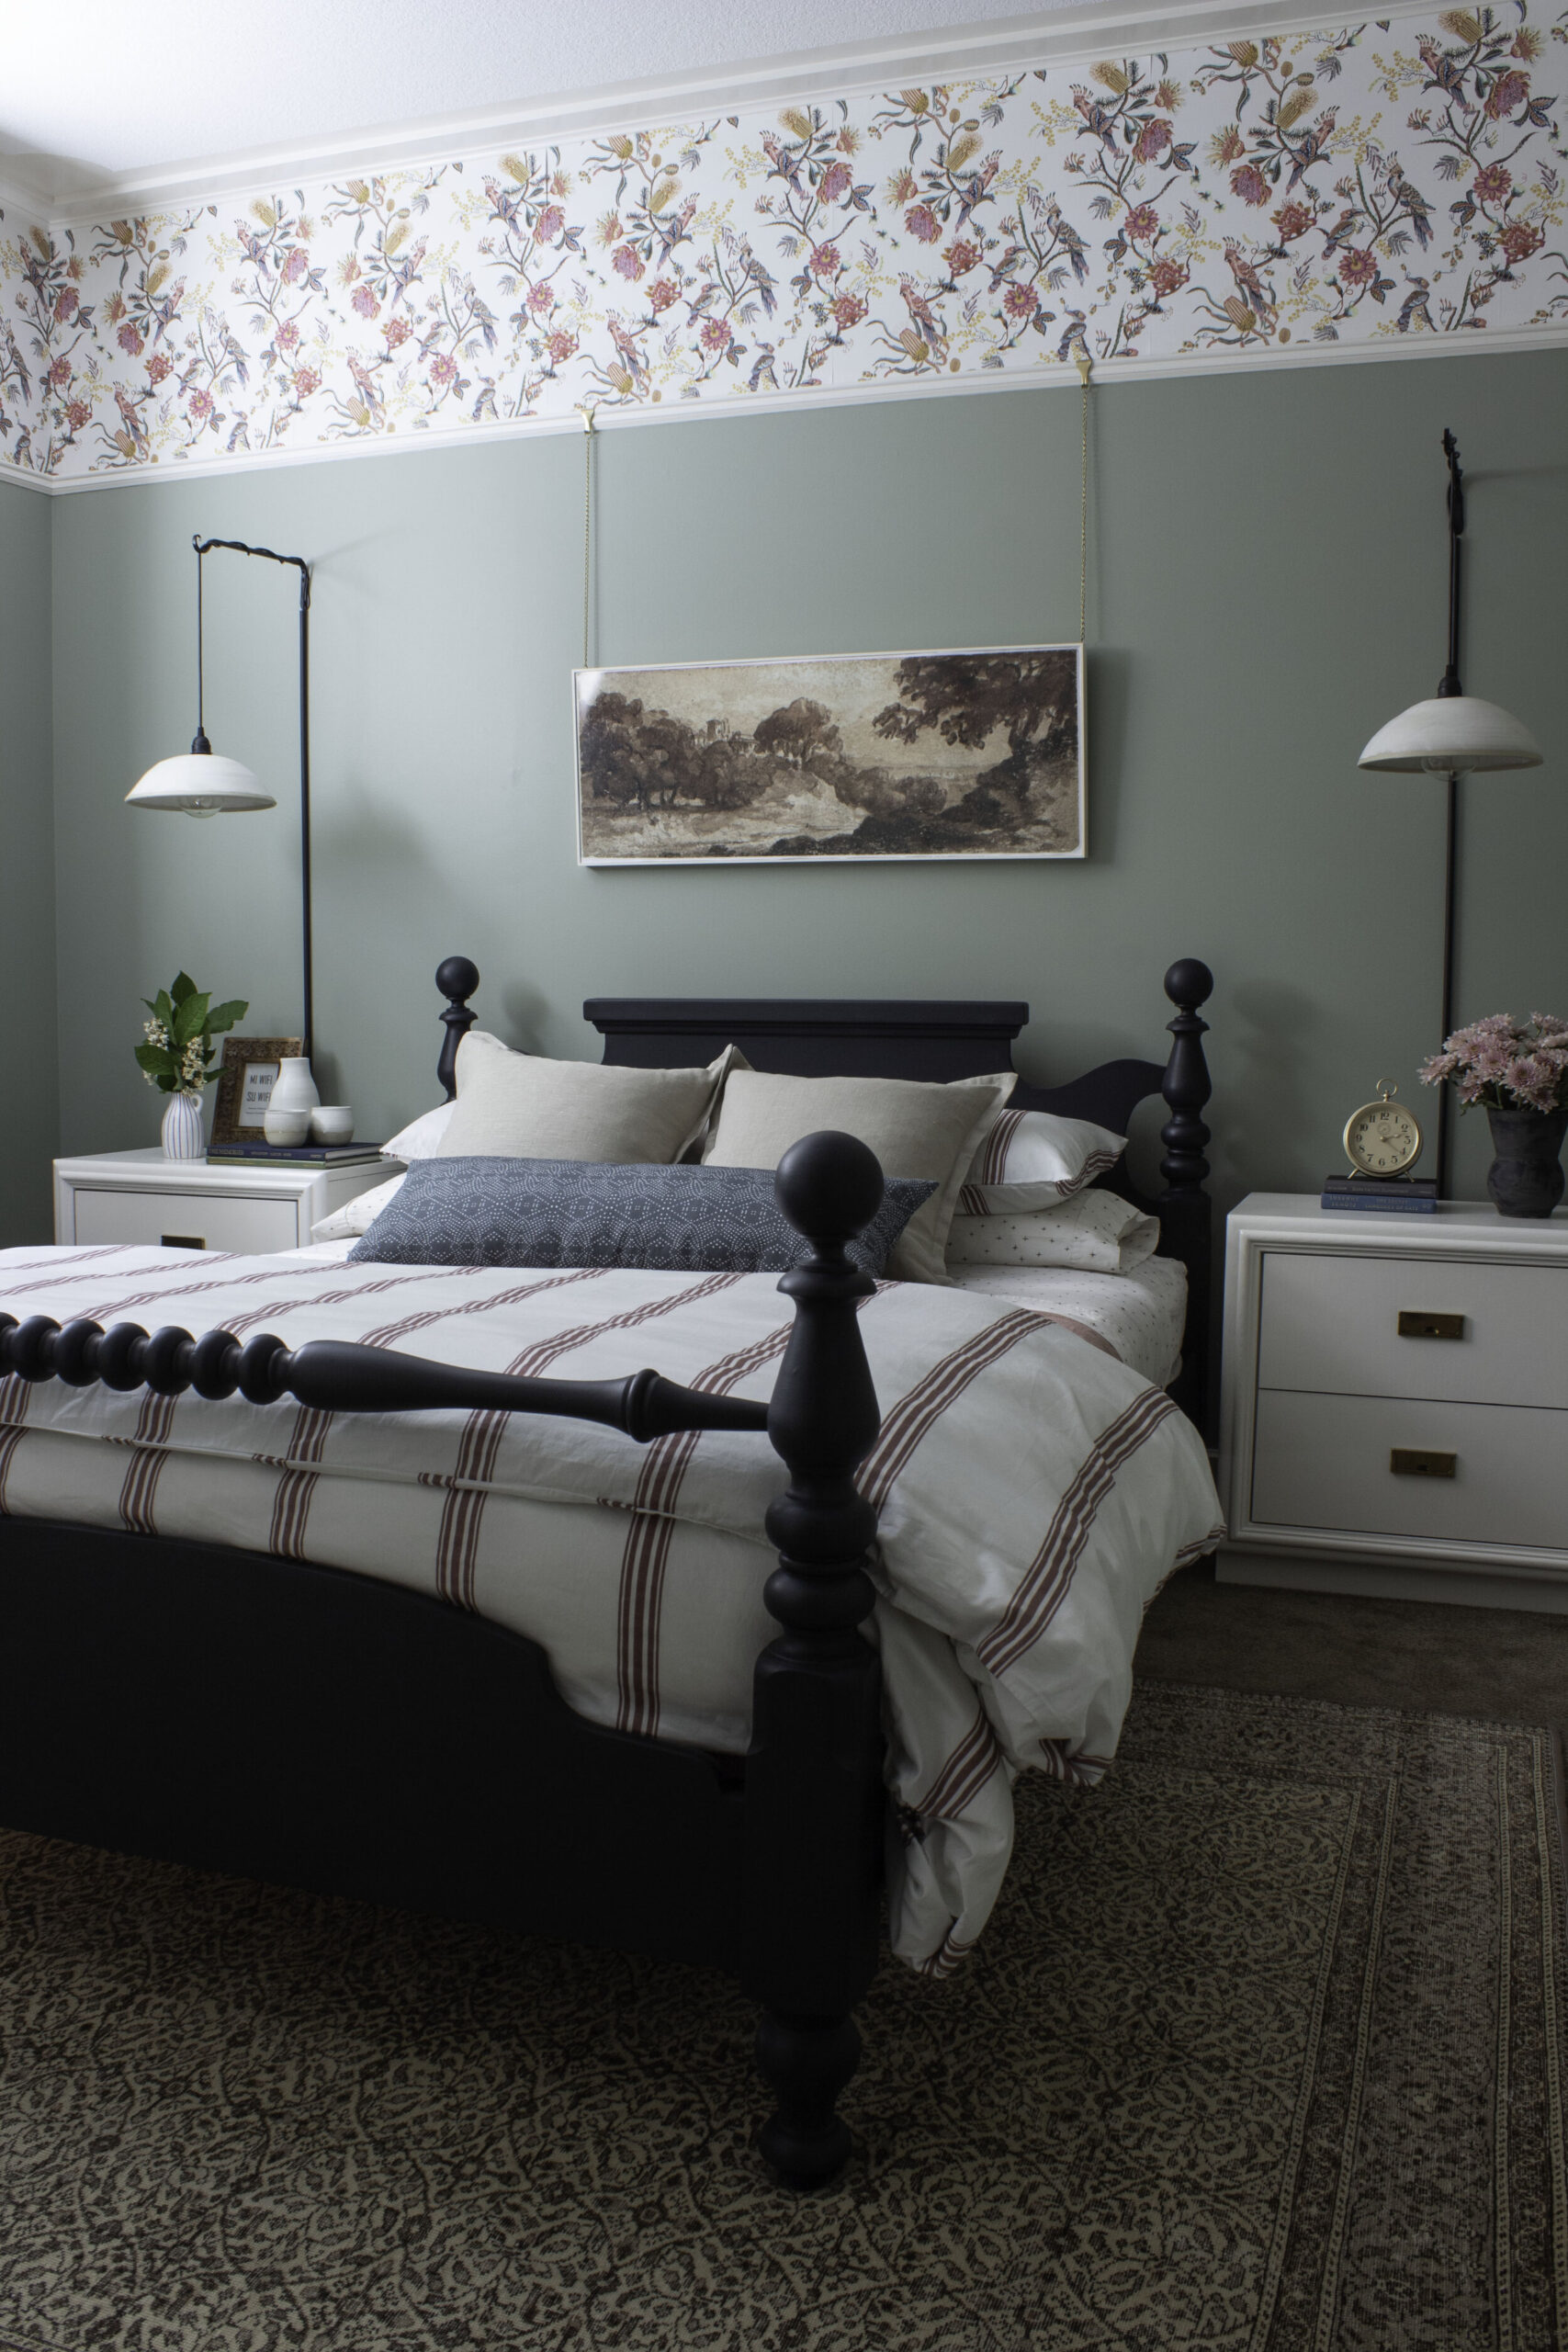
THE AFTER
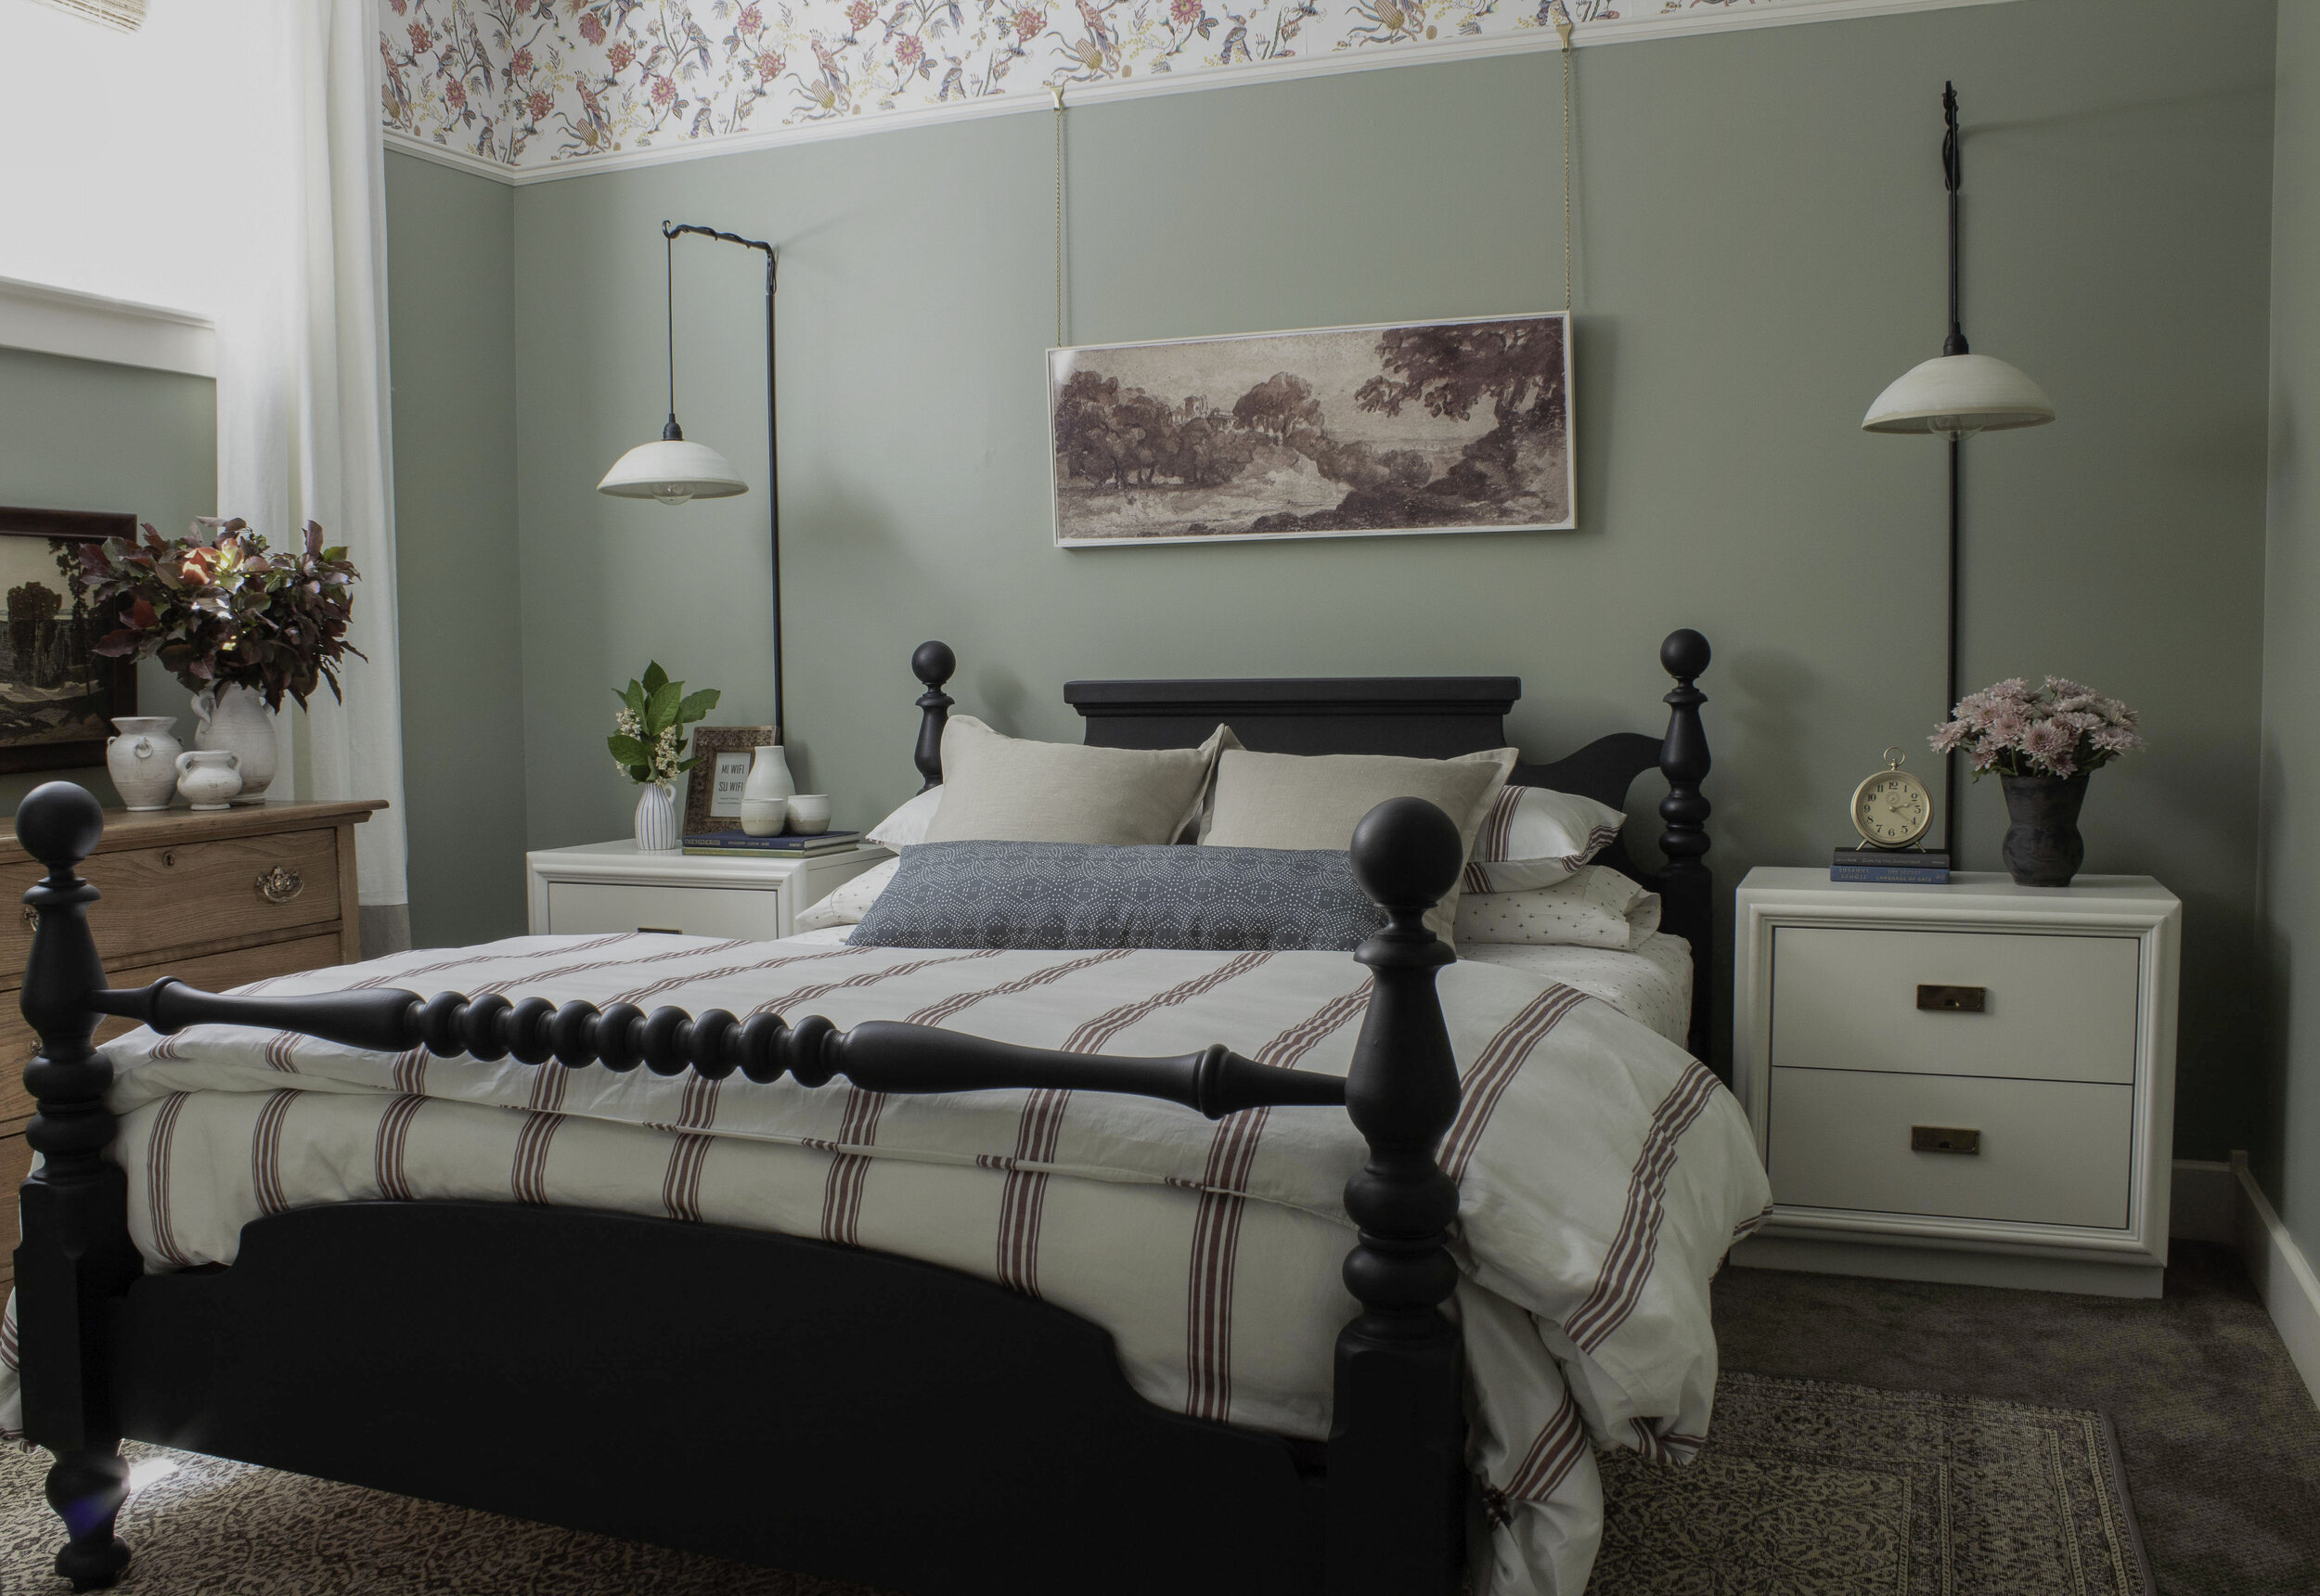
Ready to talk design decisions? First of all, what was the general direction I wanted to take? I started pinning photos that I loved and realized that I was drawn to rooms that were a little European looking and traditional in style, but with some modern touches. I always love a touch of whimsy, too. I also found that the rooms that really stopped me in my tracks always included some colour, pattern or a well-blended mix of both. I really tried to create something a little different and a little unique. I wanted to take a bit of a RISK. Because this was my own house and a guest room to boot, there was no one I needed to please with this design. That’s what you call design FREEDOM and oh my gosh is that fun!
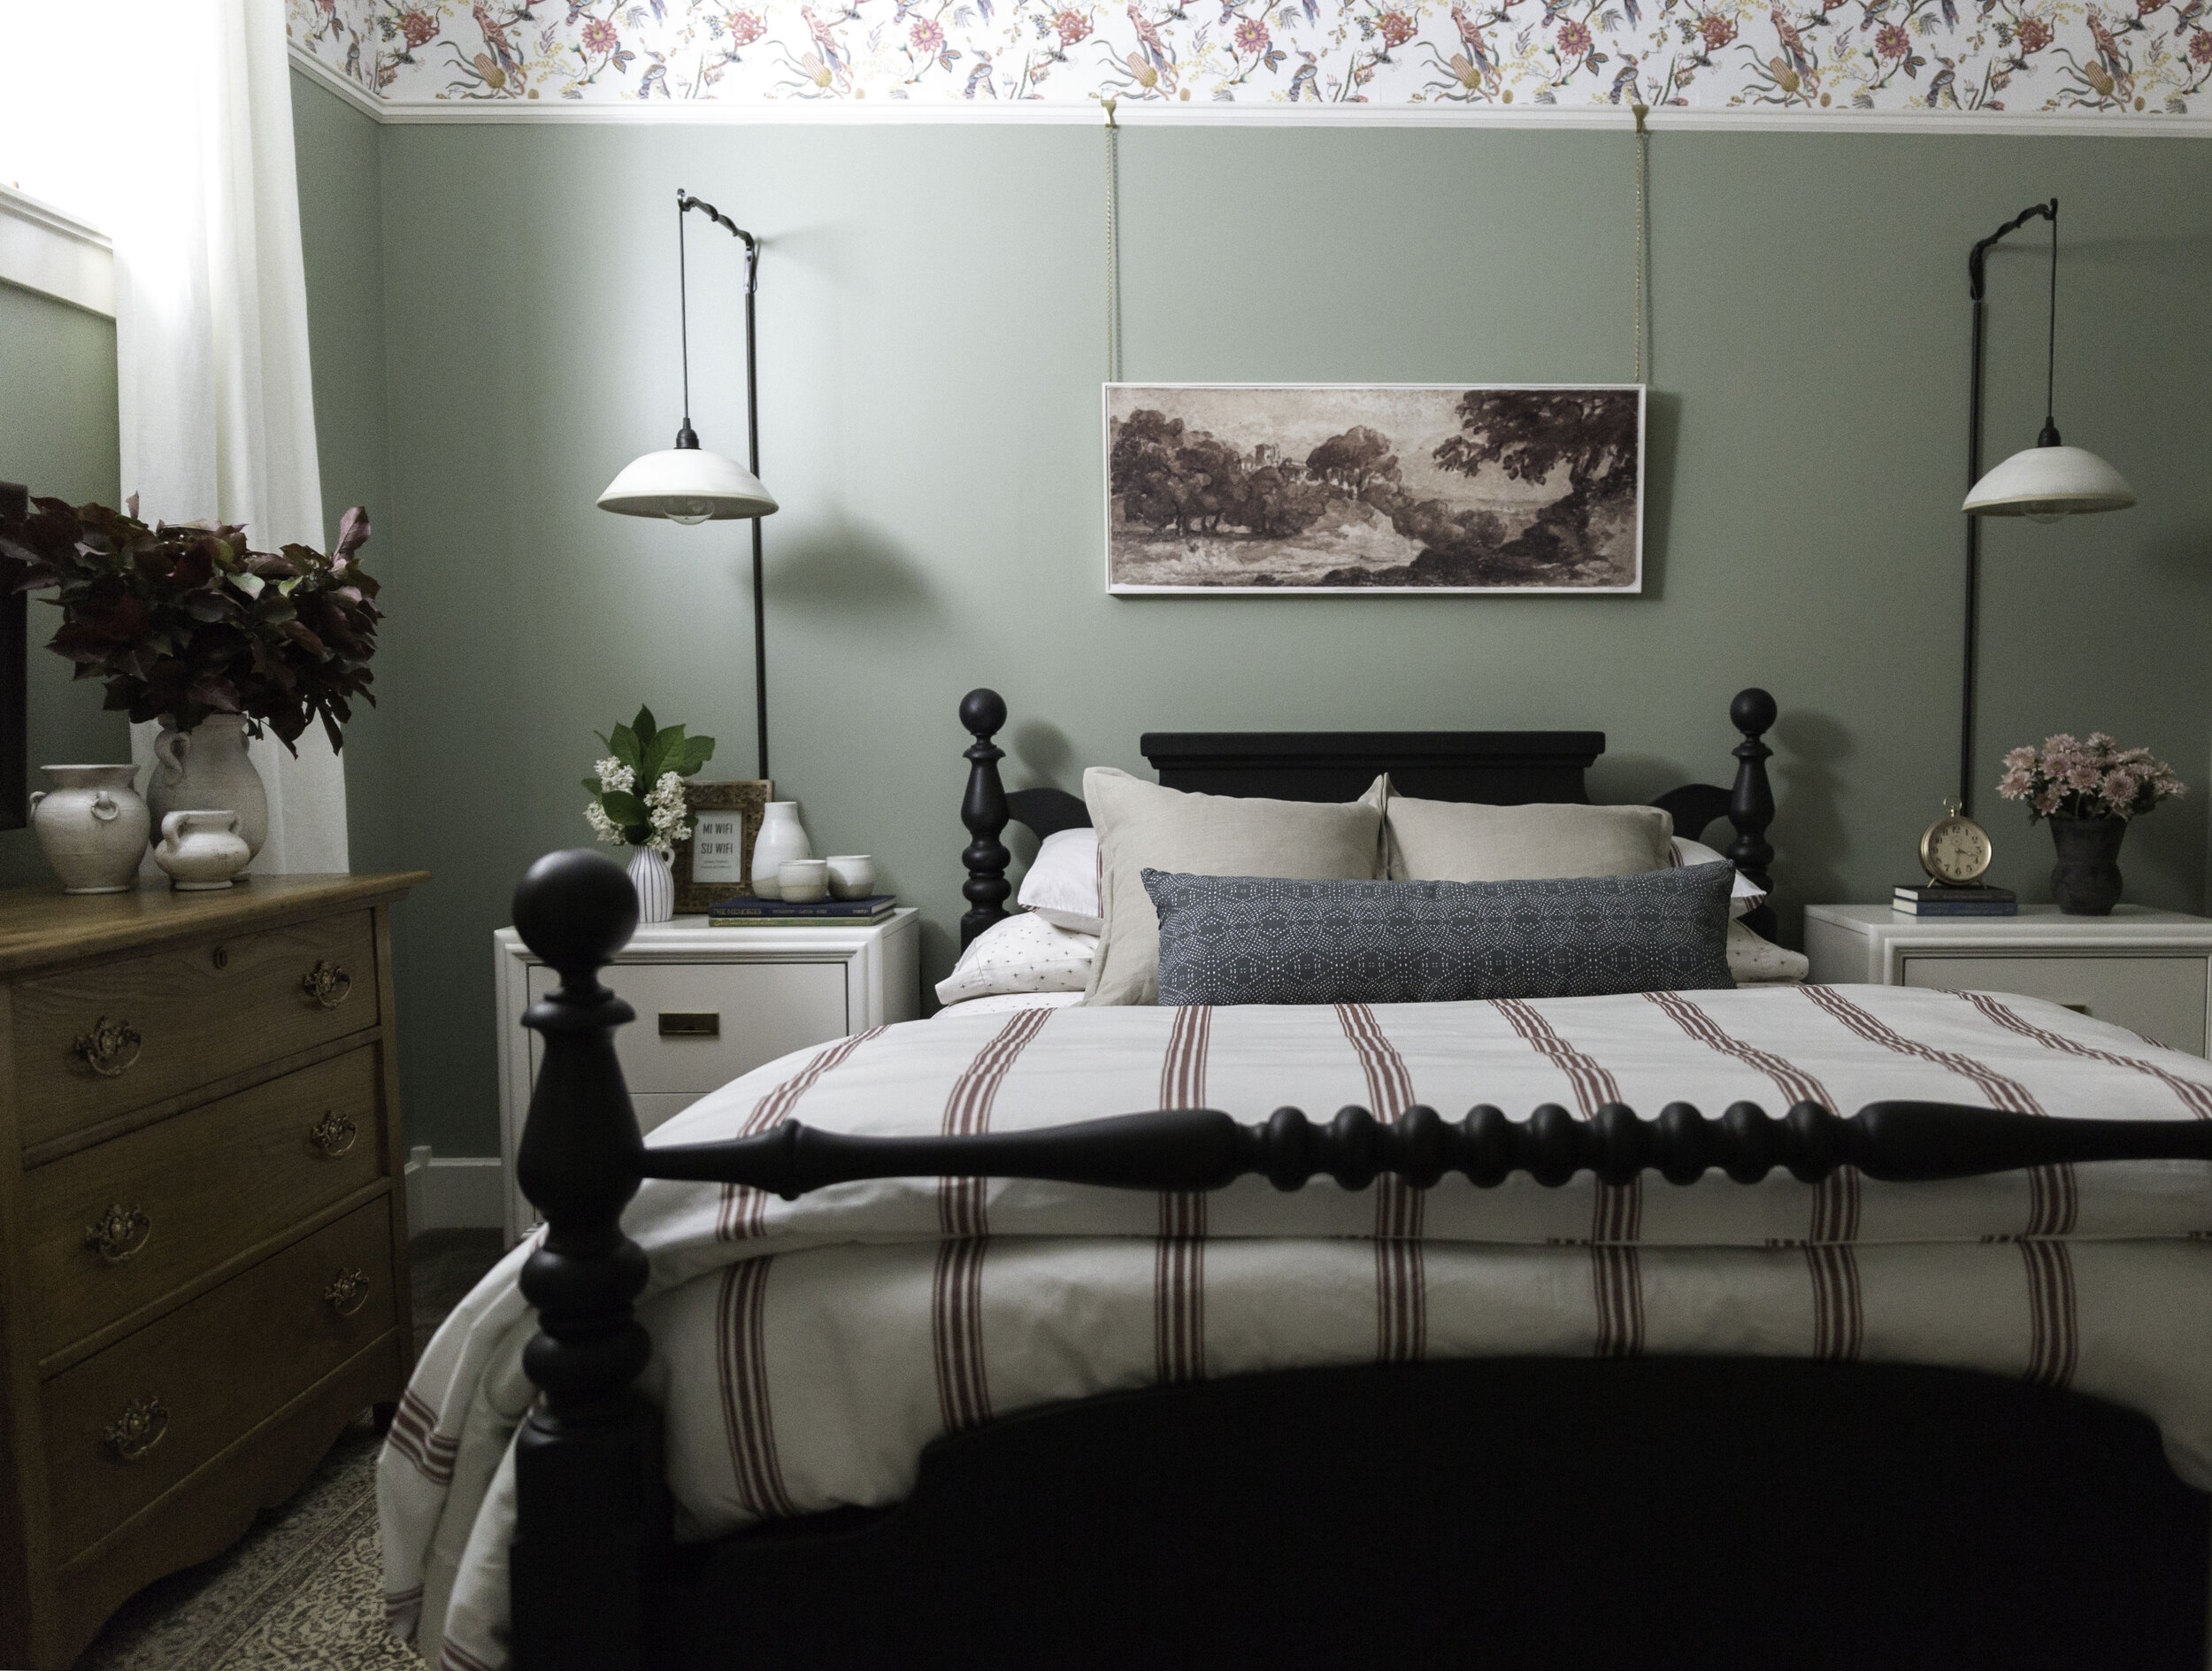
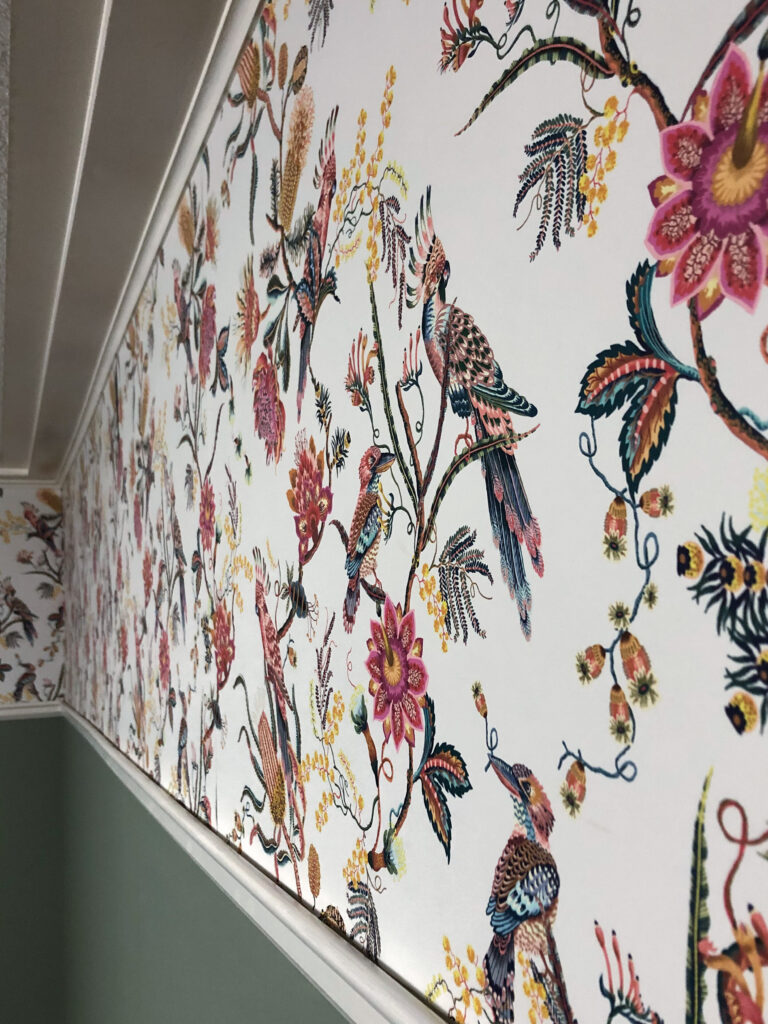
The first thing that I sourced for the room was the wallpaper. I was leaning towards wallpaper and I knew I wanted to do it all around the room and not on only one wall, but I also realized that something like that could be a bit overwhelming in a small room. So I decided to treat just the very top of the wall with wallpaper, and hang a picture molding a few feet below the ceiling and also add a simple crown molding to provide a “frame” for the wallpaper and also add some architectural interest. My ceiling height is 9’ in this room so I had plenty of wall space to work with.
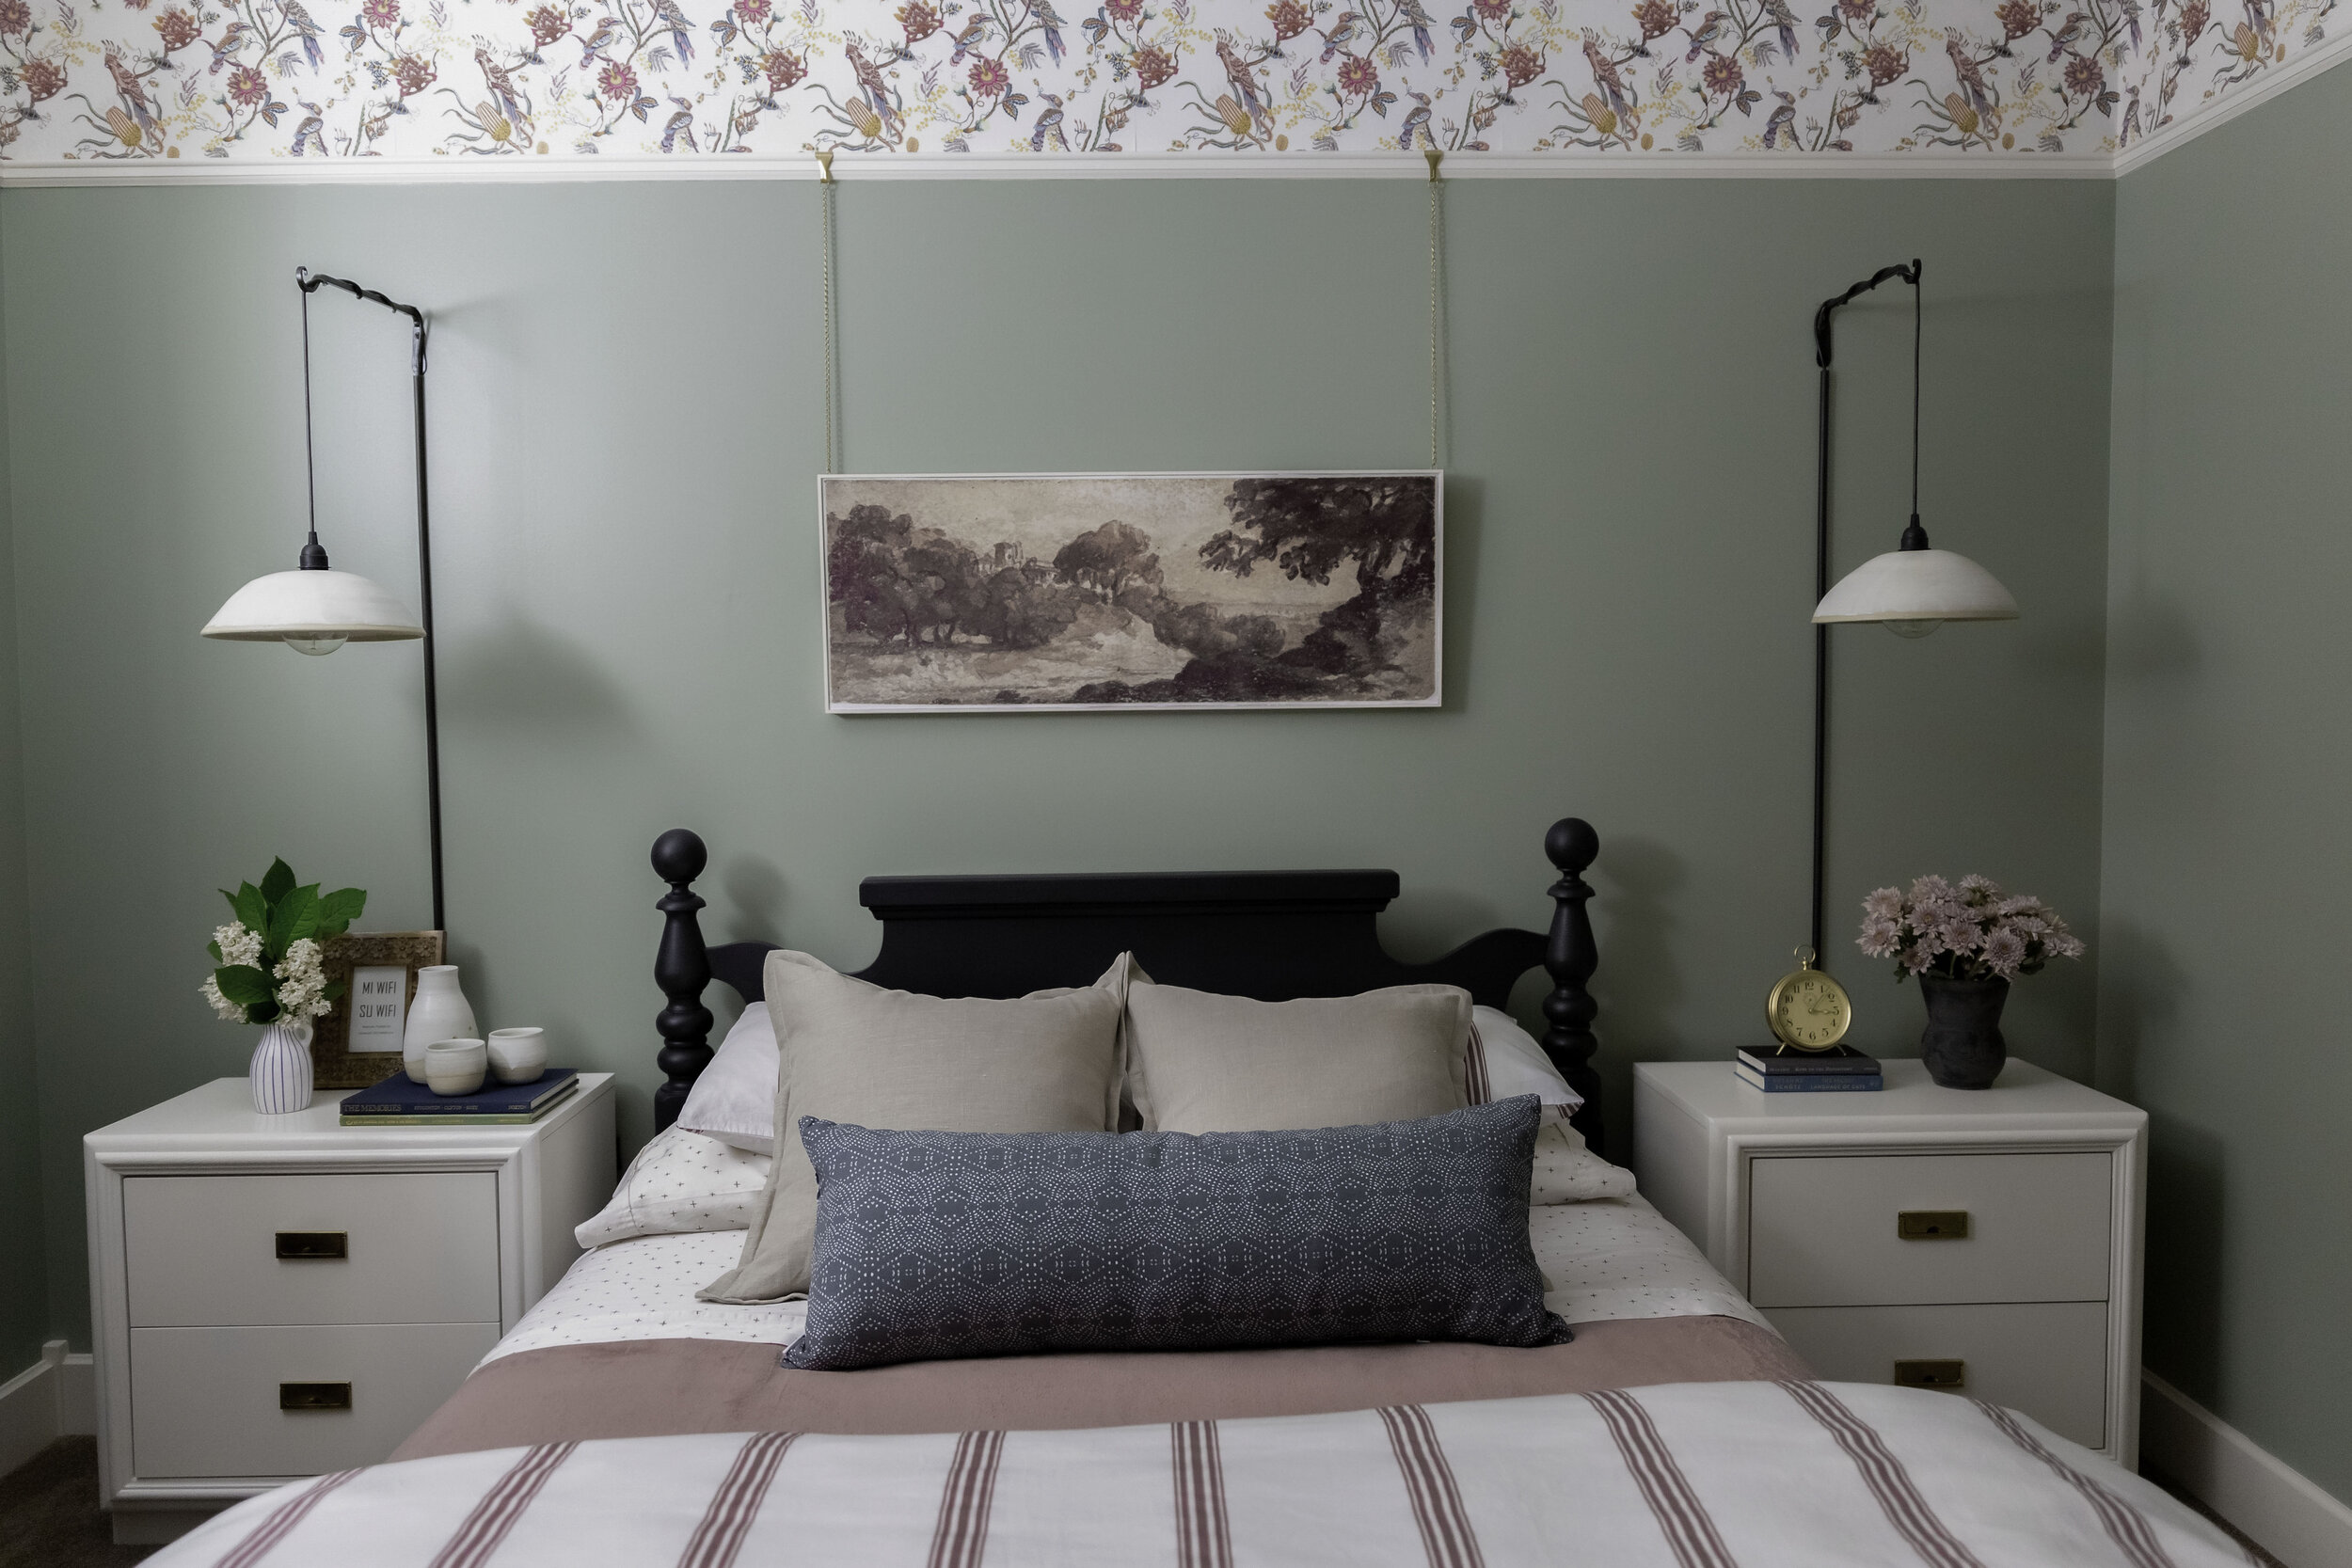
I chose this absolutely gorgeous wallpaper from Milton and King and the colours and the tone for the room were set. The wallpaper has many colours I could pull from for the room, but the dominant colorway was a deep pink/ red colour and so I decided to go with that as an accent in the room and use its complementary colour, green, for the walls. The wall paint was provided by Valspar and the walls were painted in Valspar Green Tea Leaves, which is a mid-tone sage green that leans a little gray in some light and definitely kept the space within my colour comfort zone – colourful, but not too overly saturated.
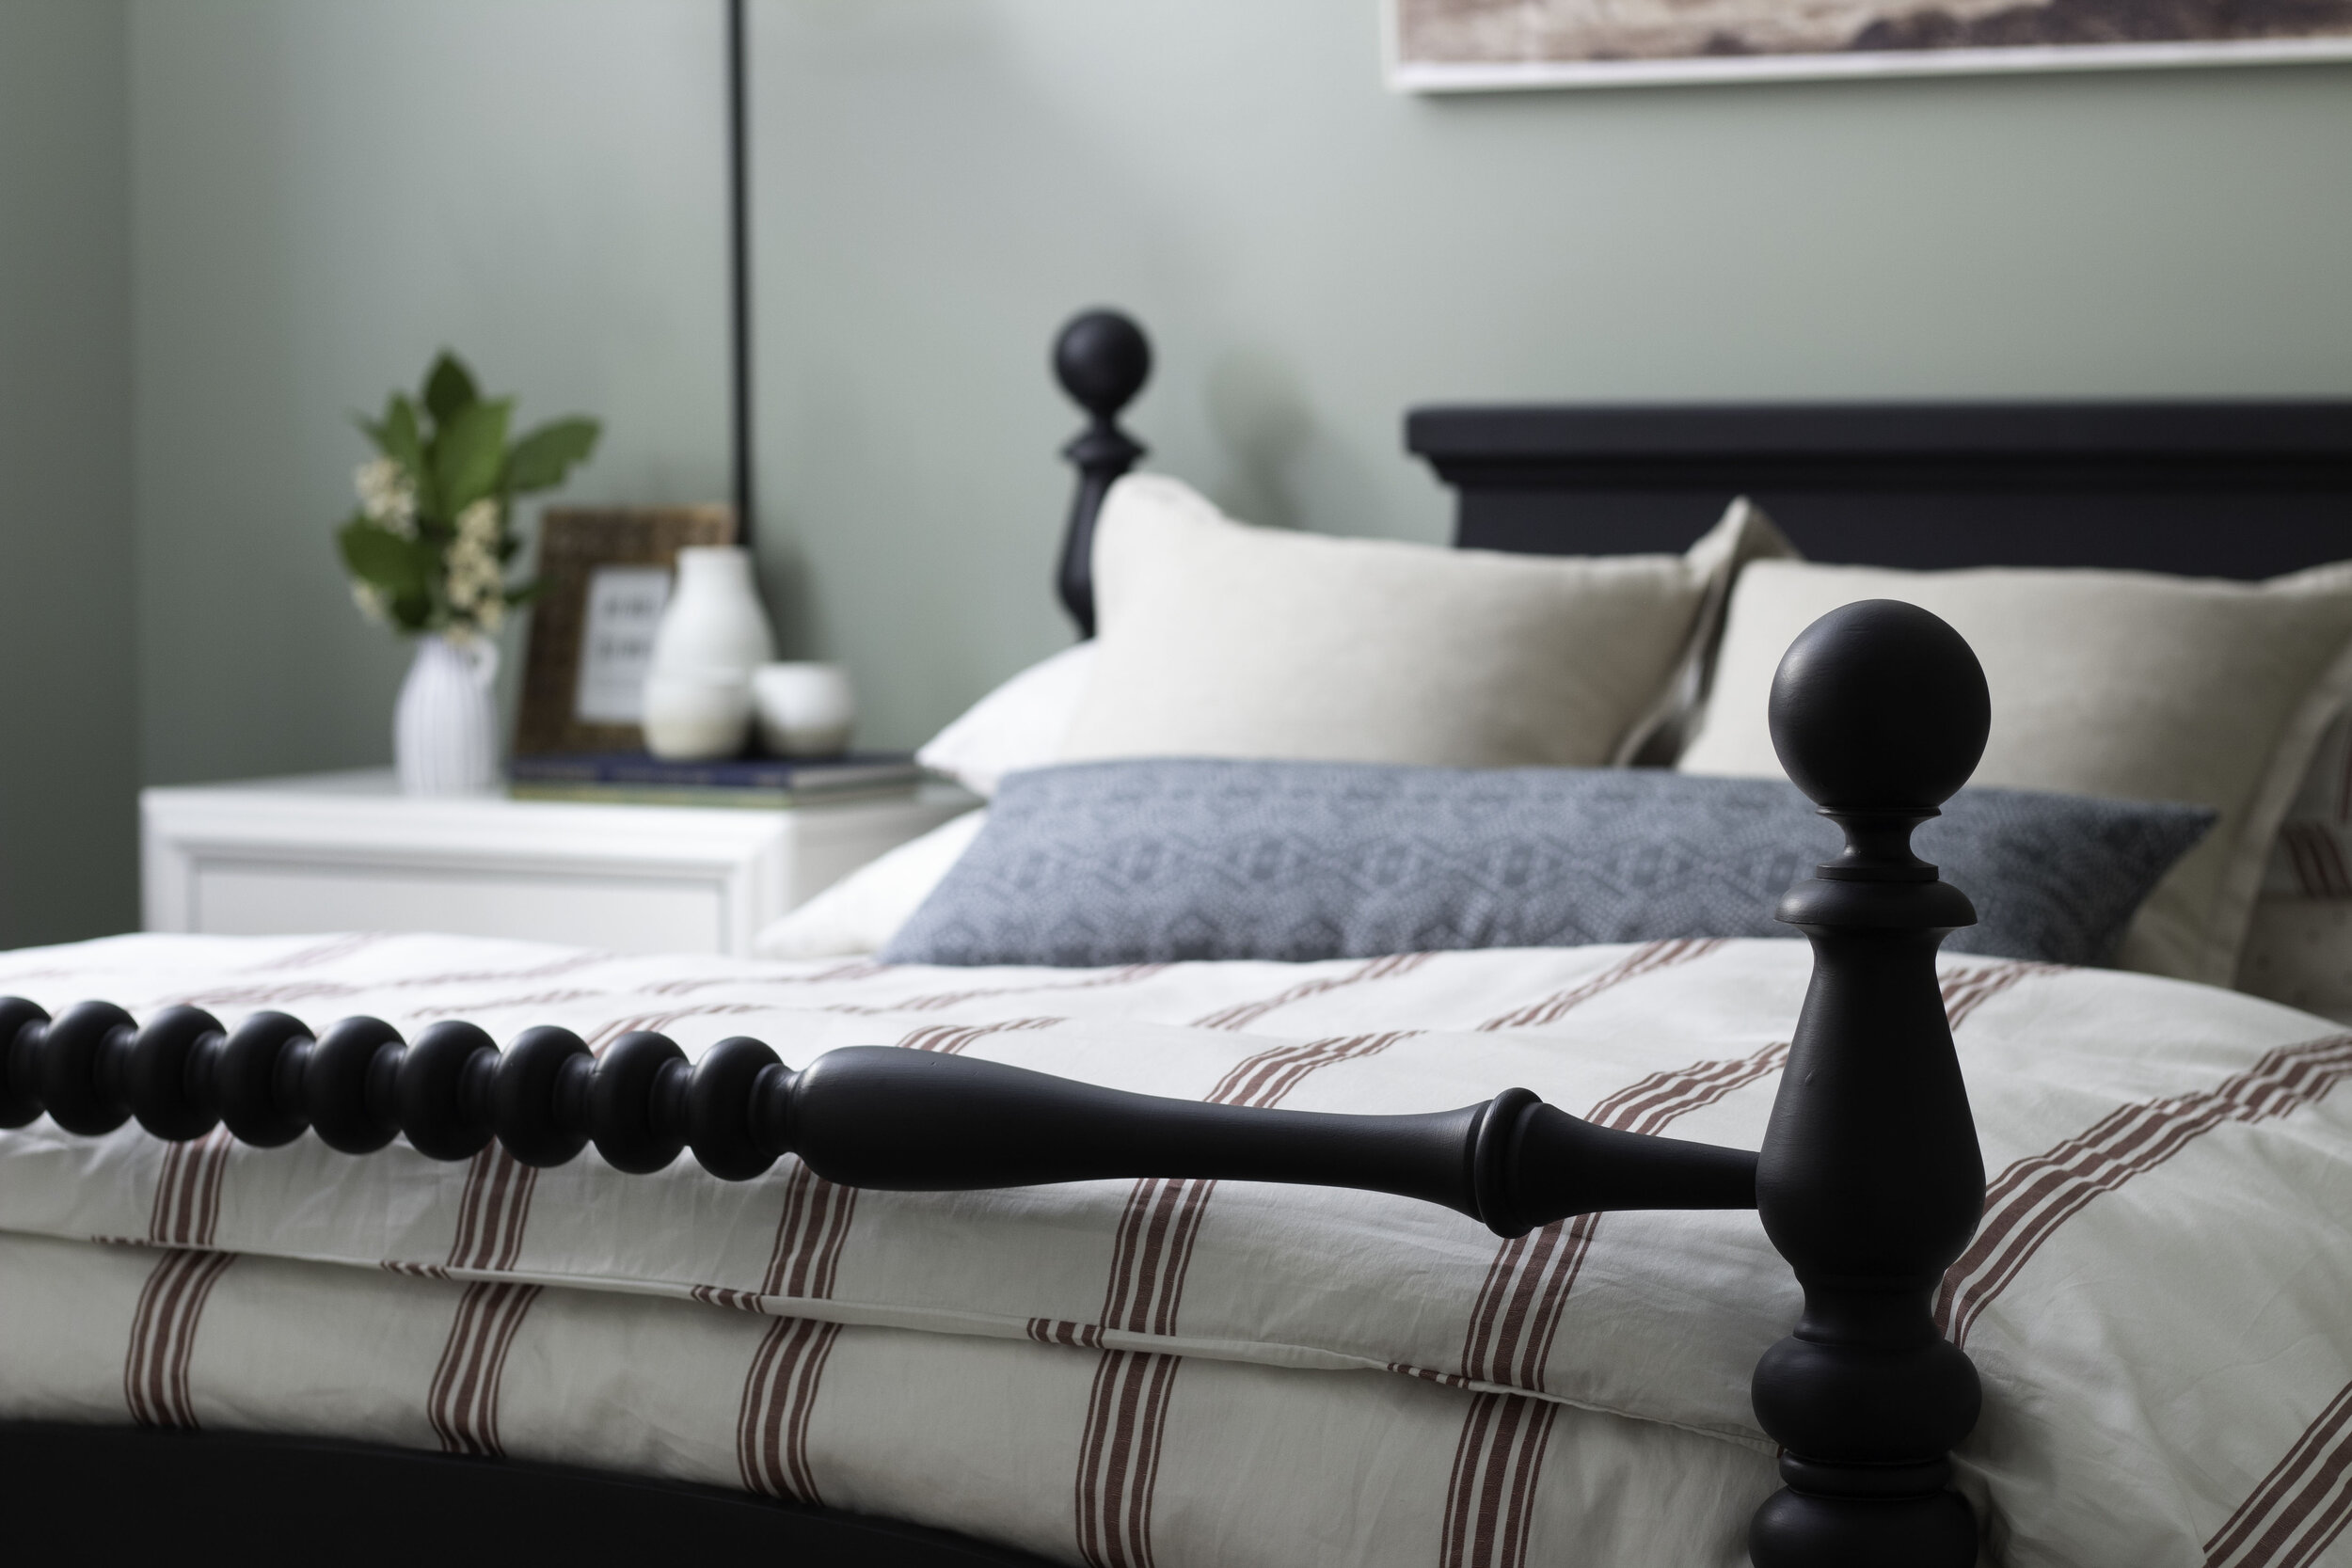
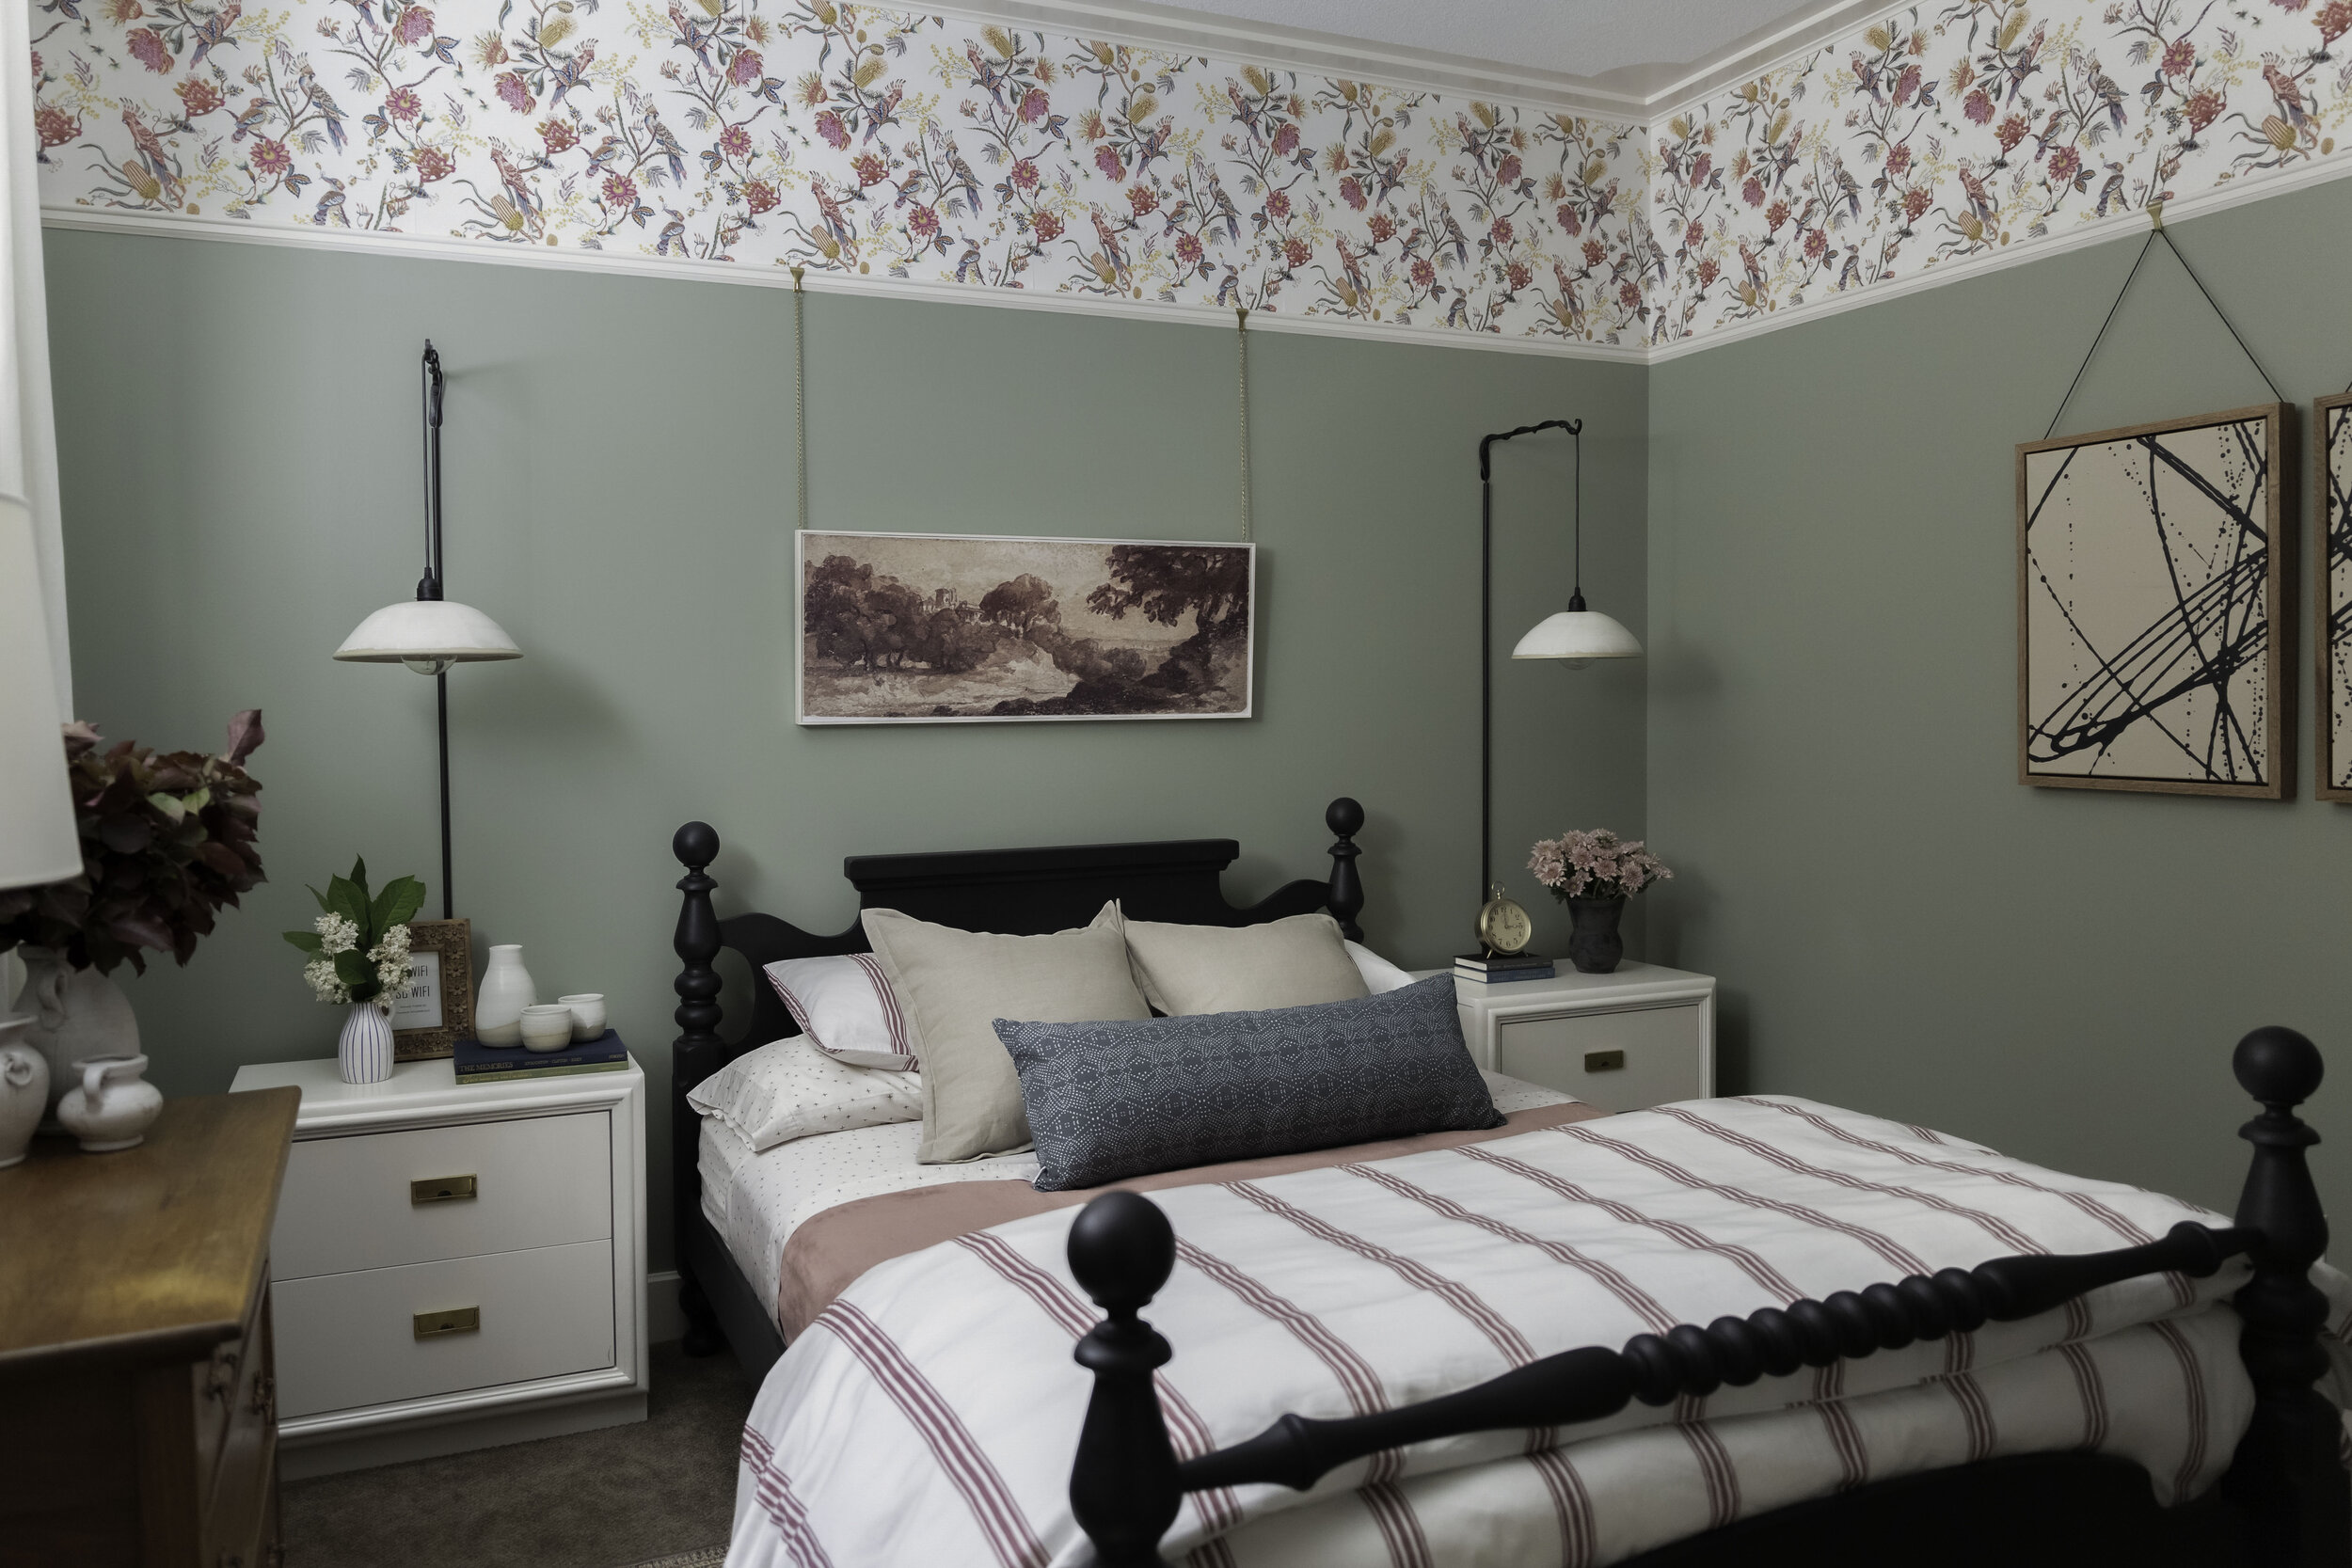
I always like to have a touch of black in any room to ground a space and add that much needed contrast, and so a black bed just seemed like it would be the perfect solution for this. I found the bed and nightstands on Facebook Marketplace and gave them a bit of a makeover – you can read all about it in my Week 5&6 post, here.
I wanted the bedding to be something special and luxurious for my guests. The duvet/shams, sheet set, and lumbar were all provided by Spoonflower and one hundred percent helped me achieve that goal. I was able to totally customize the pattern and colour to perfectly coordinate in the room, which is just a designer’s dream! I’m so used to searching and searching for that ideal shade and pattern, and being able to customize this was heavenly. I chose a mix of pattern and colour that worked with my design scheme – pinks and greens, with a touch of navy for a bit of that contrast that I love. I talk a little more about mixing patterns in Week 5&6.
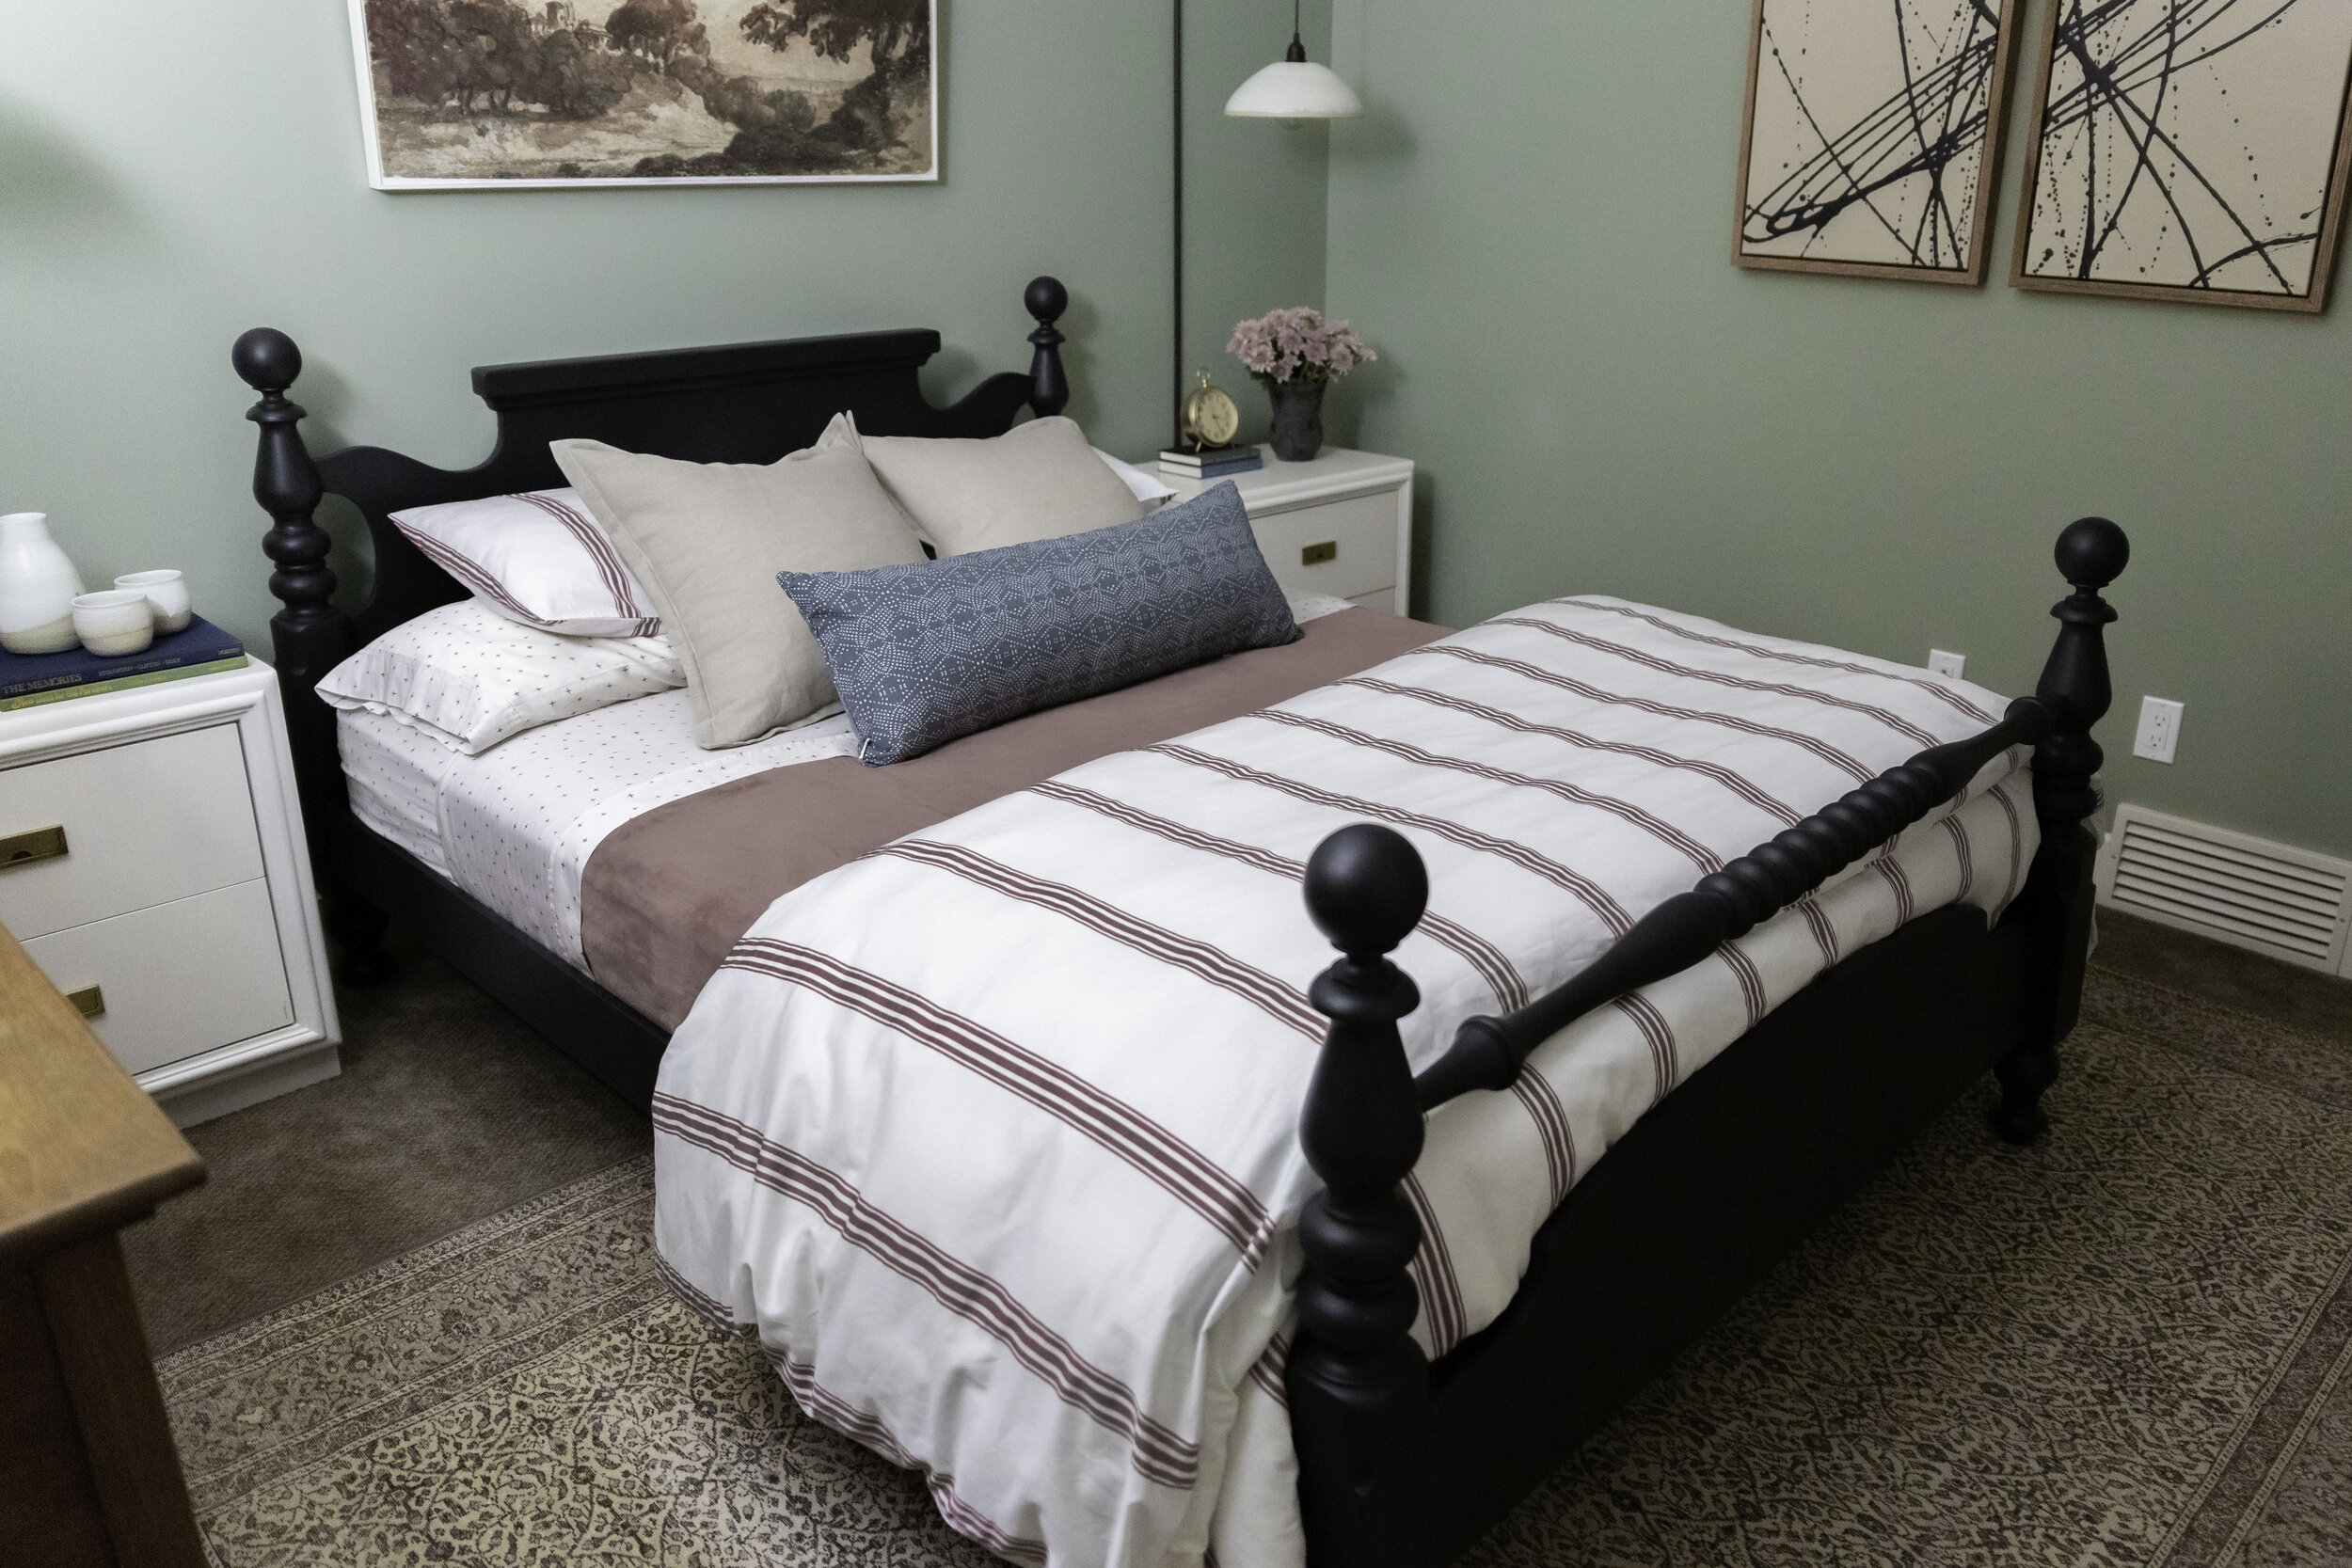
If you have been following along you know I almost ended up without a rug in here (see this post), but ended up finding the perfect rug at Revival rugs. It’s a vintage beauty and I am so in love with it. I went for a neutral rug, as there was already so much colour happening I thought the room needed a good dose of neutral.
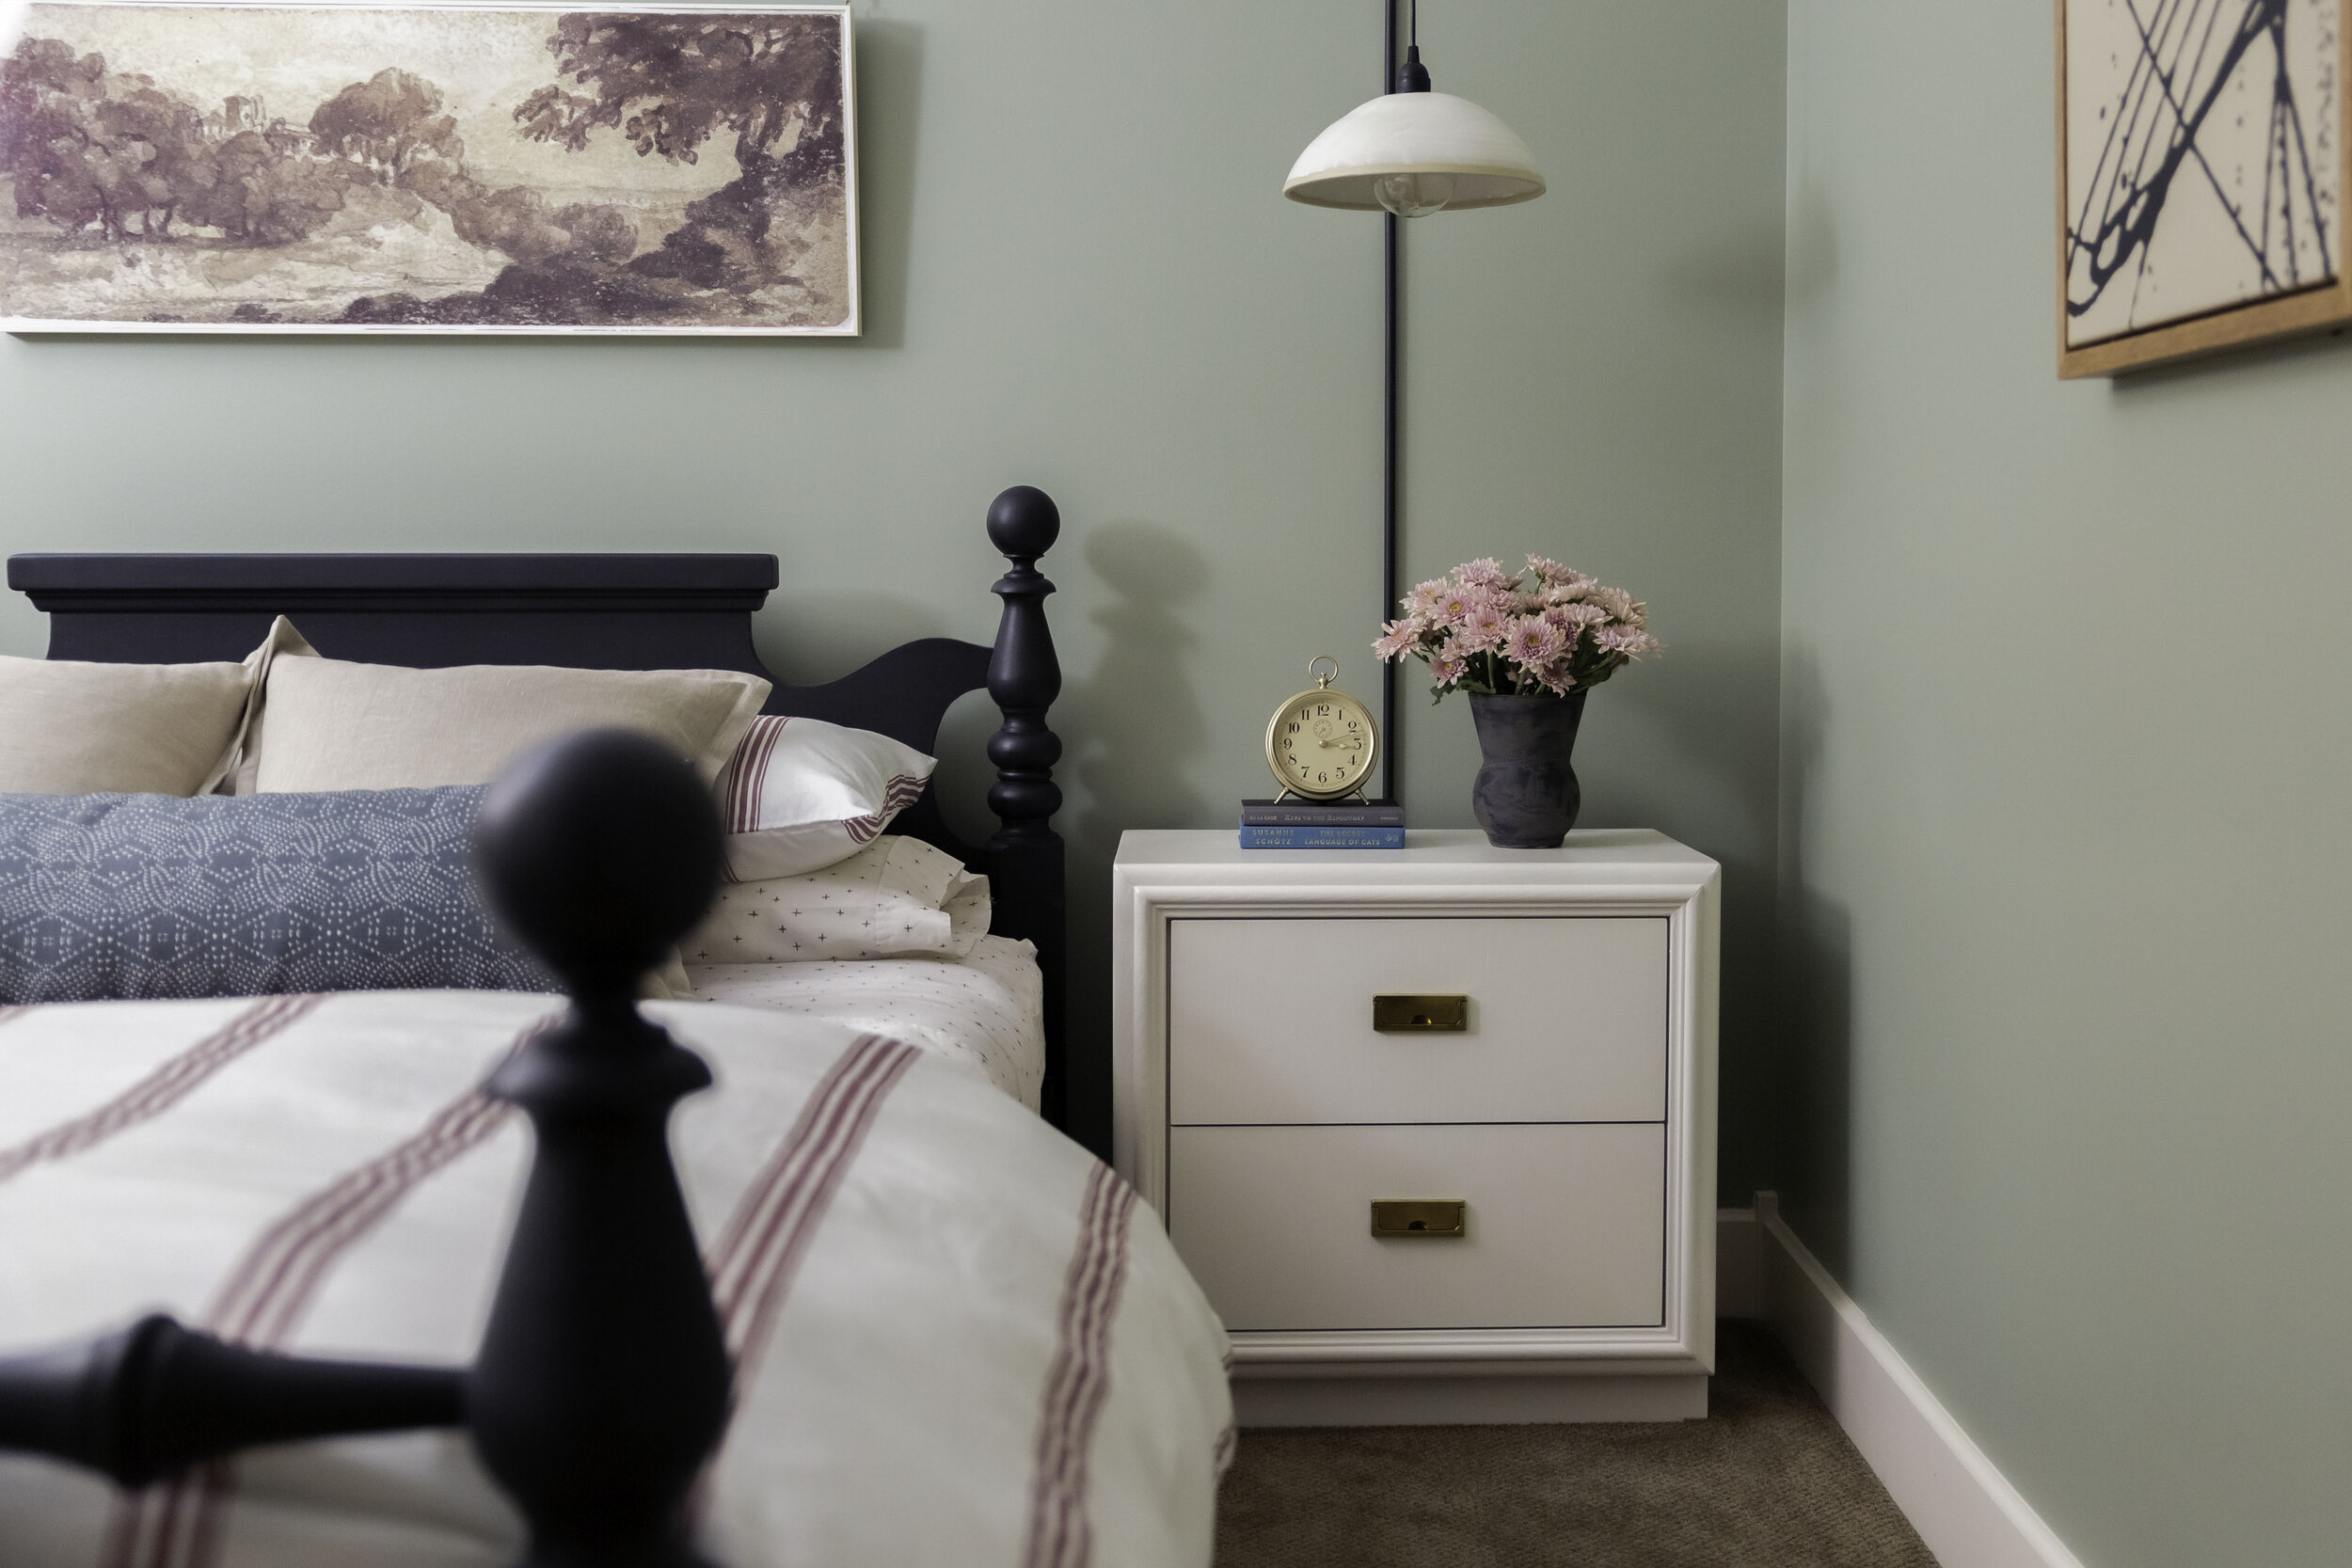
The sconces are also something special – they were handmade by my sister who teaches art and ceramics at our local high school. I hung them with a plant hanger and a plug-in light kit, and I love how unique they are! They really add something special to the space!
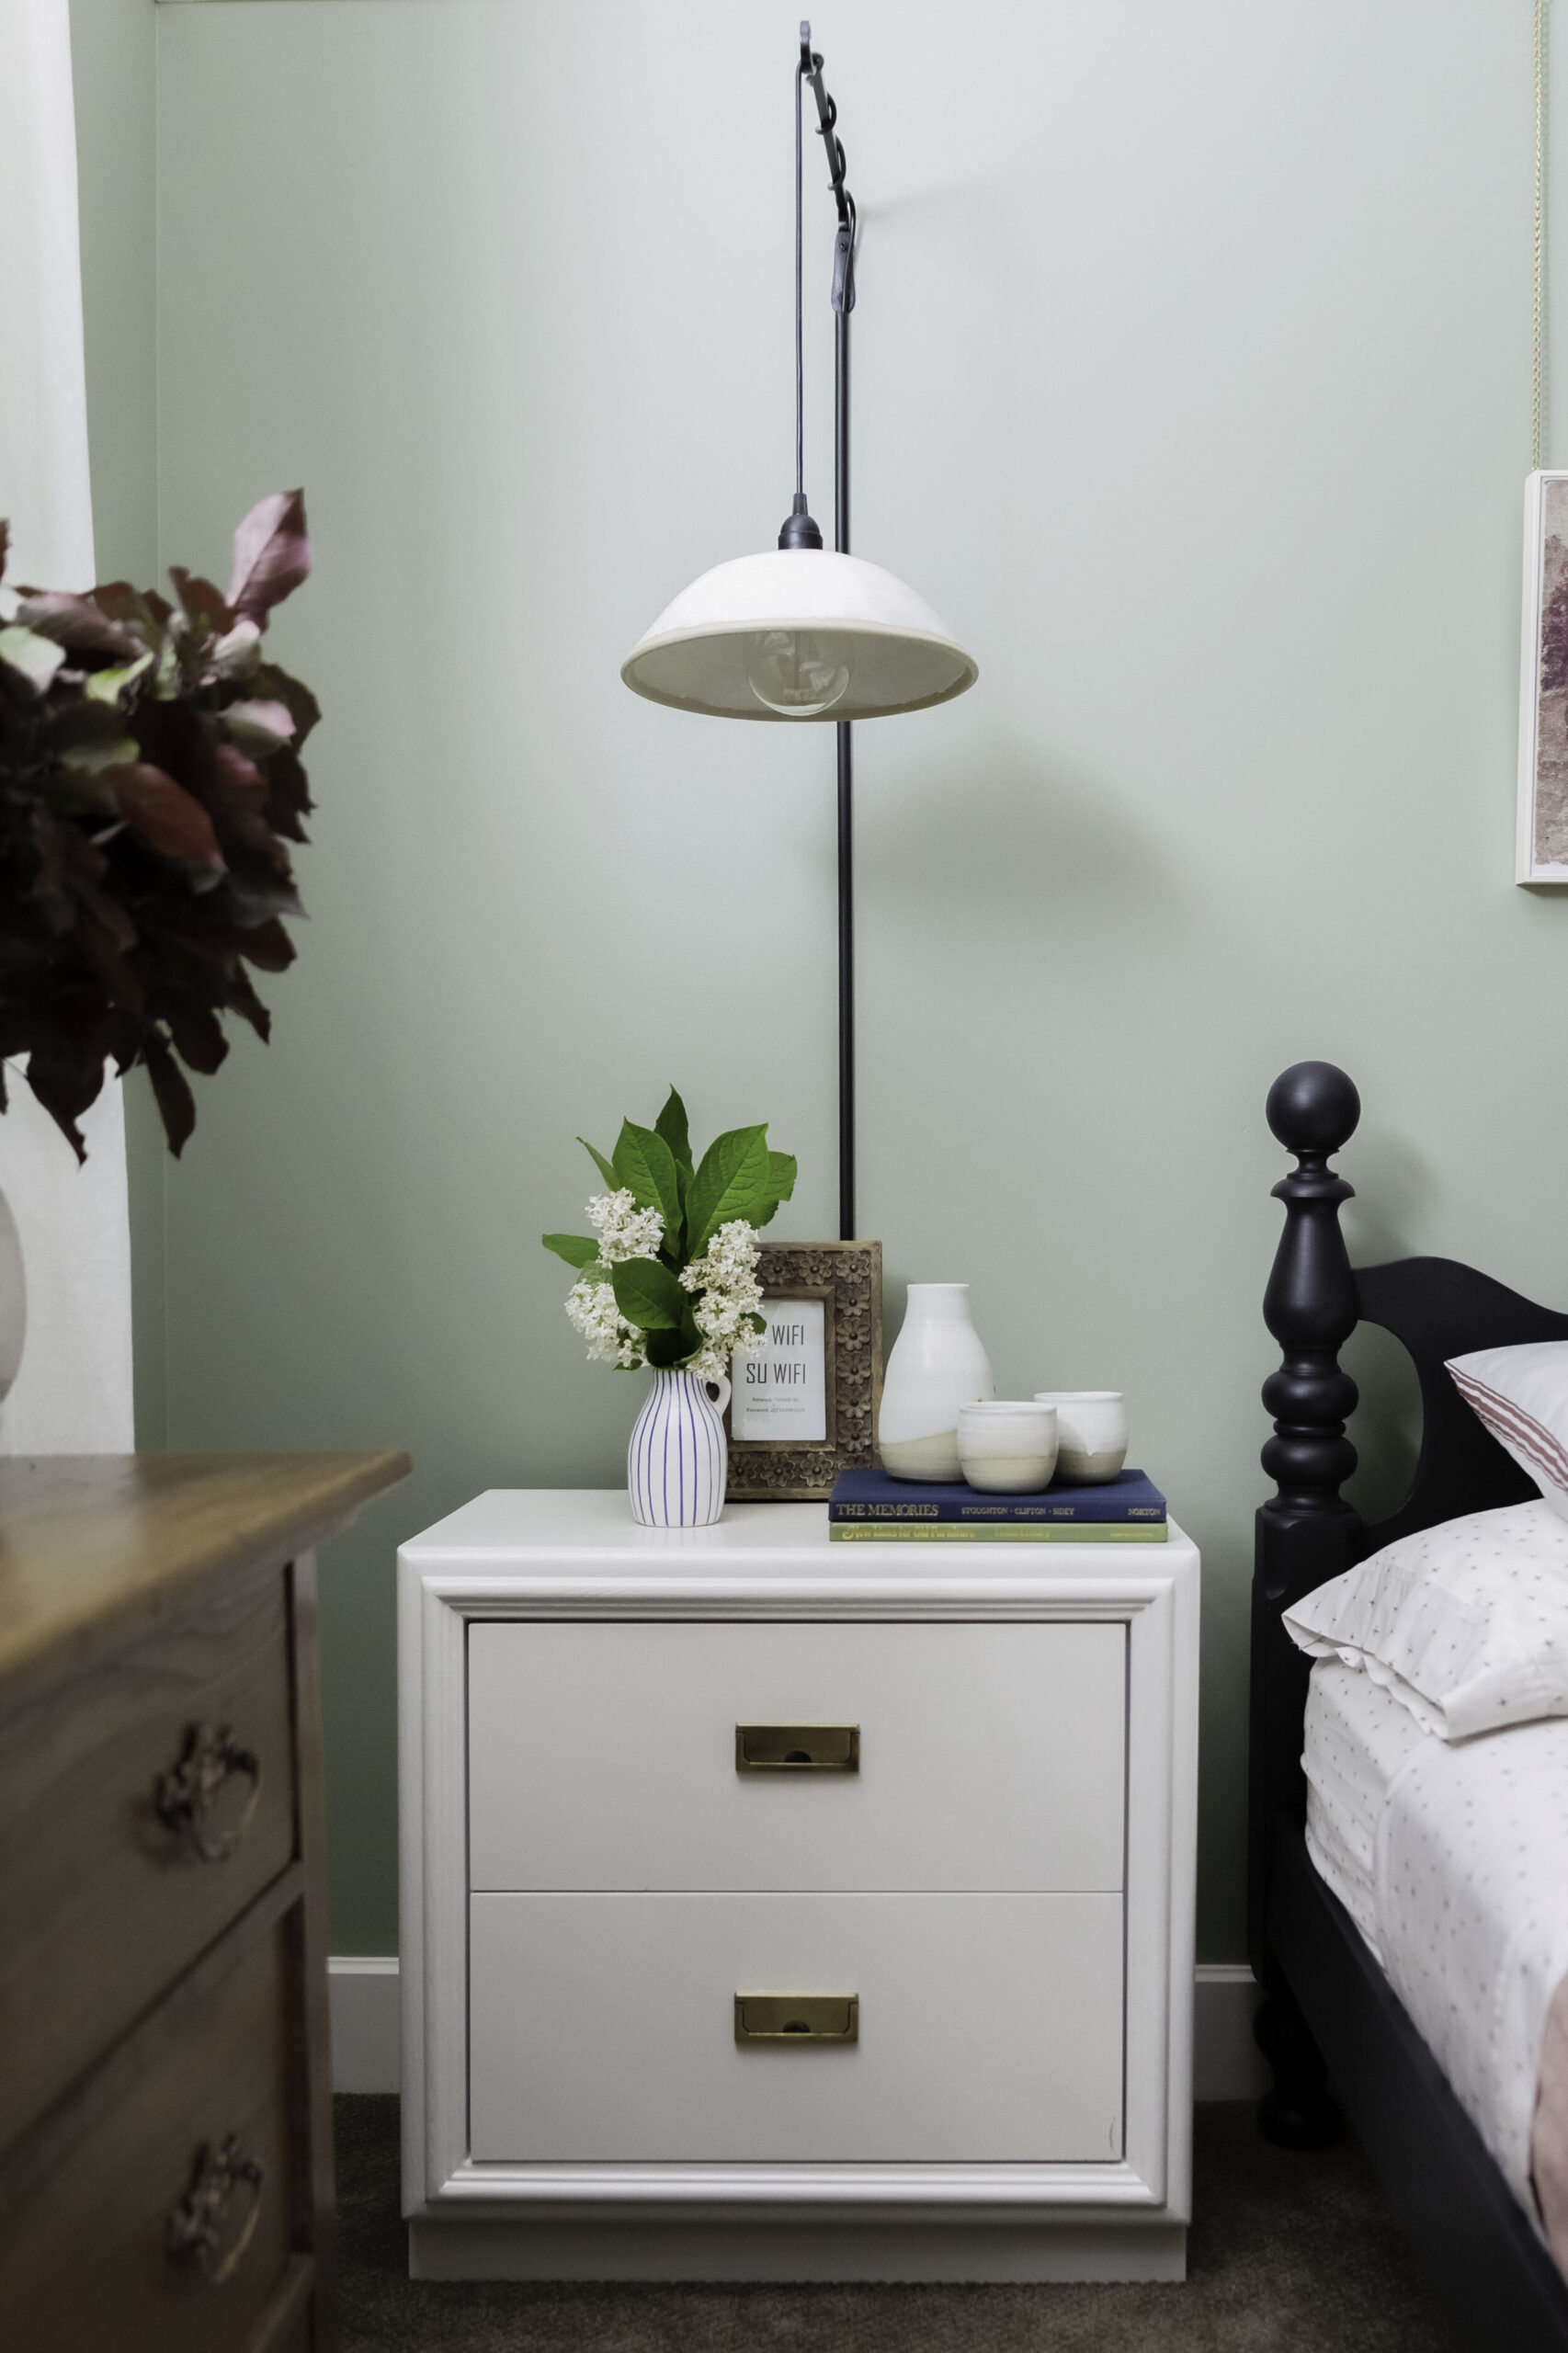
Everything that is hanging on the wall is DIY or thrifted. You guys know that I love affordable art, mainly because I a) can not afford the real deal usually, b) I’m cheap and c) I like to change things pretty regularly and if I use affordable art, that allows me to do this guilt-free. The art over the bed was a free download from the Metropolitan Museum of Art which I sized in photoshop to fit a frame I already had, and then printed out. I then hung it from the picture rail using a chain and some hooks I found on Amazon, which really gives the art just a little something extra!
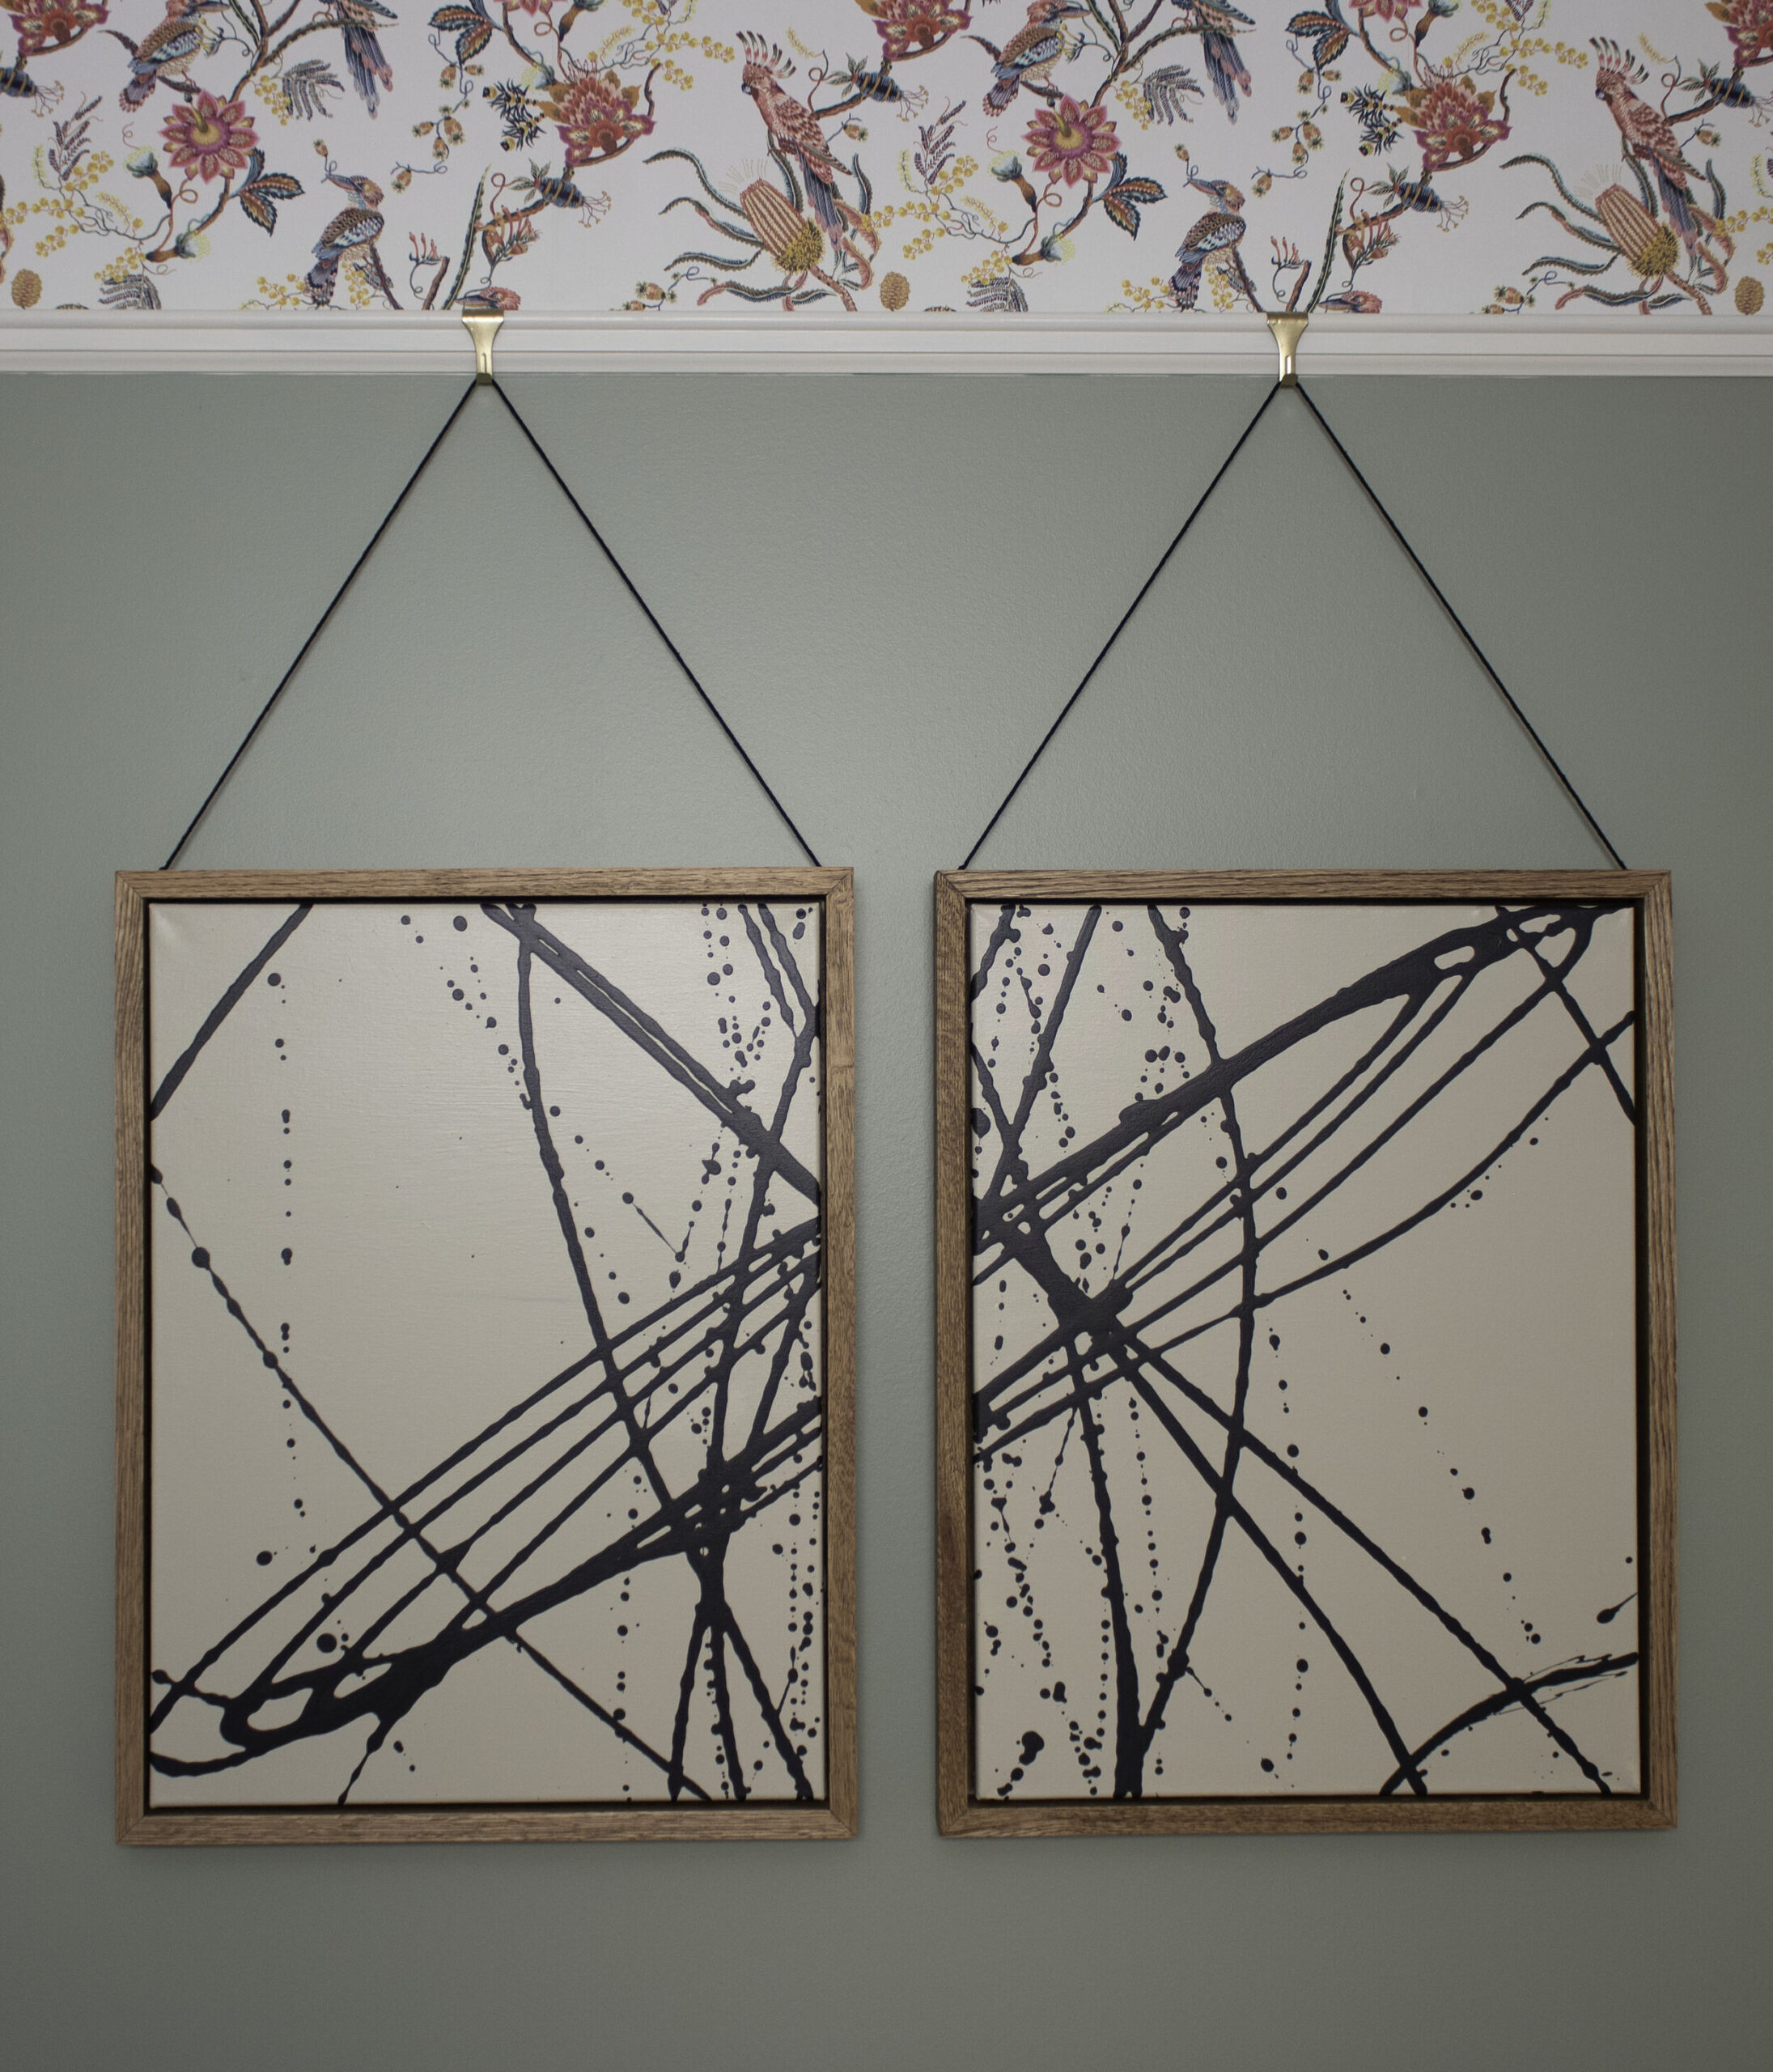
I knew I was going to attempt an abstract DIY art piece for the room but I didn’t know that it would turn out to be one of my most favourite DIY’s ever! You can catch up on how I made the Diptych art in this post – but basically, it consists of swinging a bottle full of paint around from the end of a string and seeing what comes of it! The DIY oak float frames made the art look SO high end, I used Chris Loves Julia Tutorial to make it and it was easy-peasy! That tutorial can be found here.
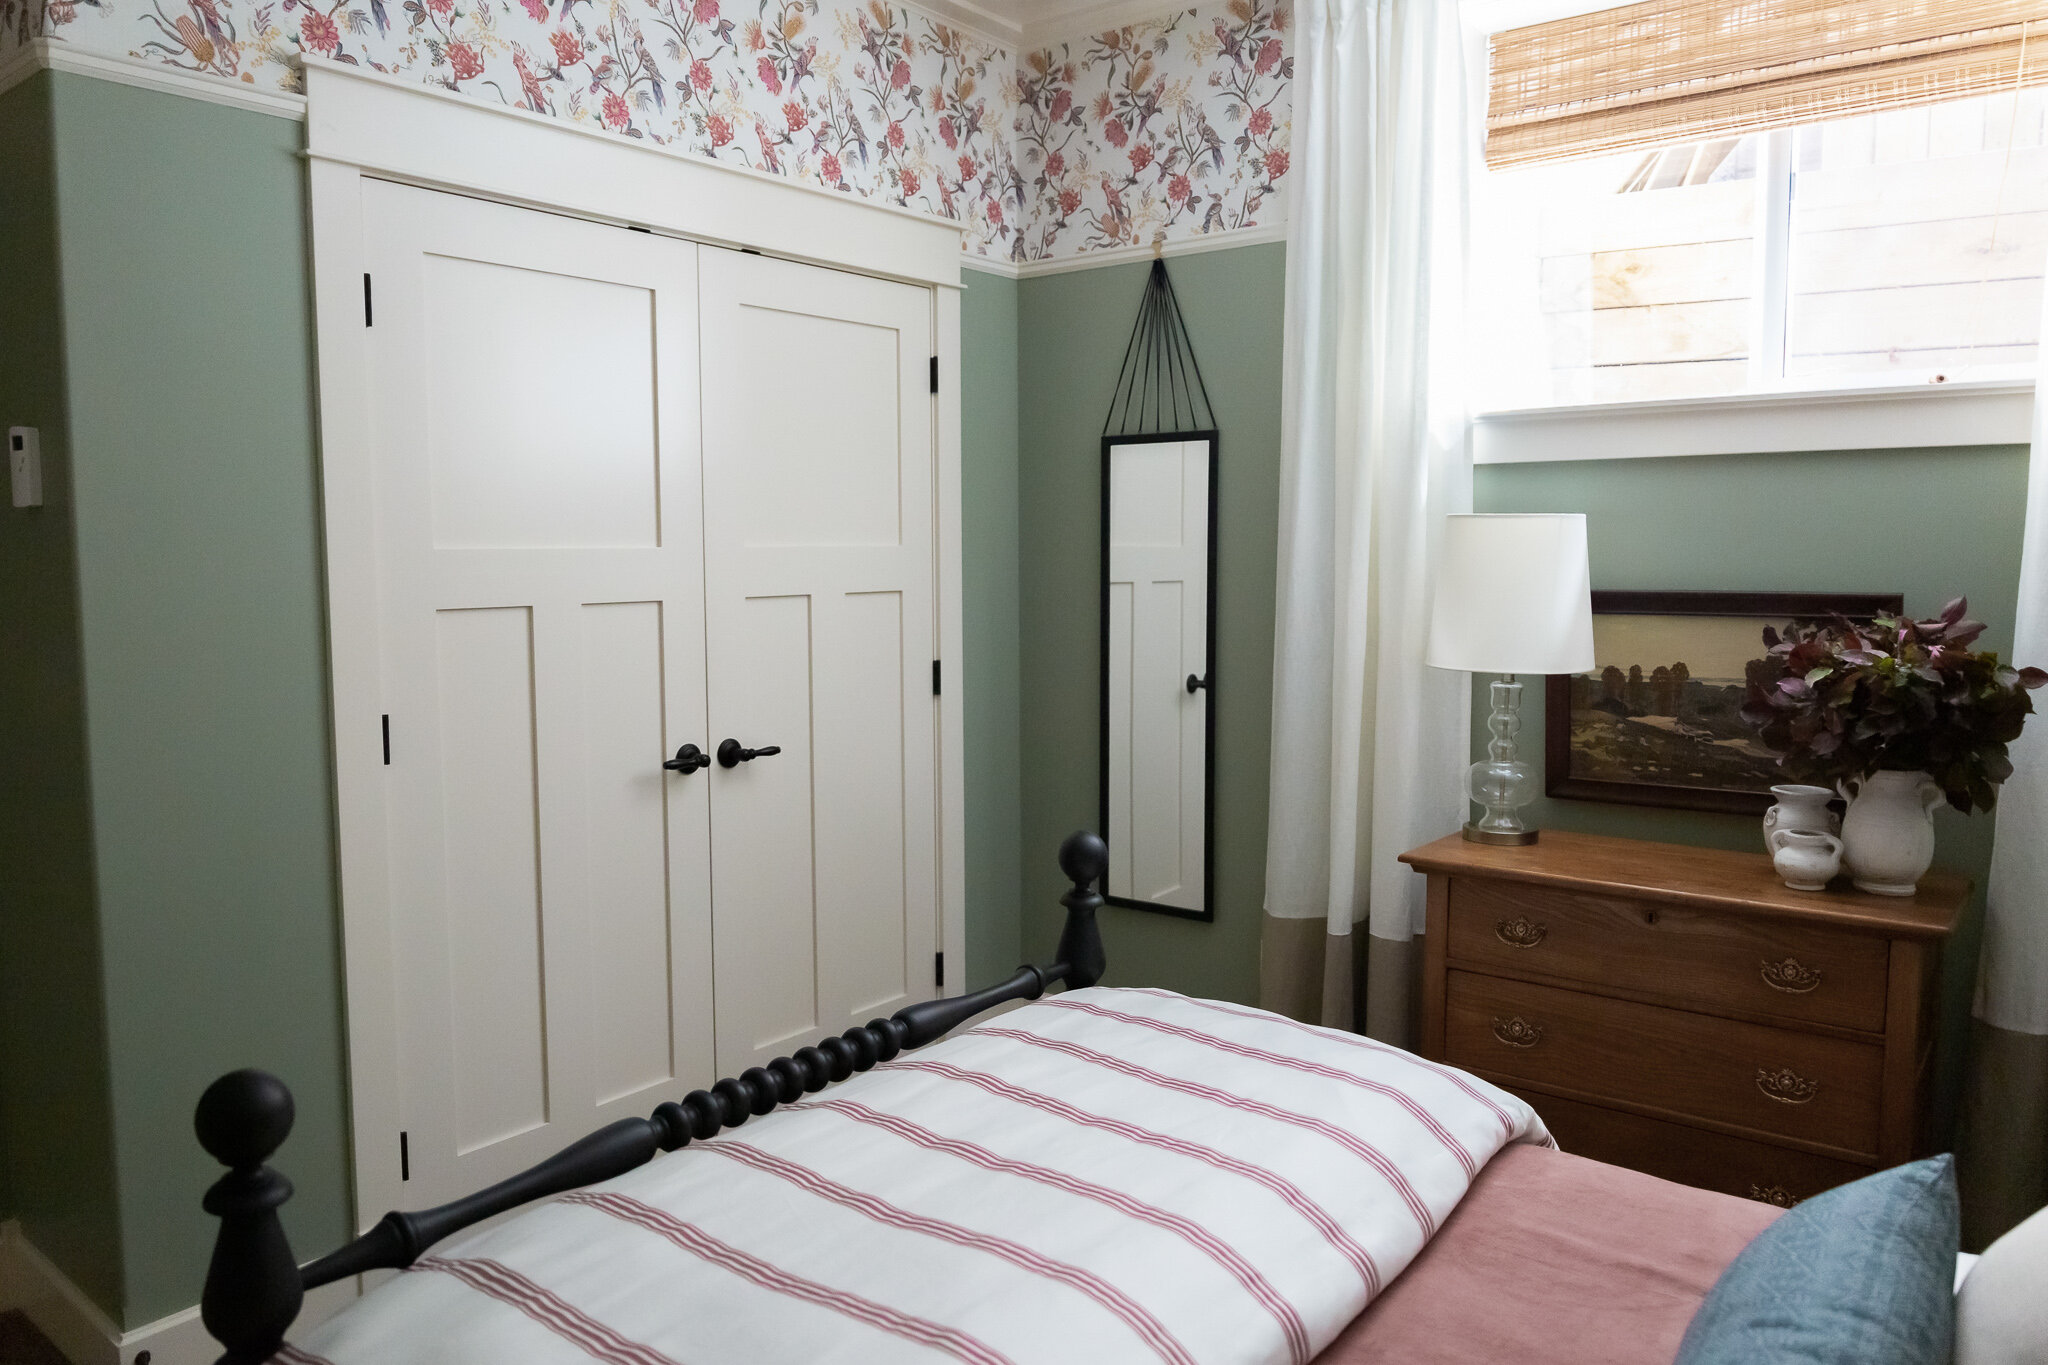
The art over the dresser was a thrifted gem I got for a few dollars. I would call it more of an antique than vintage – the paint is actually crackling and the canvas is so discoloured and old. I am in LOVE with it. When I bought it months ago I had no idea where I might put it but it ended up being the perfect piece for over this dresser. I love to incorporate vintage pieces, especially in my accessories, whenever I can.
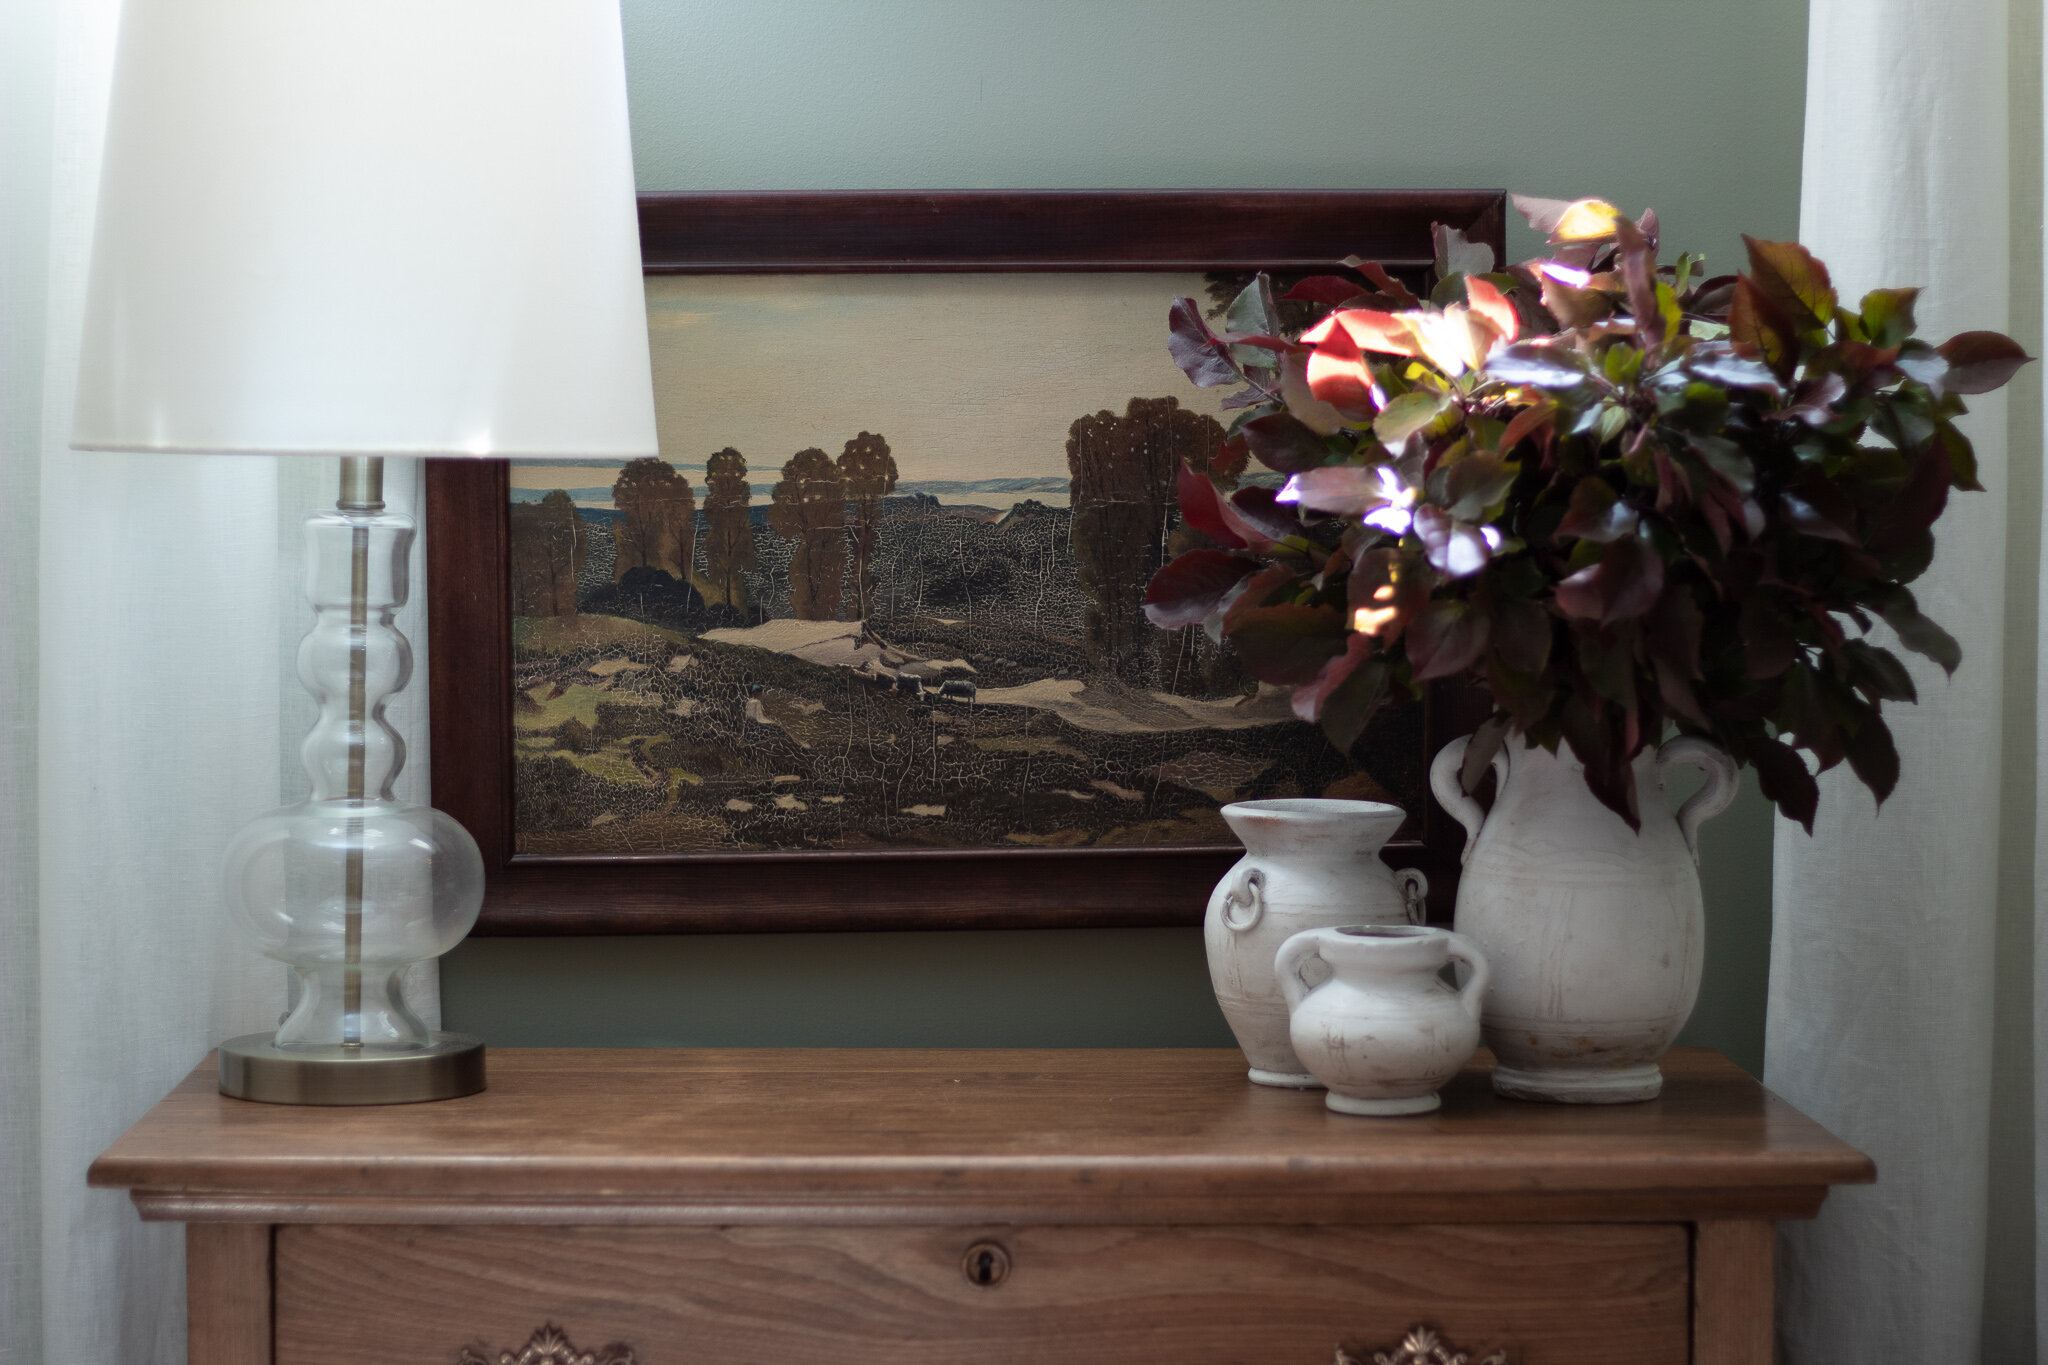
The dresser is sort of nostalgic for me and it will likely be something that I keep forever. It was the first piece I ever refinished. There is a funny backstory there – when I was pregnant with my first child, I bought this dresser at an antique sale (it was in terrible shape) thinking it would give me something to “do” once the baby was born (I was so naive!) I signed up to an antique restoration course that was to start 3 weeks after my baby’s due date. It was 2 hours once a week for 6 weeks in the evening, during my baby’s “grumpy time”. Needless to say, it was very difficult to leave him with my husband (hard on my husband too!) but it turned out to be just the thing that new mom needed all those years ago. And now that baby has just graduated from high school! Cue sobs. But I digress.
The curtains were already in the room and are linen panels from IKEA, the “AINA”. I had previously sewed a green fabric to the bottom and so I removed that and added a beige linen (also the AINA fabric, sold by the yard at IKEA) to the bottom instead. I also sewed a couple of euro-shams to bring a bit of the beige neutral solids to the colorful and pattern heavy bed, to help balance that out. (OK you guys can stop laughing now, you know I did not sew these. But I did buy the fabric and drop them at my mom’s house, and receive the finished pillows and curtains a few days later!)
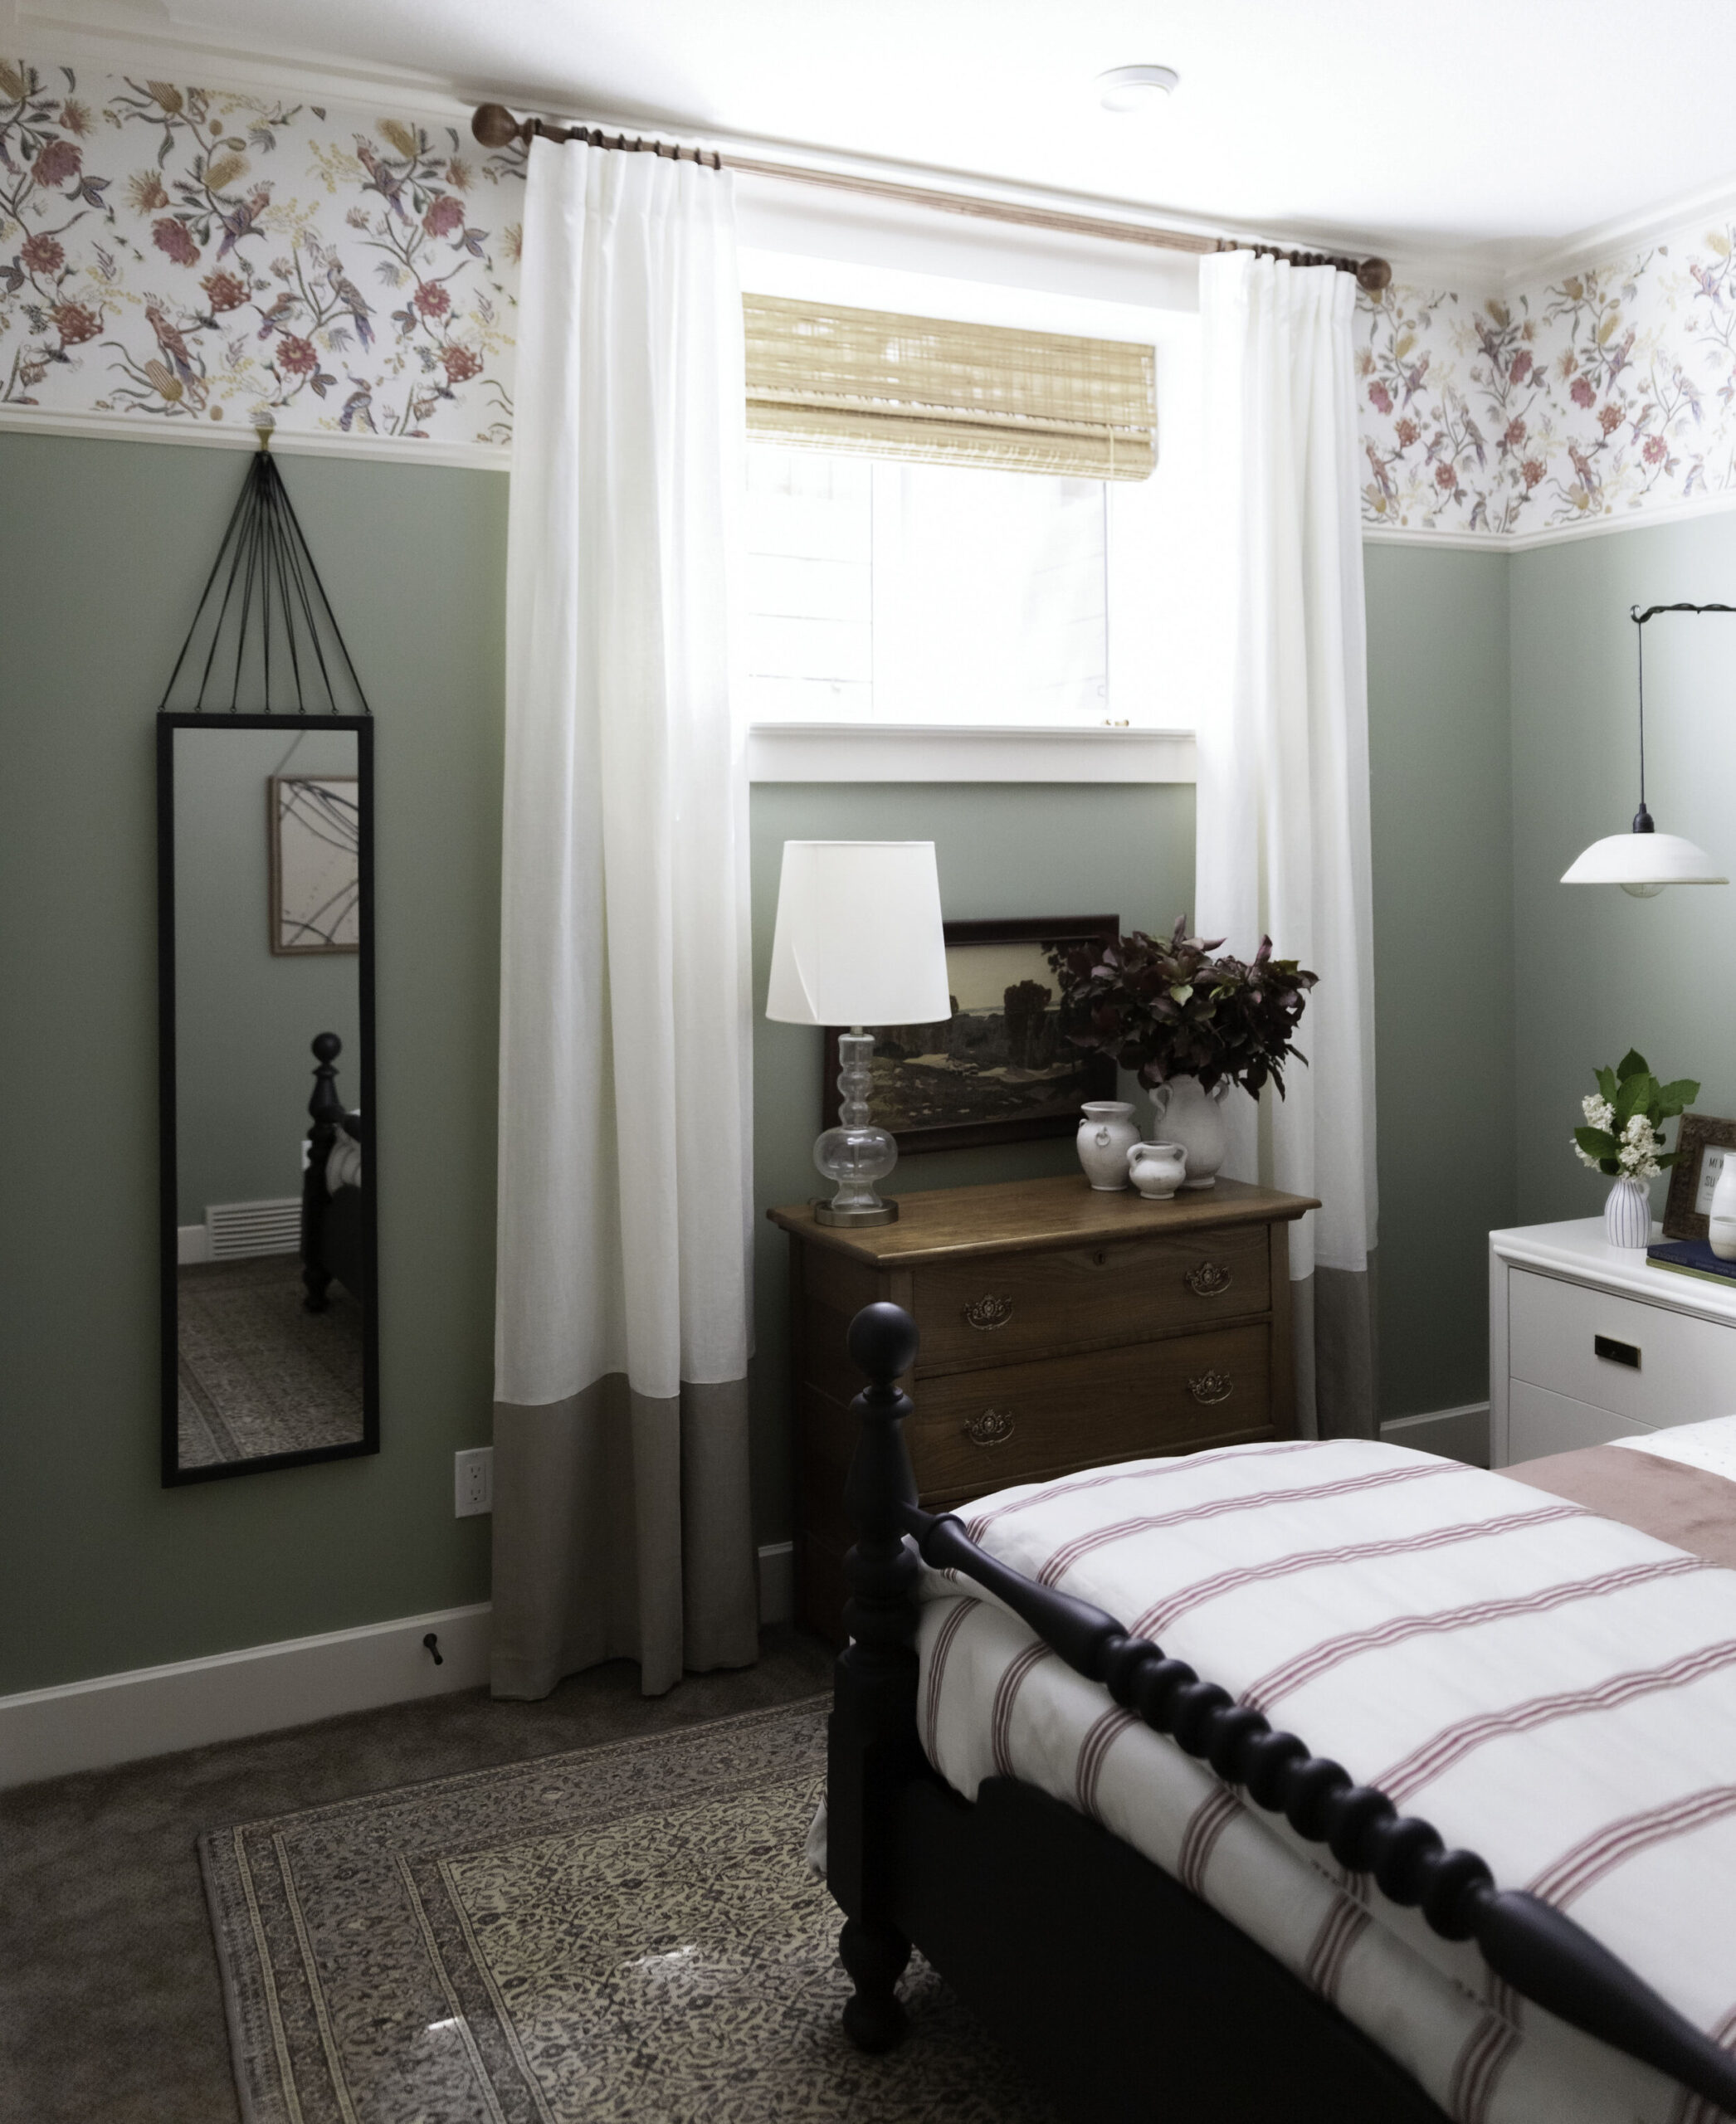
The mirror was a DIY born out of desperation. I really wanted a mirror that could be hung off the picture rail in an interesting way (really, I just want to hang all the things off that picture rail!) and I came up with this idea to really make the picture rail a feature using a cheap $10 mirror.
The remainder of the accessories were thrifted or pieces I already had, and that about wraps it up!
Sources
Rug (gifted) – Vintage – Revival Rugs (SIMILAR)
Bed and Nightstands – Vintage from Facebook Marketplace (Painted – see this post for details) (Similar Bed)(Similar Nighstands)
Art over bed – DIY – Download from The Metropolitan Museum of Art
Hooks for picture rail – Amazon (Spray Painted with this)
Chain for picture rail – Lowes
Picture rail moulding – Local Lumber Yard – Similar
Crown moulding – Lowes Flat Stock and Cove Moulding
Wall Paint – Valspar Signature, Eggshell – Colour: Green Tea Leaves
Paint Trim – Color matched to existing trim
Wallpaper (gifted) – Milton and King – Matilda in Oceania
Pendulum Abstract Art – DIY – Tutorial HERE
Pendulum Art Float Frame – DIY – tutorial from Chris Loves Julia Post HERE
Ceramic sconces, Water Carafe and glasses – Handmade (gifted) (Similar Sconce Here, Here and Similar Carafe Here and Here)
Plug in light kit for sconces – IKEA
Plant hanger for sconces – Canadian Tire (SIMILAR, Amazon)
Bedside Clock – Pottery Barn
Books for styling – Vintage
Frame – WIFI sign – Old
Duvet (gifted) – Spoonflower
Duvet Shams (gifted) – Spoonflower
Sheet Set (gifted) – Spoonflower
Lumbar (gifted) – Spoonflower
Pink blanket – IKEA
Curtains – IKEA AINA
Fabric for curtain bottoms and beige shams – IKEA
Painting over dresser – Thirfted
Lamp on Dresser – Target, Old (Similar)
“Found Pottery” – Thrifted and Painted
Mirror – Walmart (Find DIY Information HERE)
I just wanted to say thank you one last time to the generous brands I have partnered with who provided sponsored items for this makeover. Without them, this room would have not been as fabulous as it is!
Milton and King (Wallpaper)
Spoonflower (Bedding)
Revival Rugs (Vintage Rug)
Valspar (Paint)
Now click on over to the One Room Challenge Blog and catch up on alllll the other designers! There are some fabulous rooms this season and it has been so fun to work along side such talent. You can check out the other designers HERE or click the ORC Logo below.

CLICK THE IMAGE TO BE REDIRECTED TO THE ORC WEBSITE!
FUNKY! Perfect combination of styles and I just can’t stop scrolling through all the details! I have loved that bed for sooooo many years! Mixed with that art. The detail on that mirror… the lights, the bedding, the wallpaper! It’s so much fun to look at! Congrats – you nailed it!
Wow, I’m obsessed ! Amazing job done 🙂
Your room is perfect! I love where you placed the beautiful wallpaper and your DIY art is amazing!
Erin this is spectacular! I love this mix of patterns and finishes — the room looks like it took YEARS to curate.
Thank you so much Heather! I’m so glad you like it, what a compliment!
Thank you Brianna! What a compliment, I’m glad it has that collected feel, just what I wanted!
Thank you so much Sherry!!
Thank you Gloria!
This room came out so pretty! That black bedroom look wonderful against the green wall and I will always love those beautiful sconces.
Thank you so much Lindsey!
What a lovely room. The bed and nightstands were such good finds and you did such a professional job painting them. You must be so thrilled with how the room turned out. All of the components work together. Well done!
Thank you so much Brenda! Yes I’m very happy with how it turned out!