
A DIY Kitchen with Ikea Cabinets – the Kitchen Reveal!
IT IS TIME!!! The DIY kitchen using Ikea cabinets is finally done and I can’t wait to share the finished project with you! It’s been about 3 ½ months since we first started demoing this kitchen and today I’m proud to say it’s finally complete. I poured so much of my creativity, my time, and my passion into this project I can safely say I have never been more proud of a space than I am of this kitchen.
This post may contain affiliate links. That means if you purchase anything from these links I earn a small commission, at no extra cost to you! This helps support my blog, so thank you!
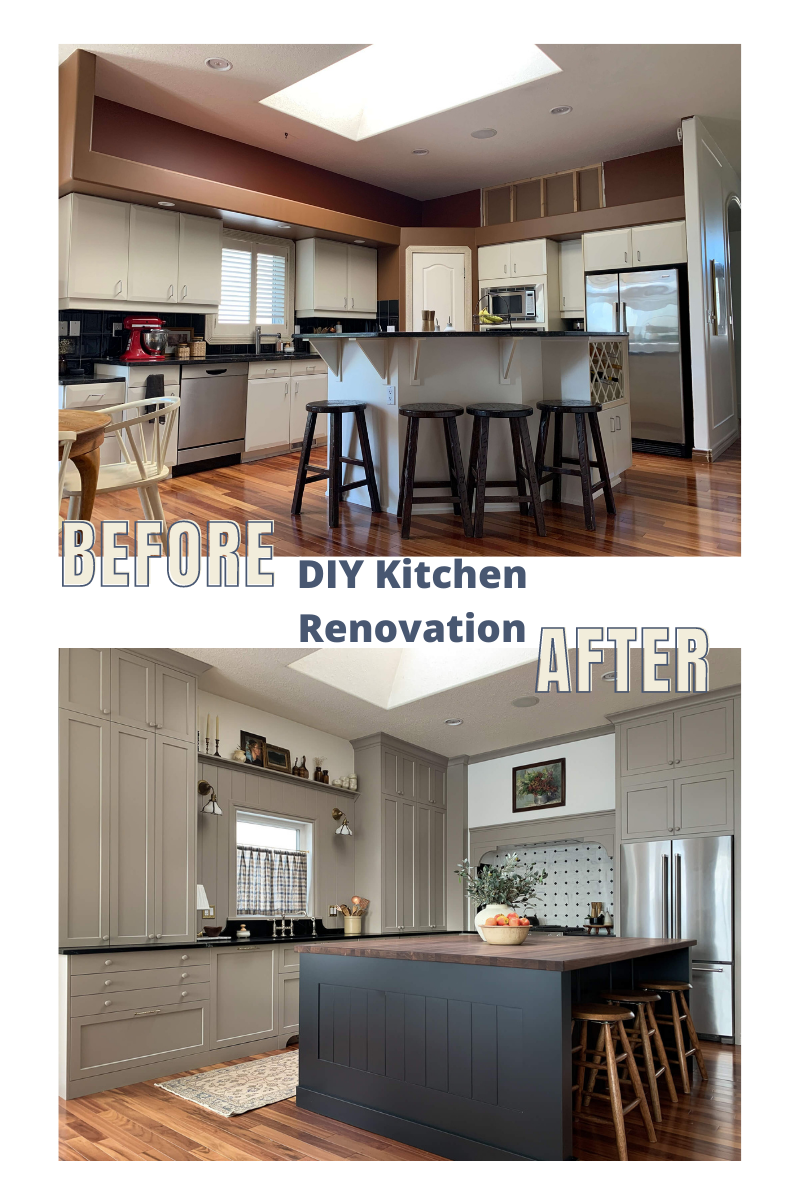
Before and After of DIY Kitchen using Ikea Cabinets
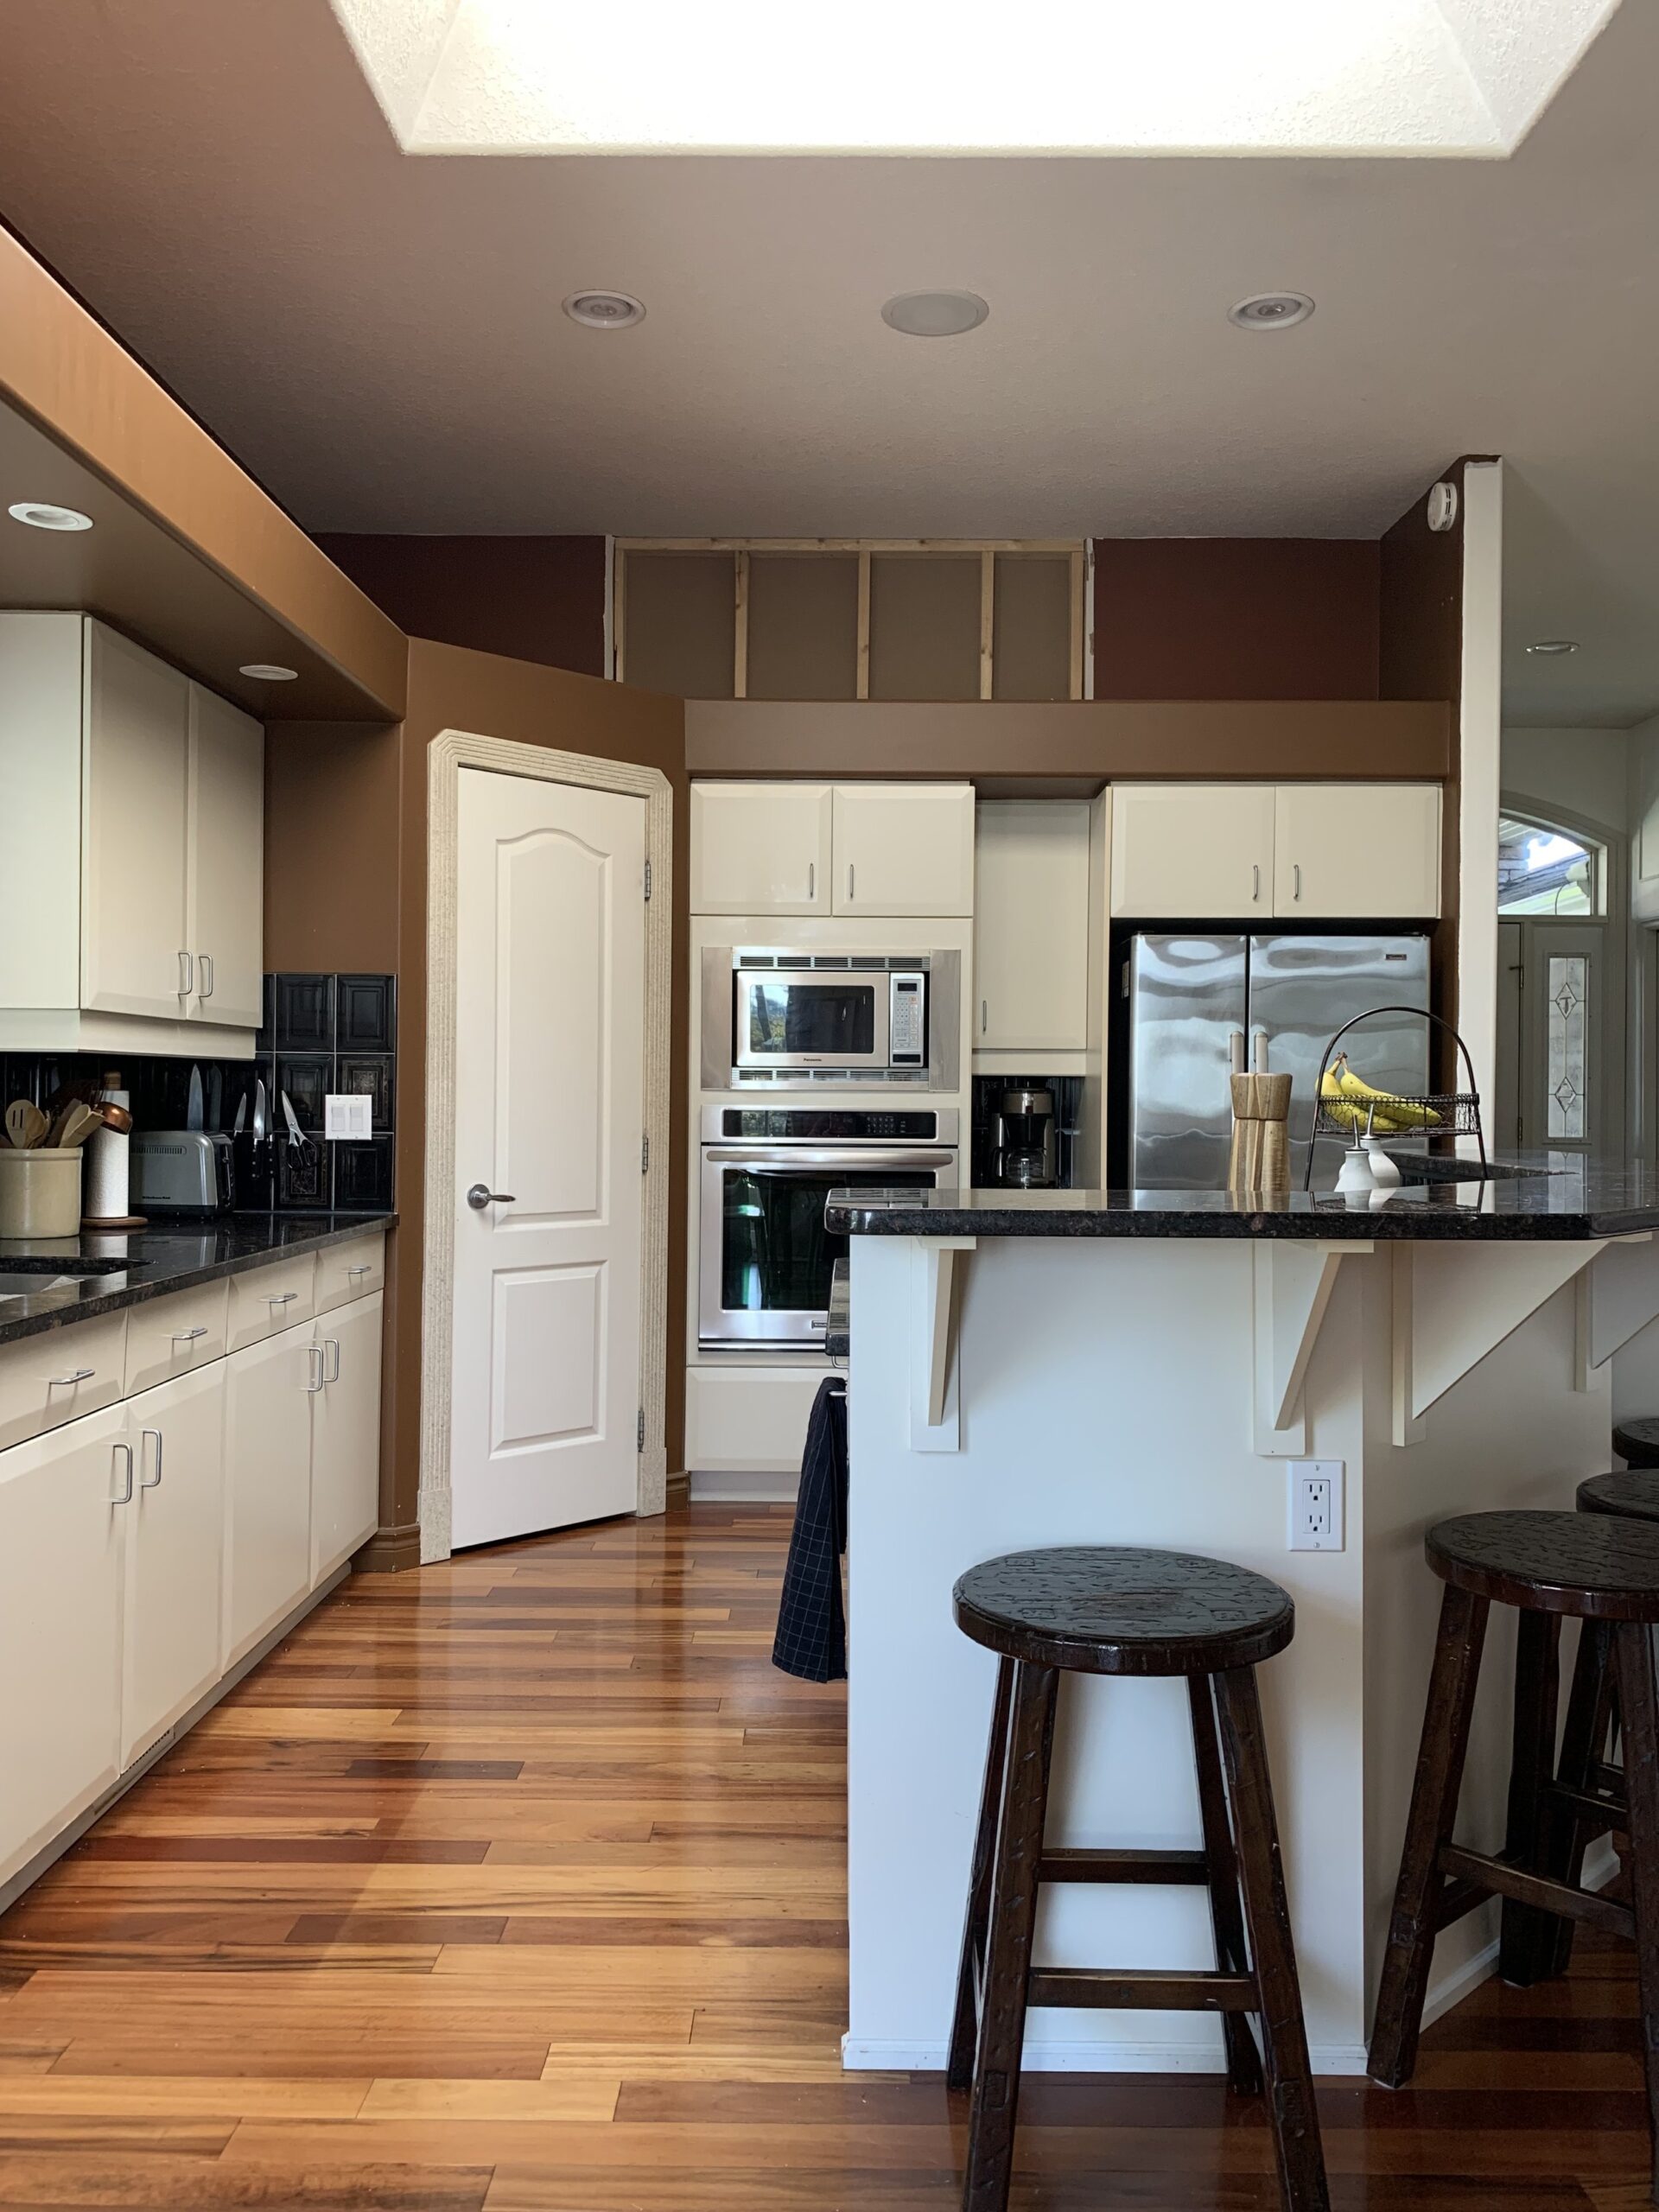
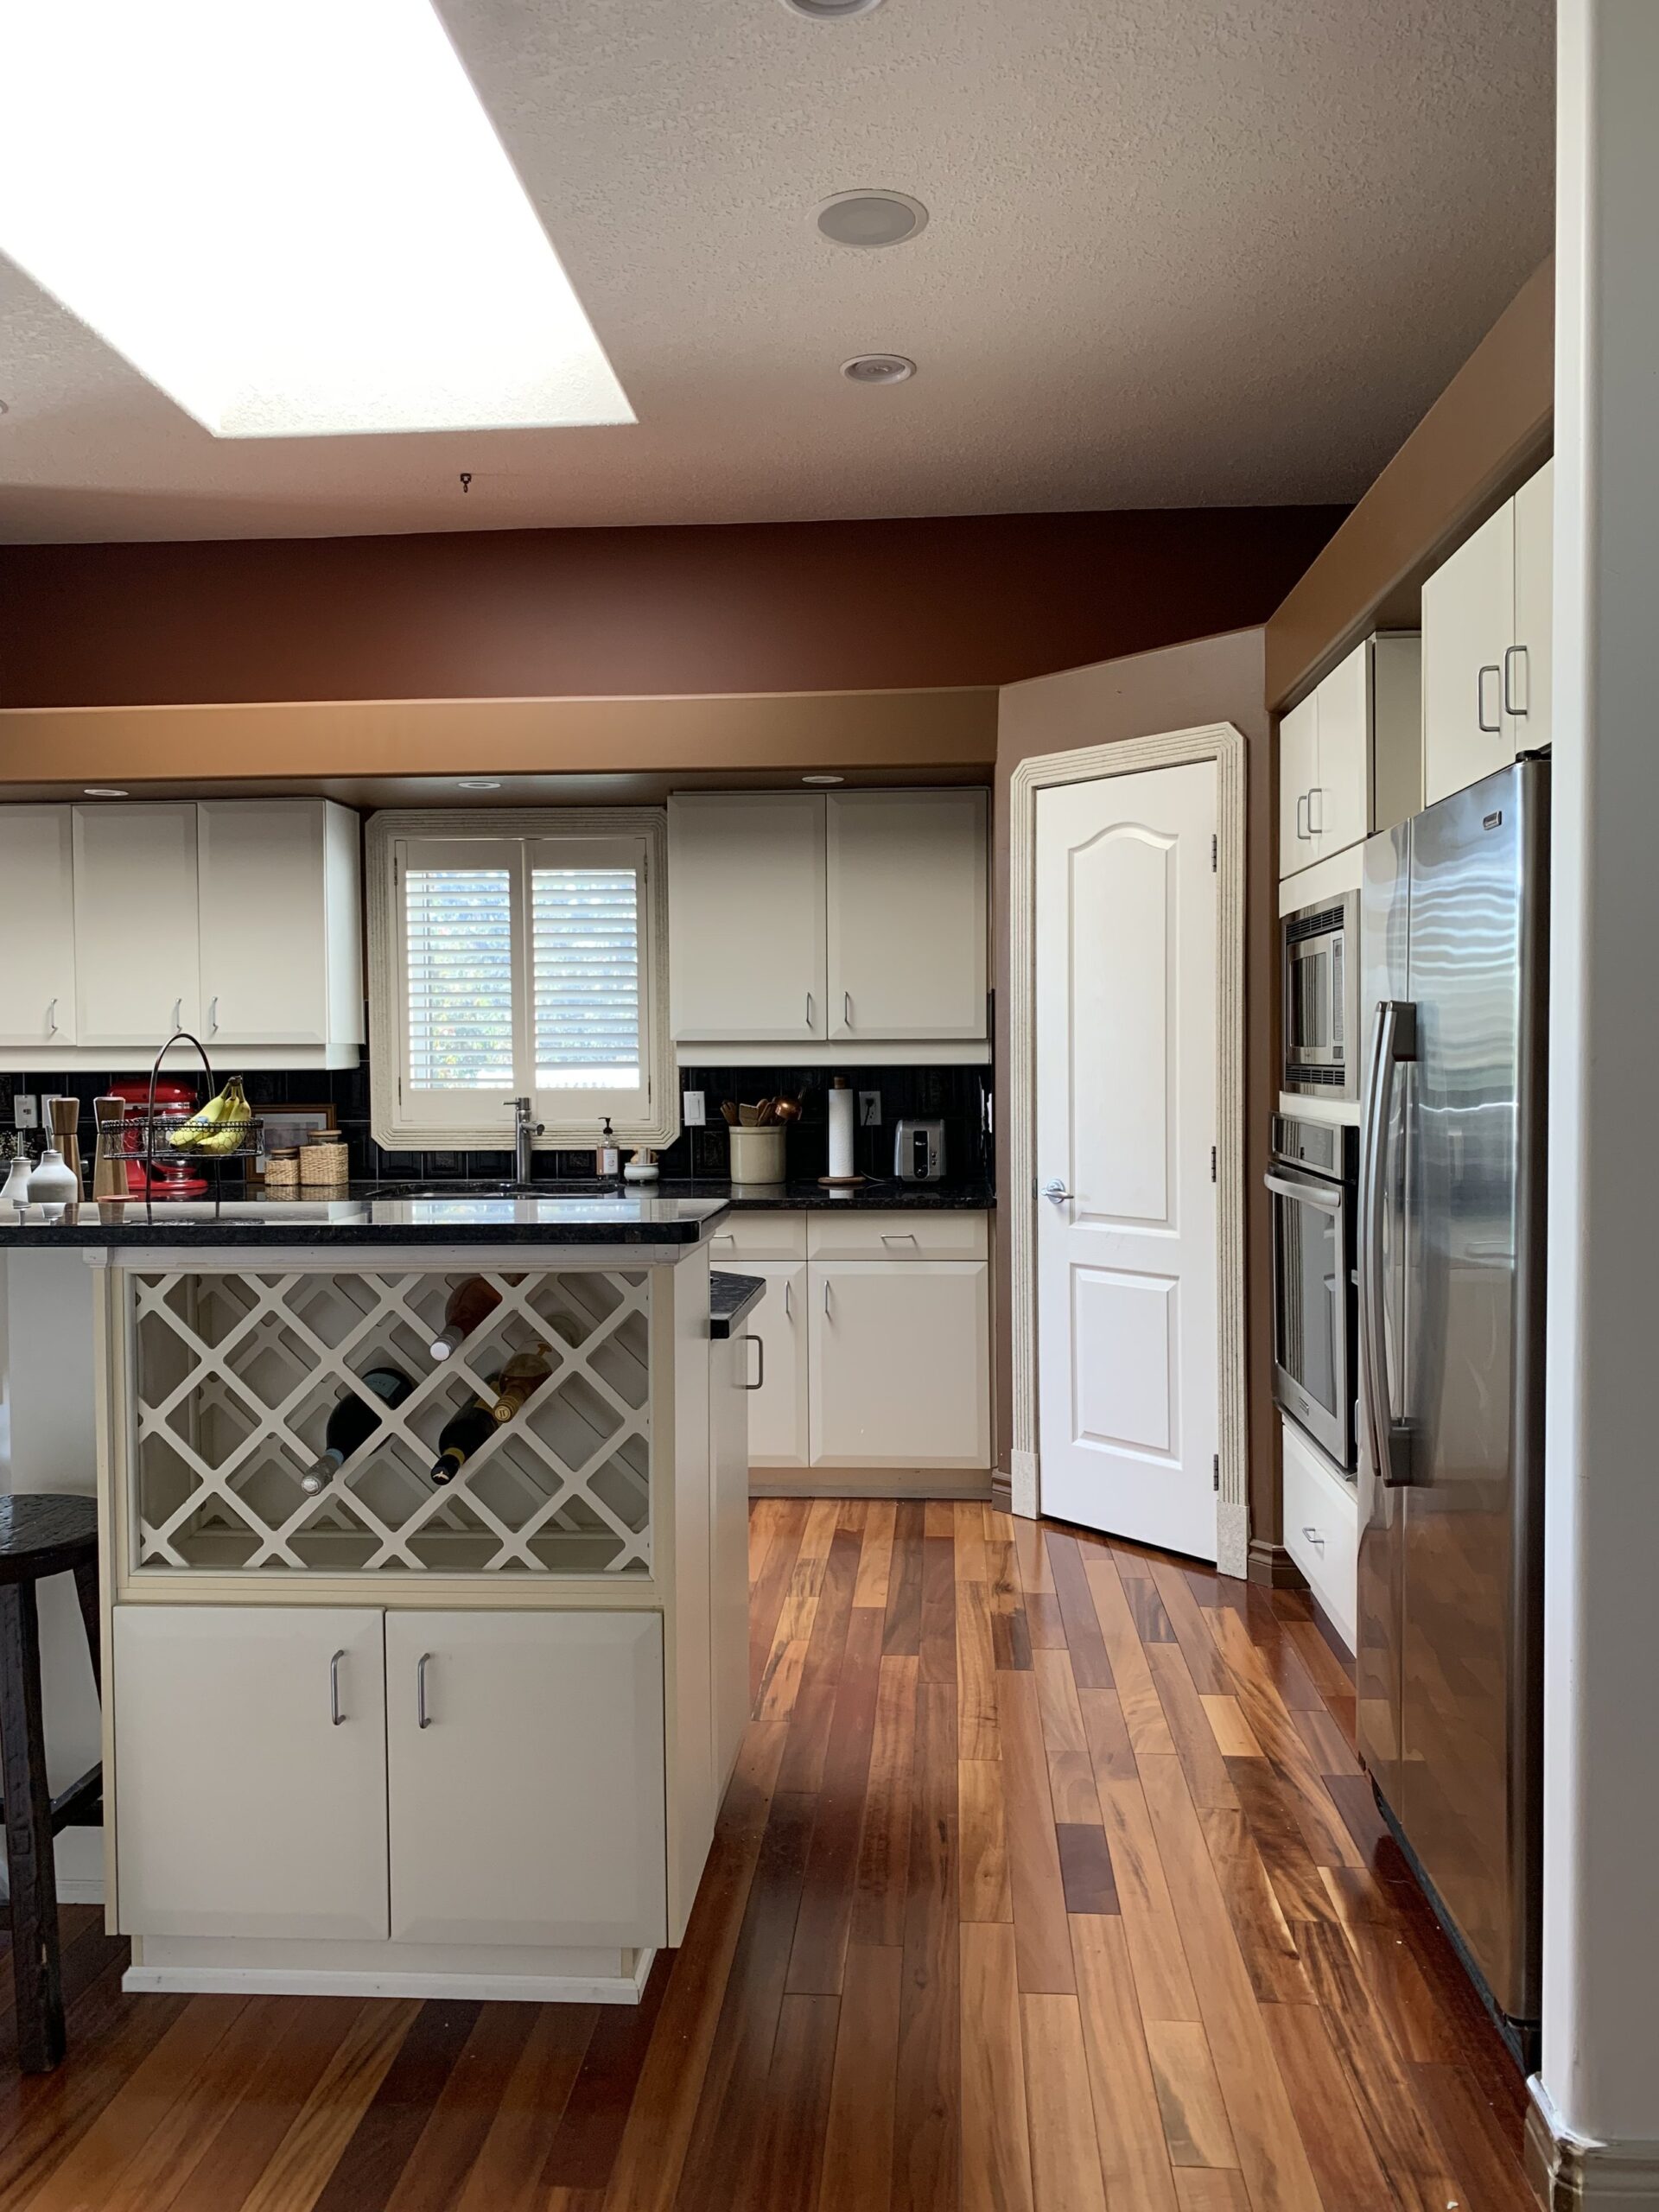
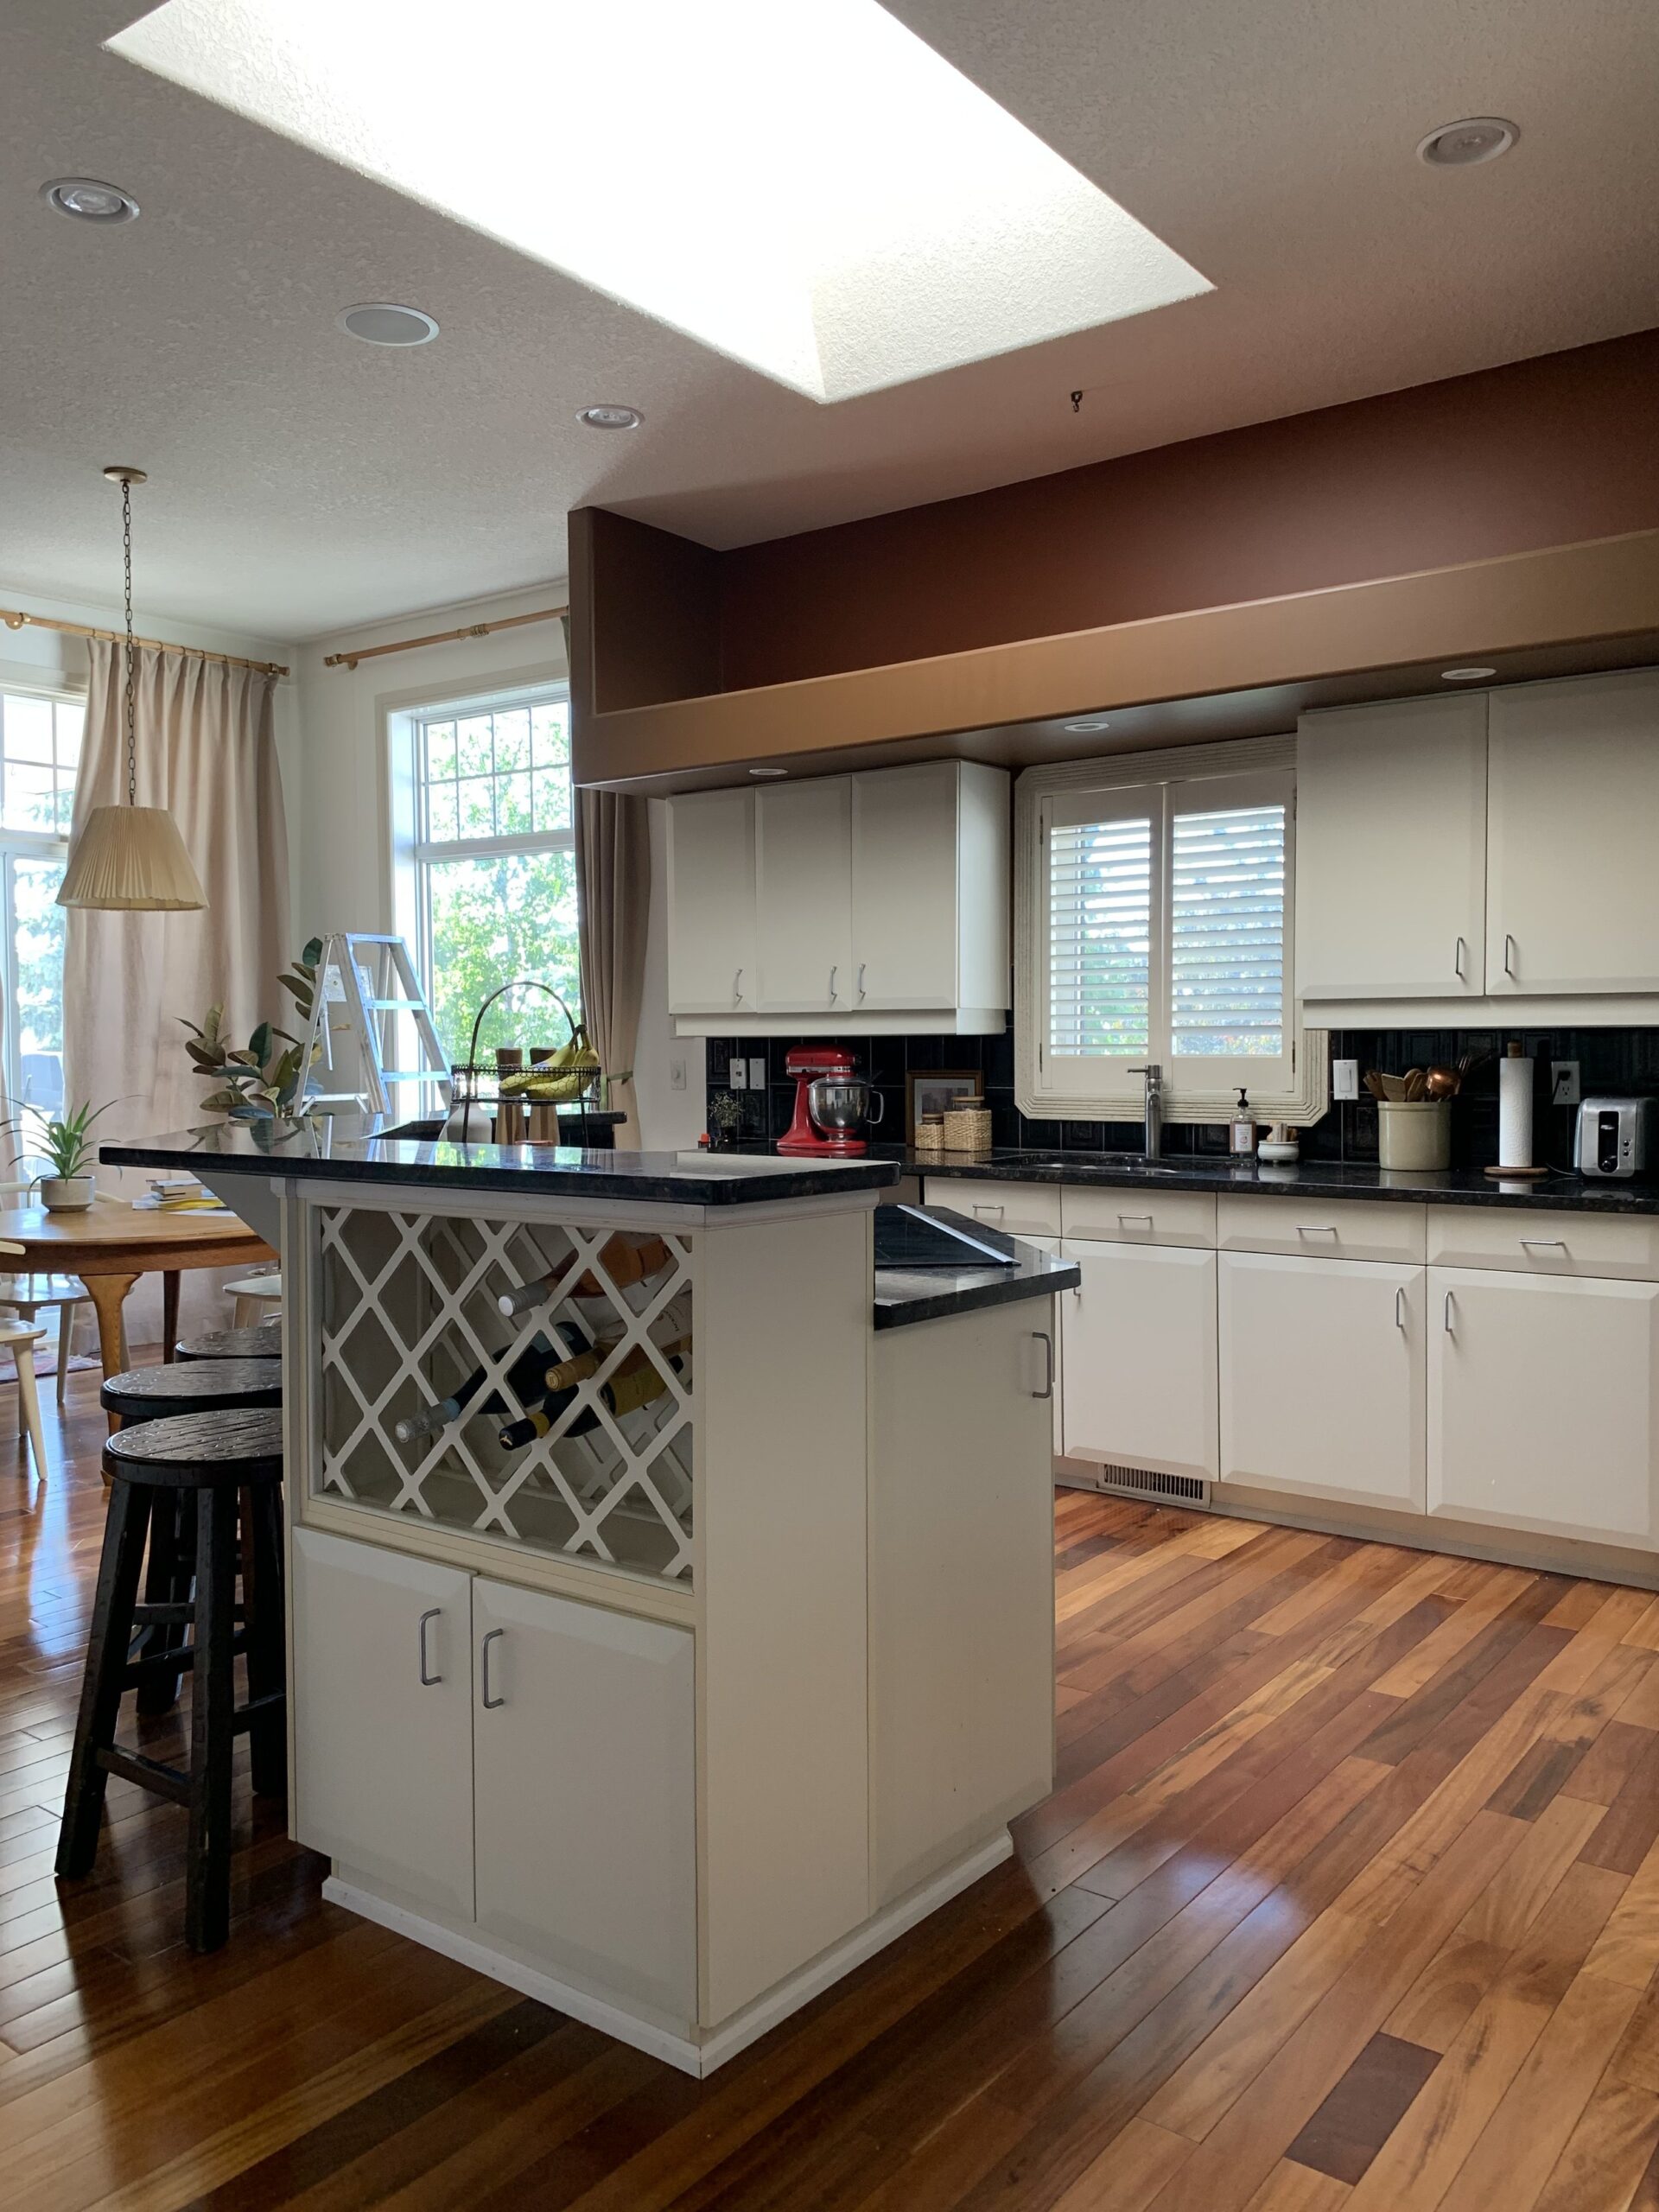
Before we dig in let’s go back and see where we started, shall we?
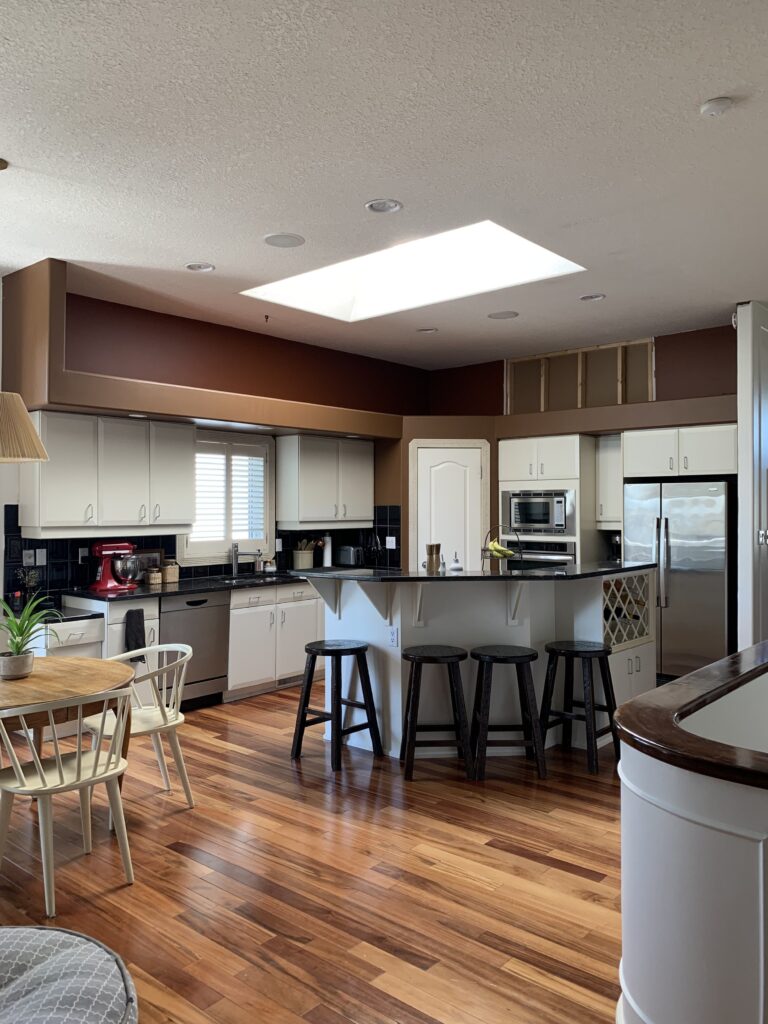
I talked all about the layout changes in this post and why we decided to fully renovate instead of refacing or some other more minor reno. At the end of the day, the existing kitchen was really frustrating to work in and we needed to fix some layout issues.
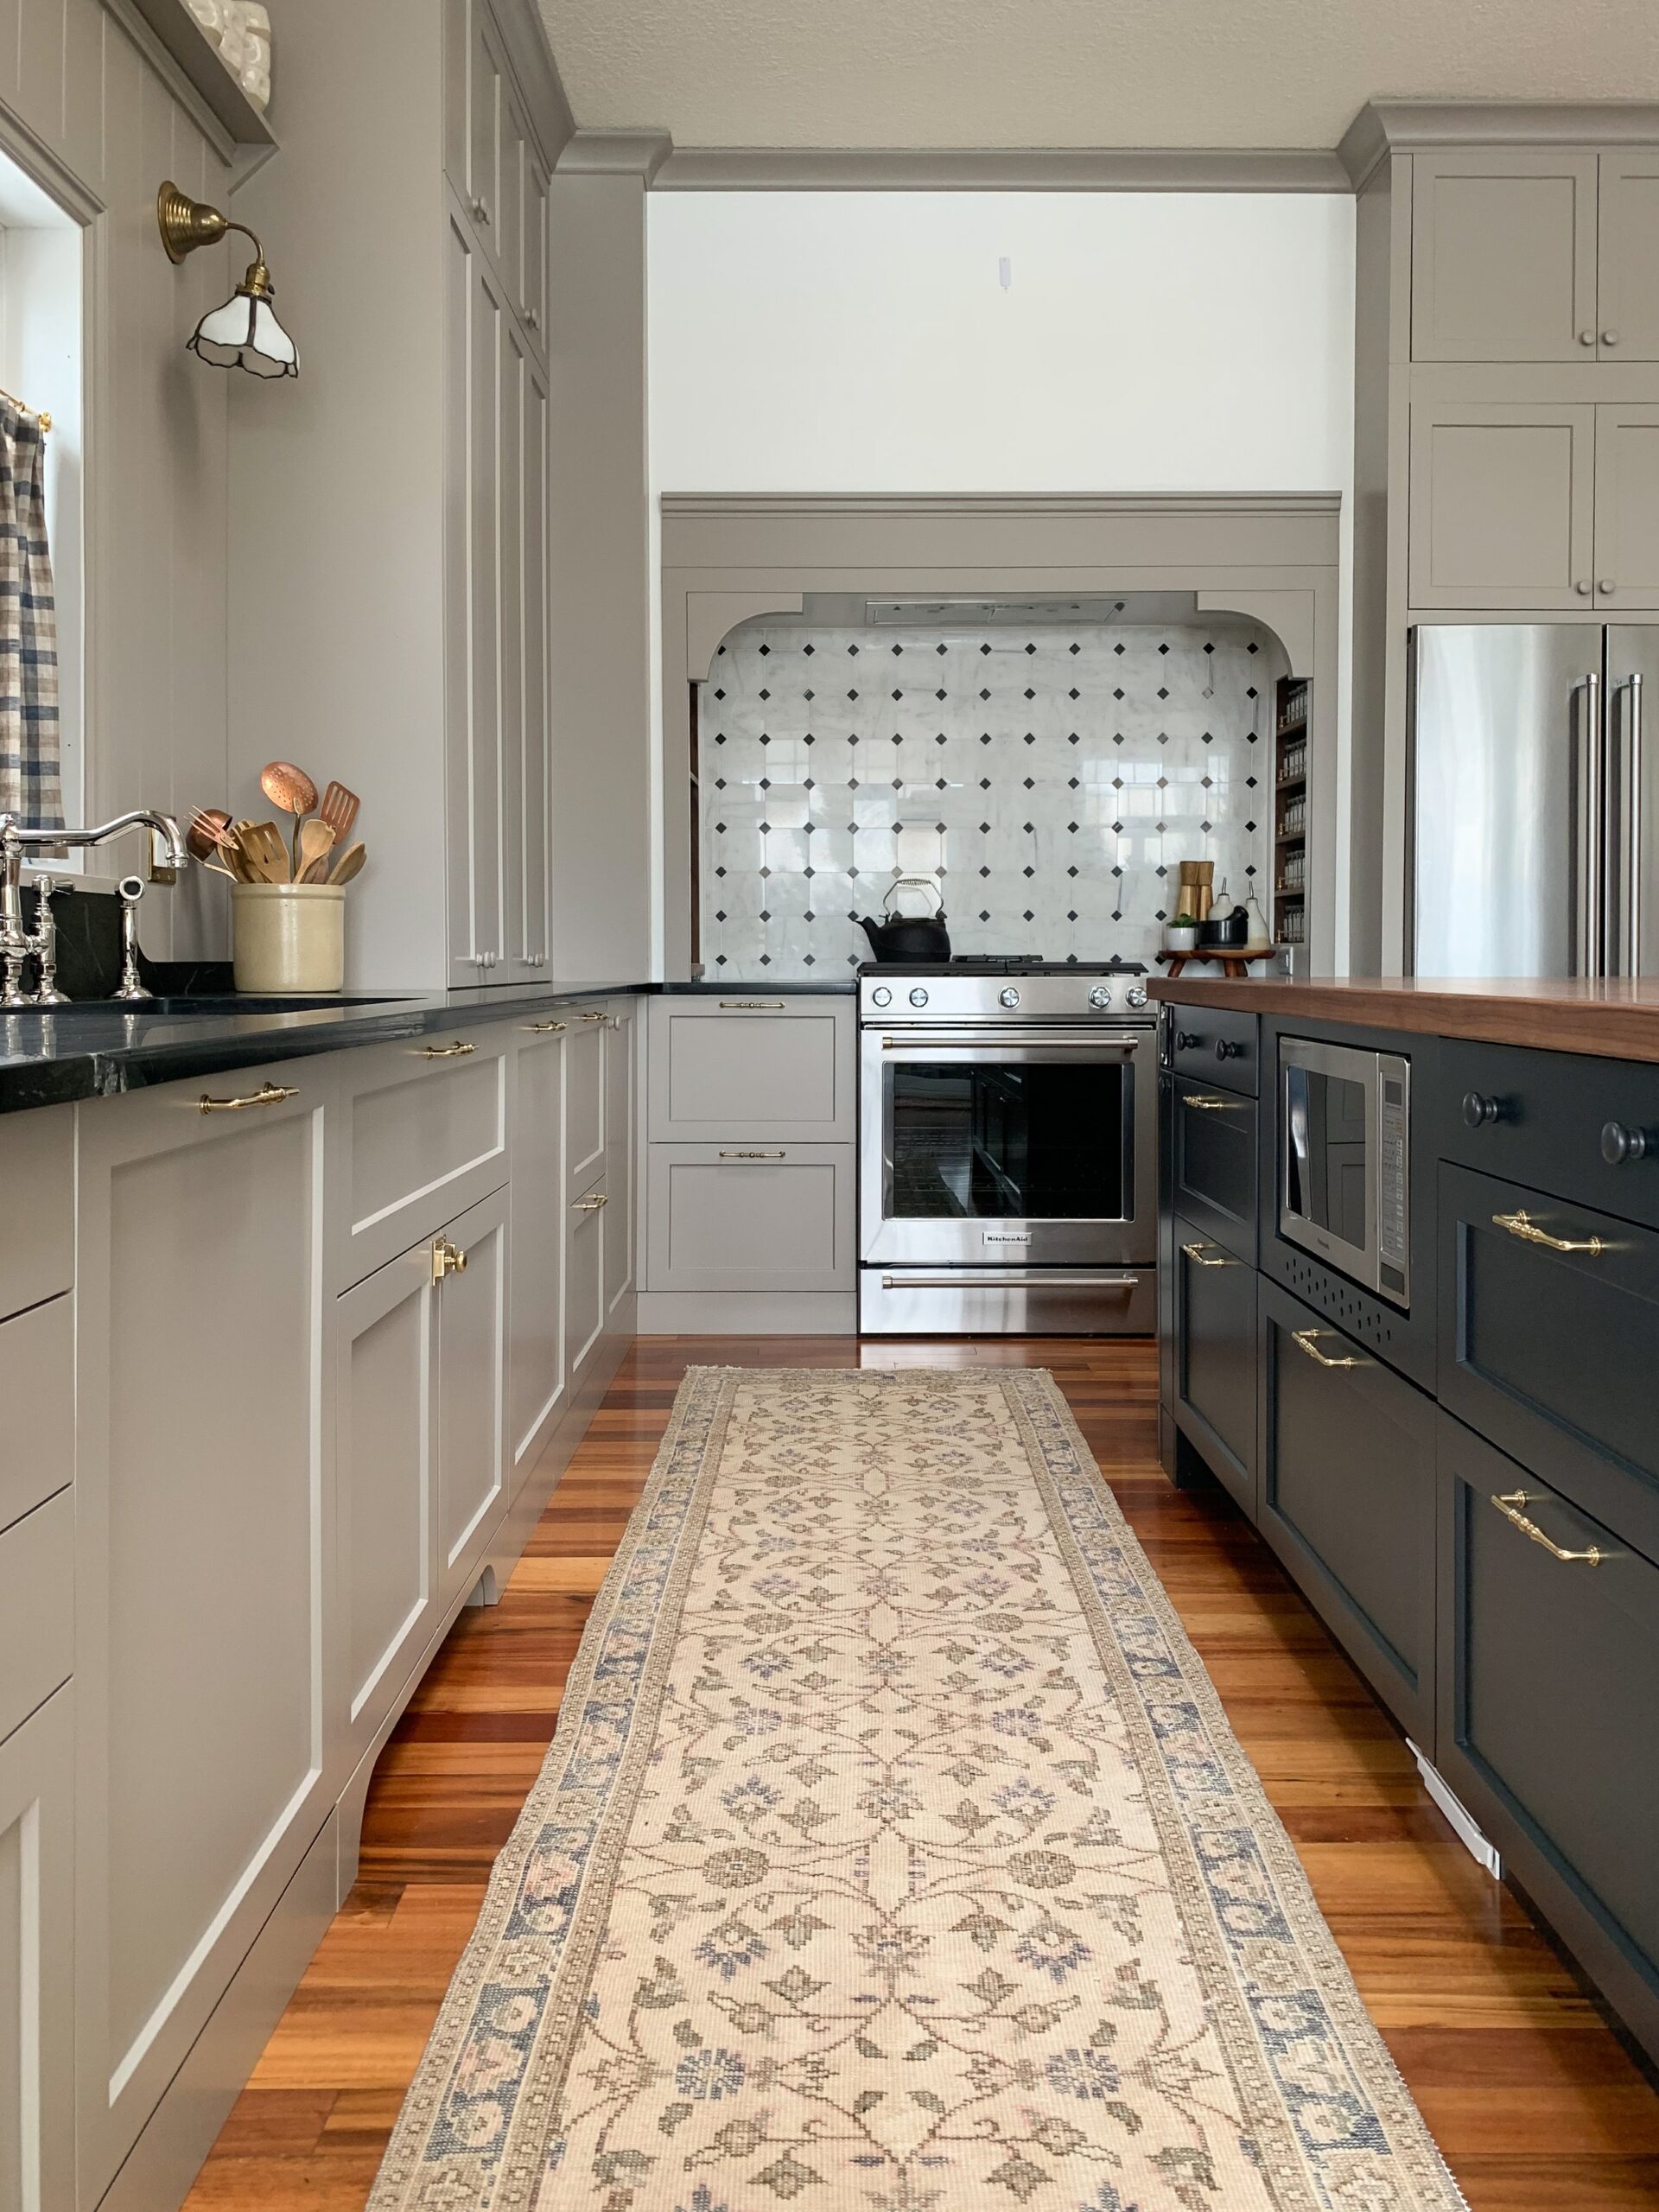
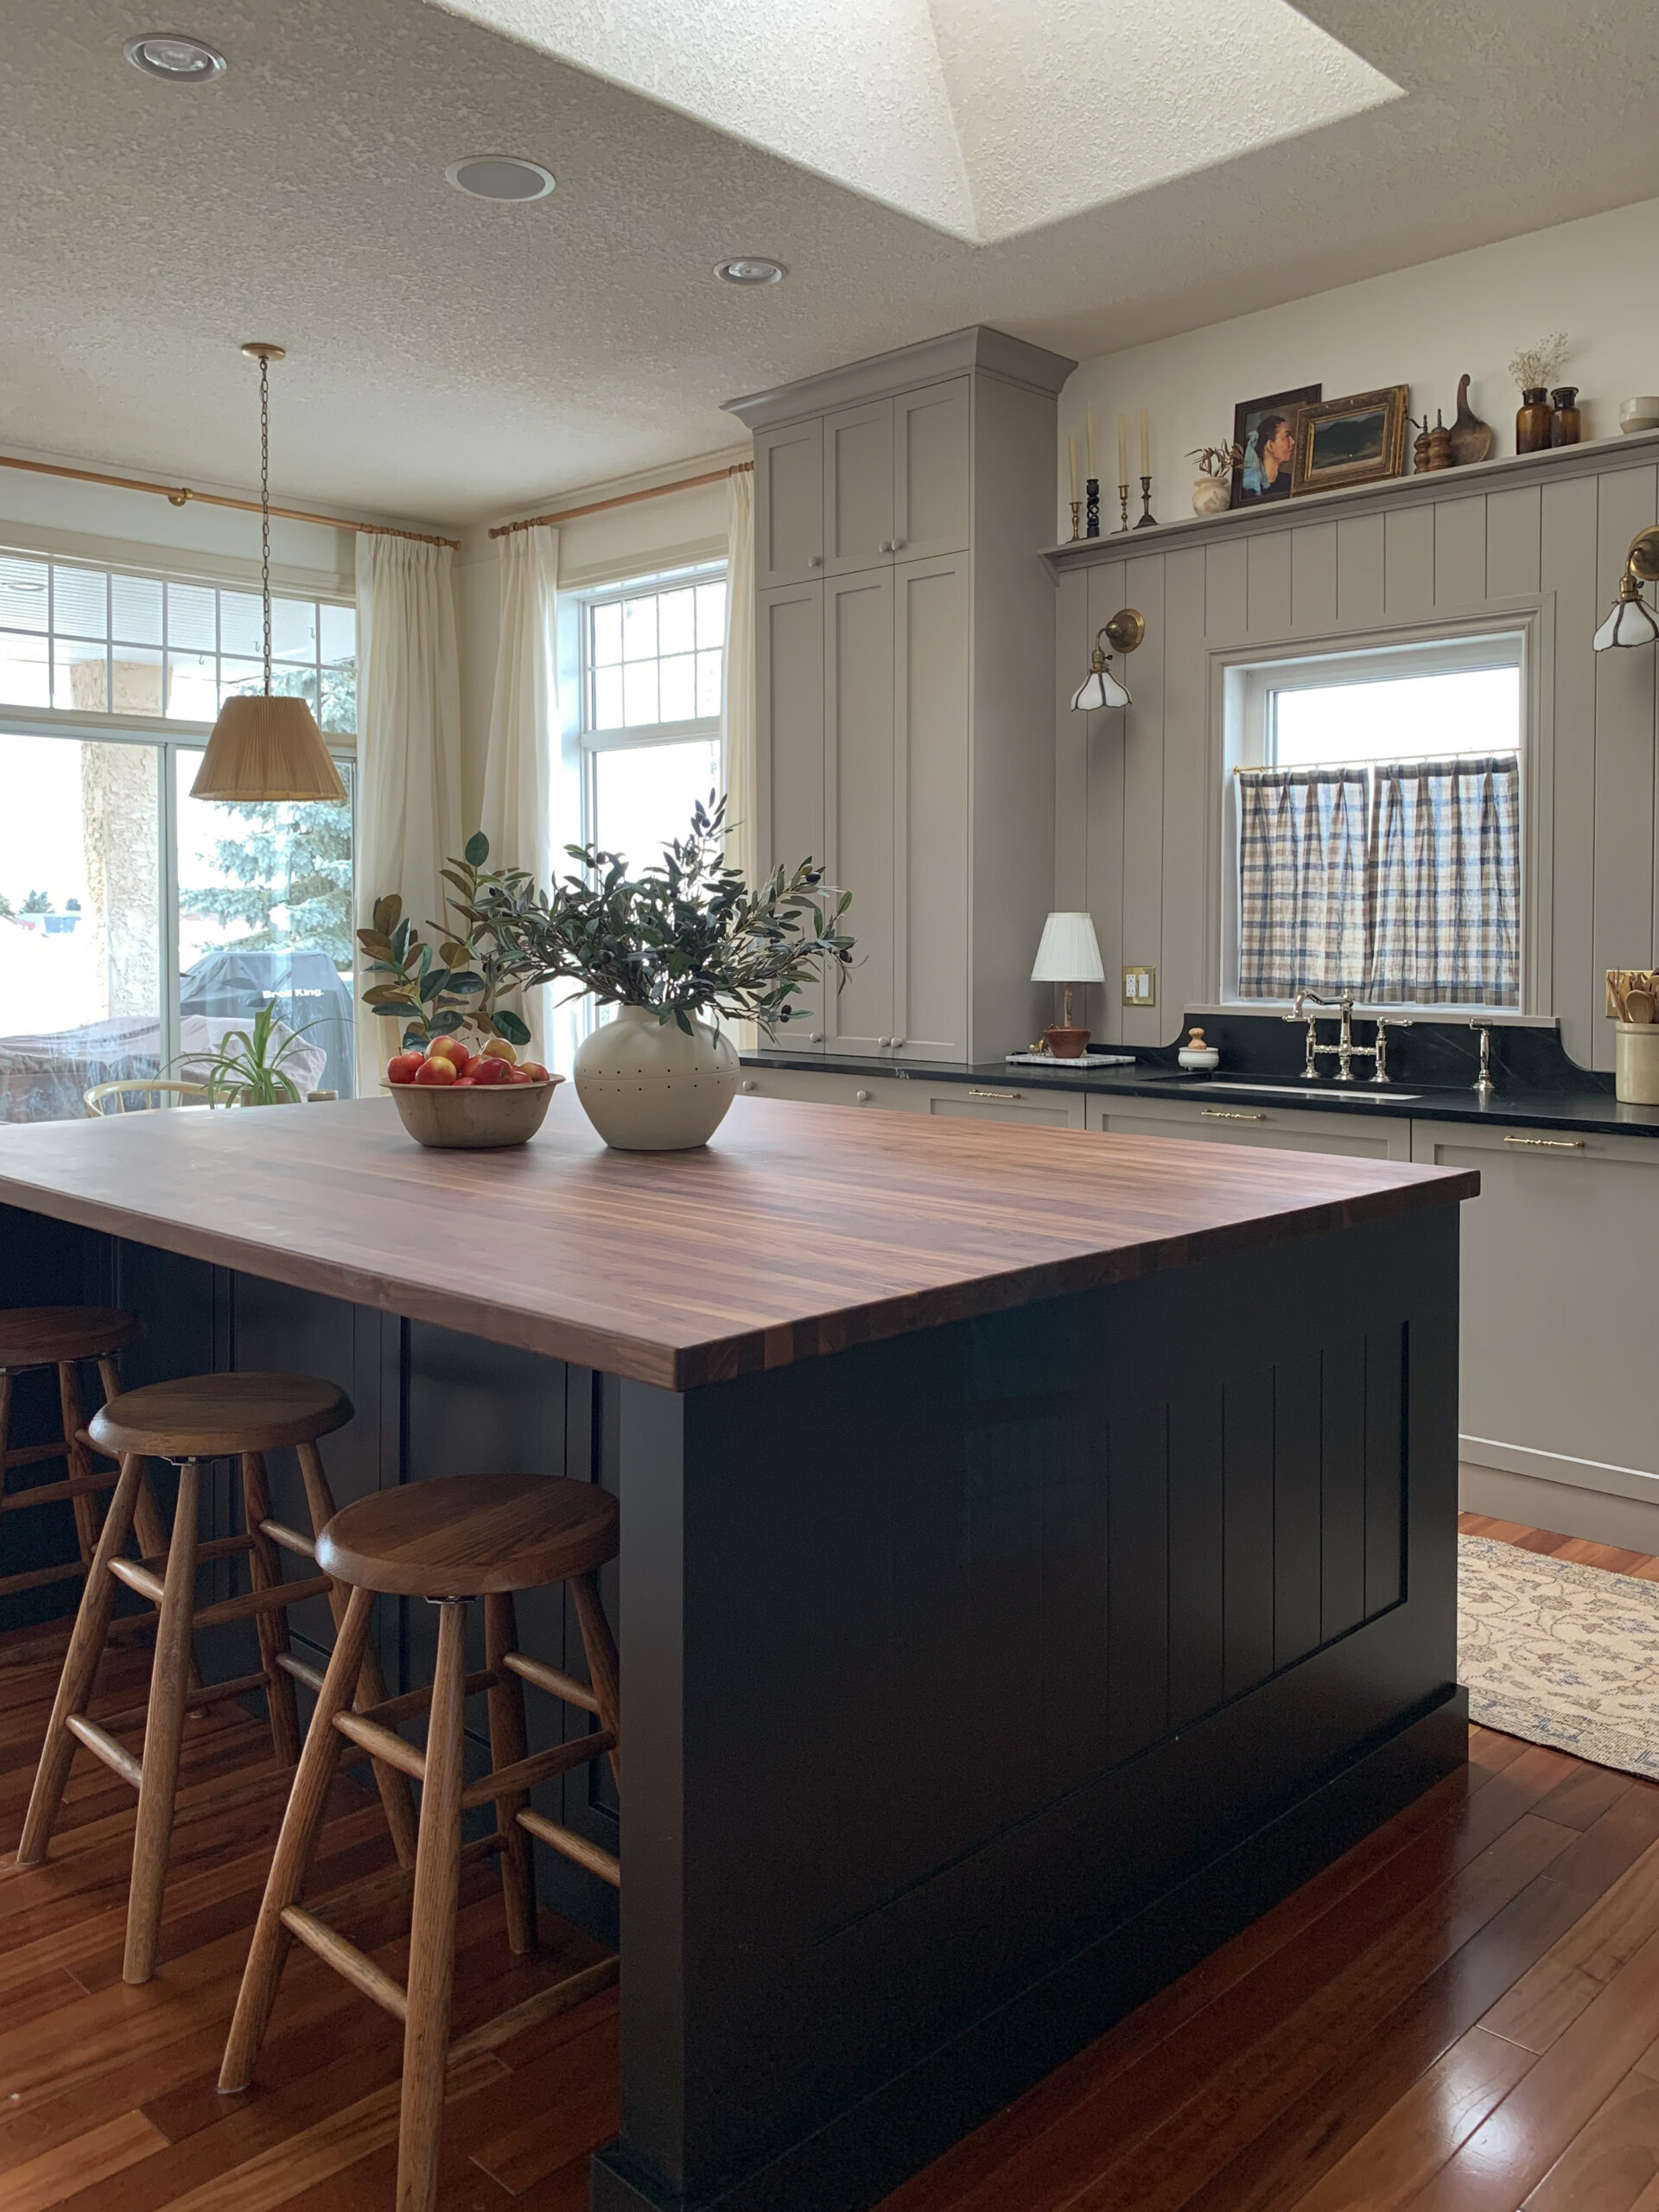
Before we dig into the details let’s look at the AFTERS!
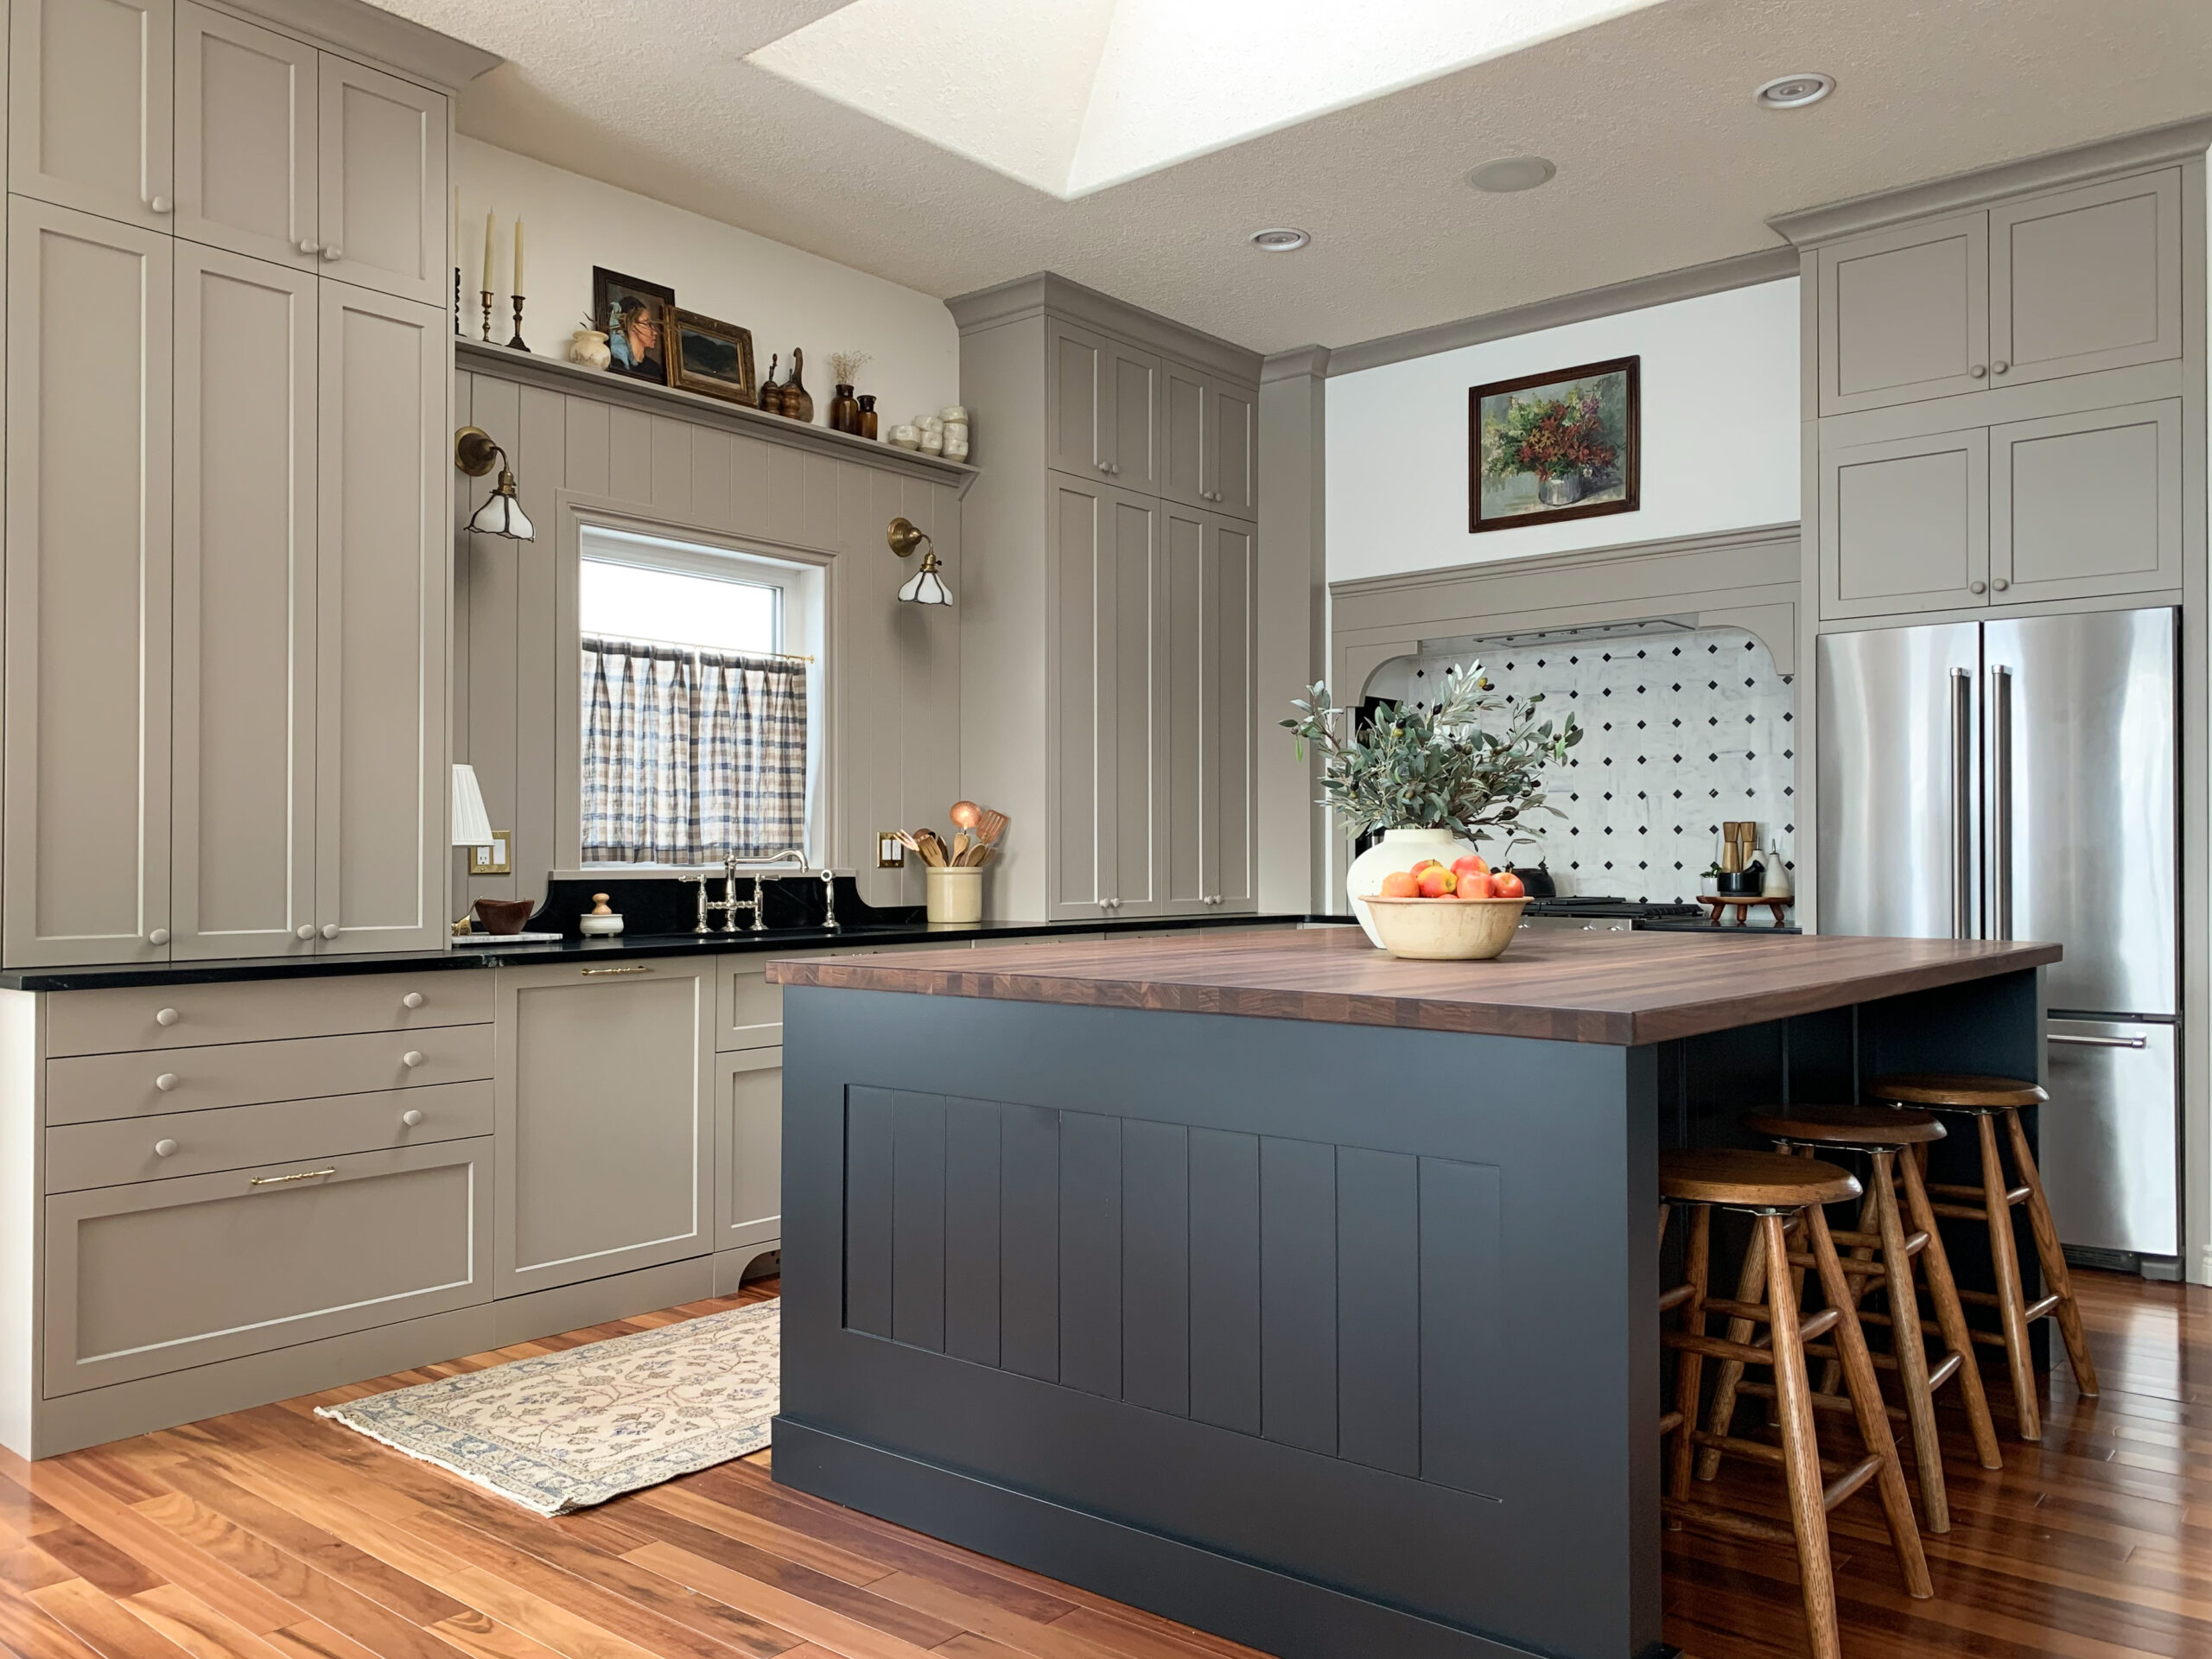
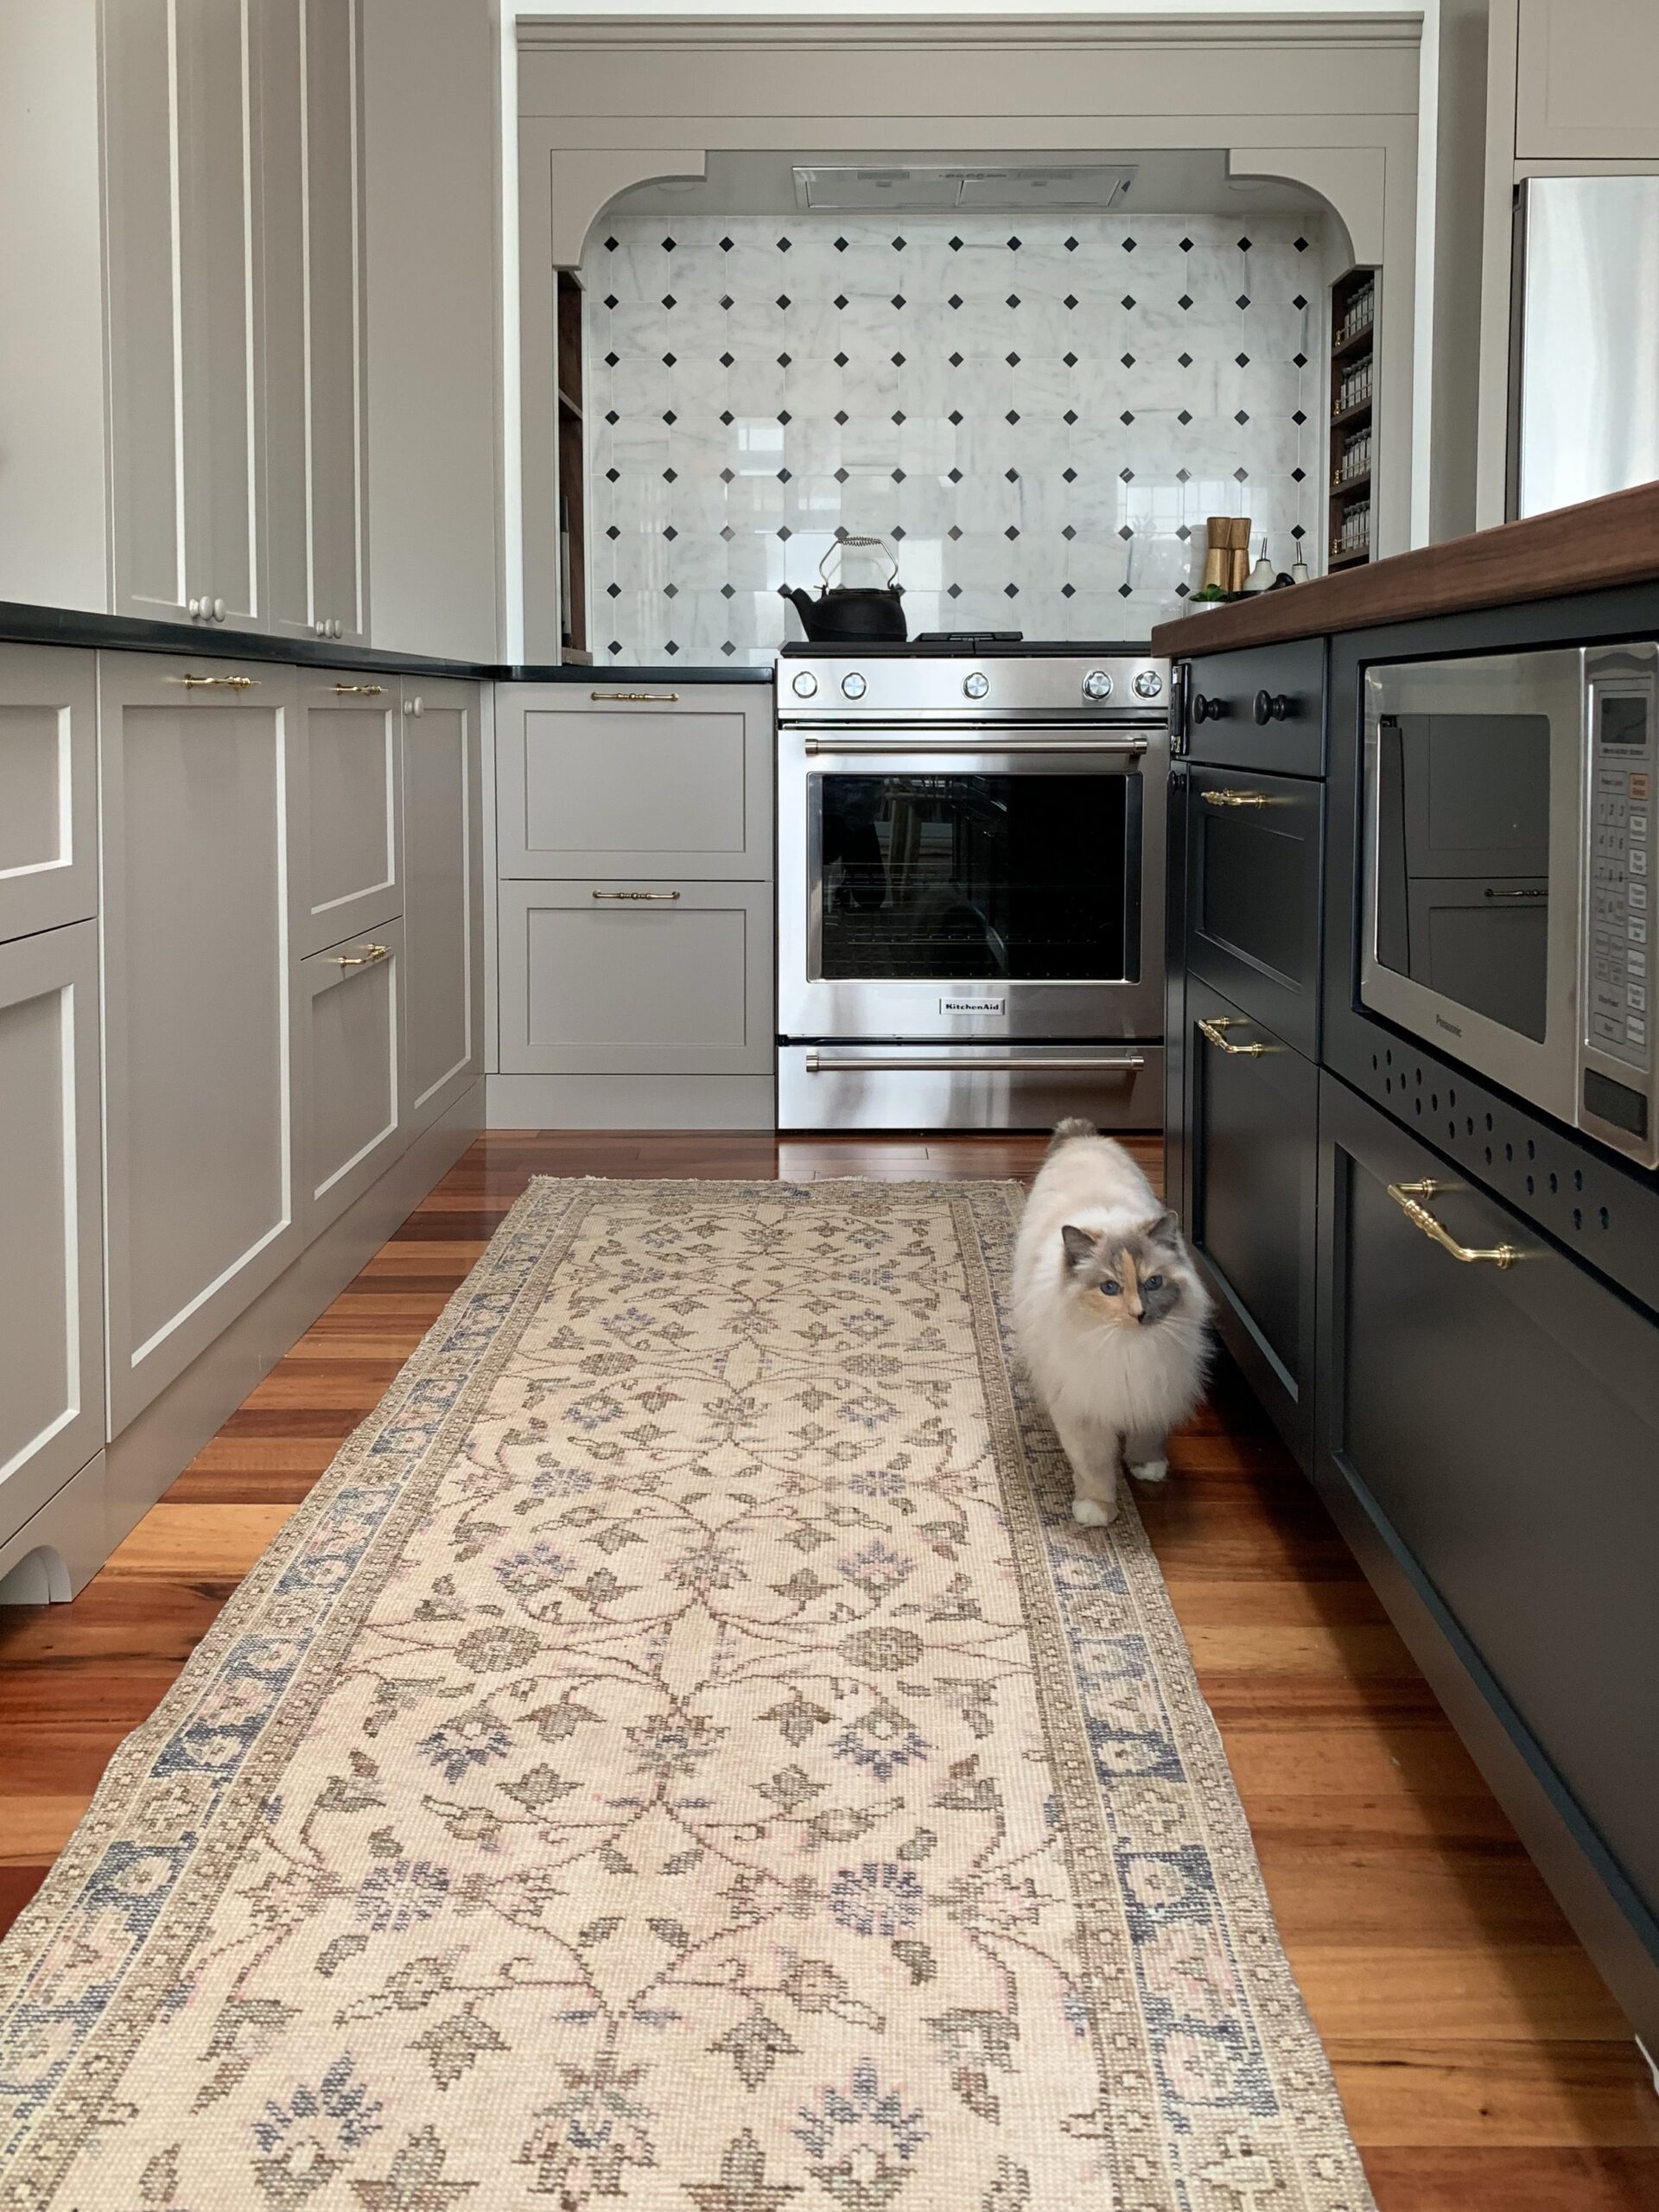

Alright, let’s dig into a few details! First of all, I knew that we wanted to DIY this kitchen using Ikea cabinets because I had so many ideas for custom touches (more on that later!) so for us, that meant IKEA. I started researching IKEA cabinet door companies (spoiler – there are a LOT!) but I settled on AllStyle Retrofit for a few reasons, the biggest one being the chance to customize my colour choices (Benjamin Moore Indian River for the perimeter and Benjamin Moore Jet Black on the island!).
For the countertop choices, I went with two different types – soapstone on the perimeter and butcher block for the island. For the island, I partnered with Caribou Block who manufactures high-quality butcher block right nearby in Edmonton. I chose them because they include waterproofing technology which means I never have to oil or deal with any maintenance and have an incredible warranty. I went with Walnut because that deep, rich colour just can’t be beaten.
So how did we customize our DIY Ikea kitchen with Ikea cabinets? Here are a few things we did:
Ways we Customized our DIY Ikea Kitchen
Skinny Cabinet to Hold a Stool and an Outlet
Shortly after I ordered my cabinet doors I realized that I was going to have to install an electrical outlet in the end panel of my island. This would really mess up the overall look of the end panel, in my opinion, so I started brainstorming ways to hide it. I came up with the idea of adding 4 ½” to either end of my island (luckily I had the floor space to do so) which meant I had space to run the wiring for an outlet in the front of the island (facing my sink) instead of on the side (facing the dining space and making my end panel all janky). We decided to try to cut down a 12” wide Ikea cabinet to 41/2” and make a skinny cabinet to hold a stool. 4 ½” was chosen because it was the exact width of the toe kick that AllStyle was supplying and that meant we could potentially use the toe kick as a door without having to try to paint it to match the finish. So, I called up AllStyle and was able to add a few more pieces of toe kick to the order and we started watching YouTube videos on how to cut down a cabinet.
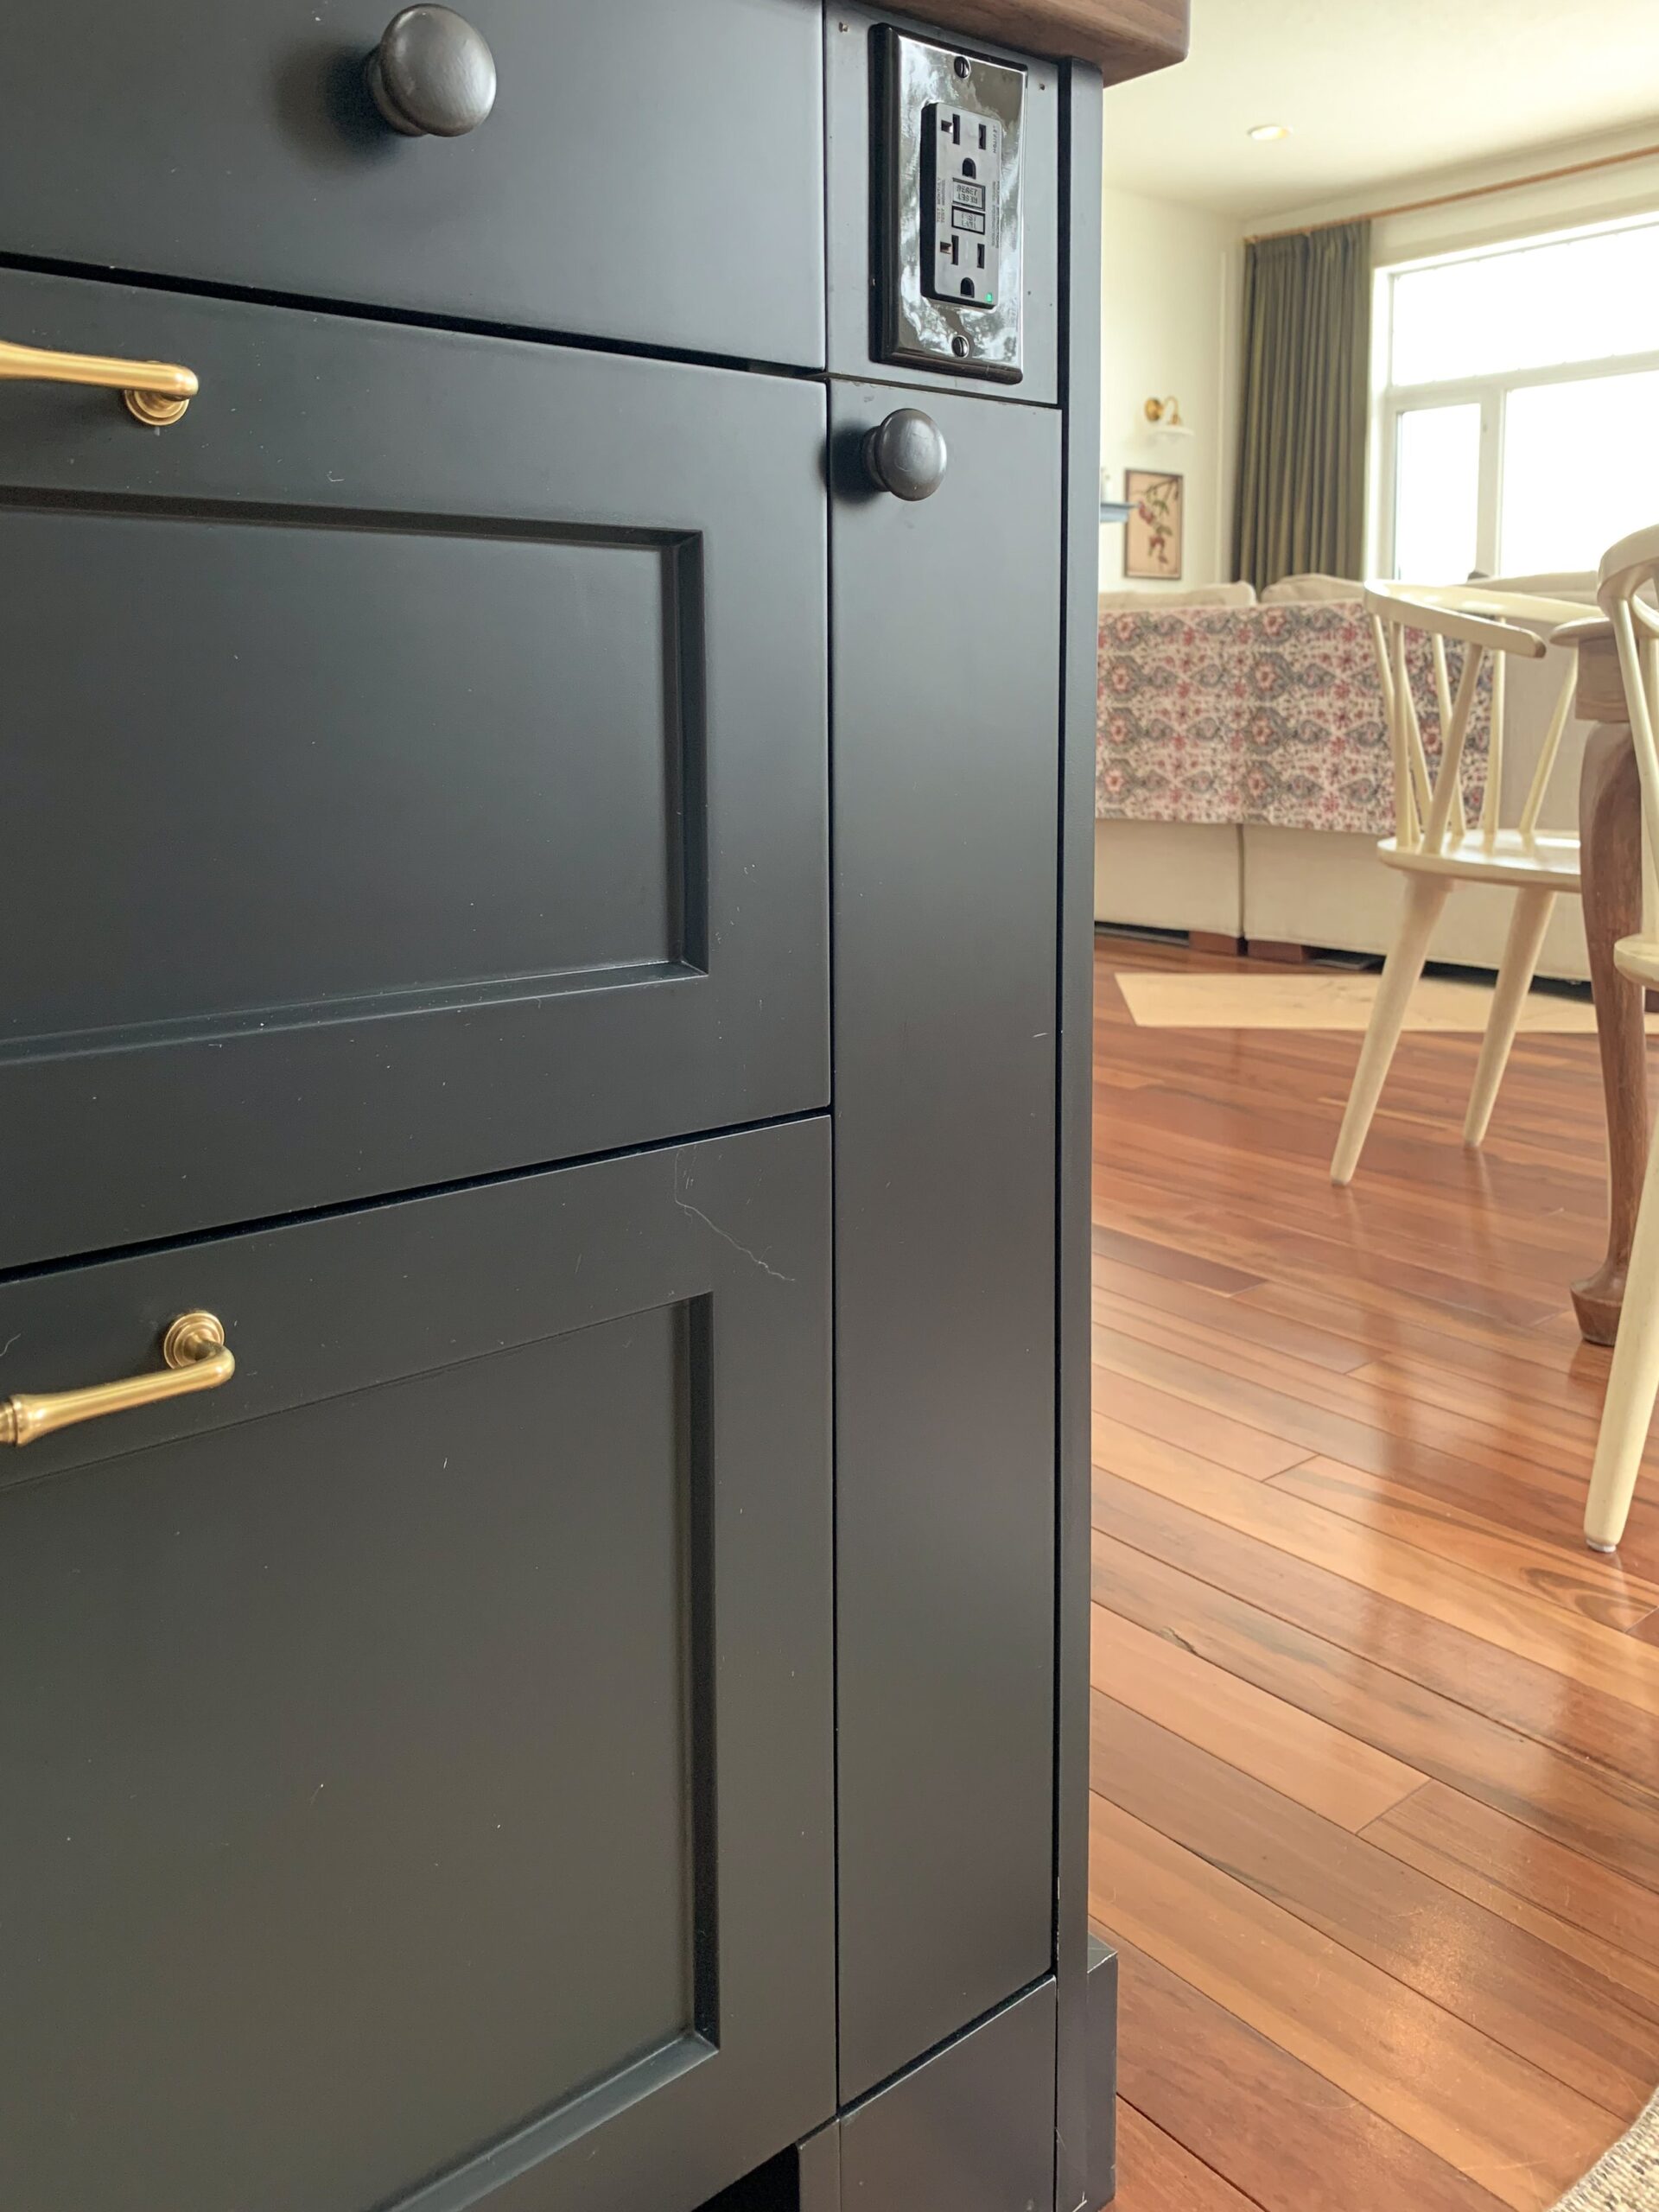
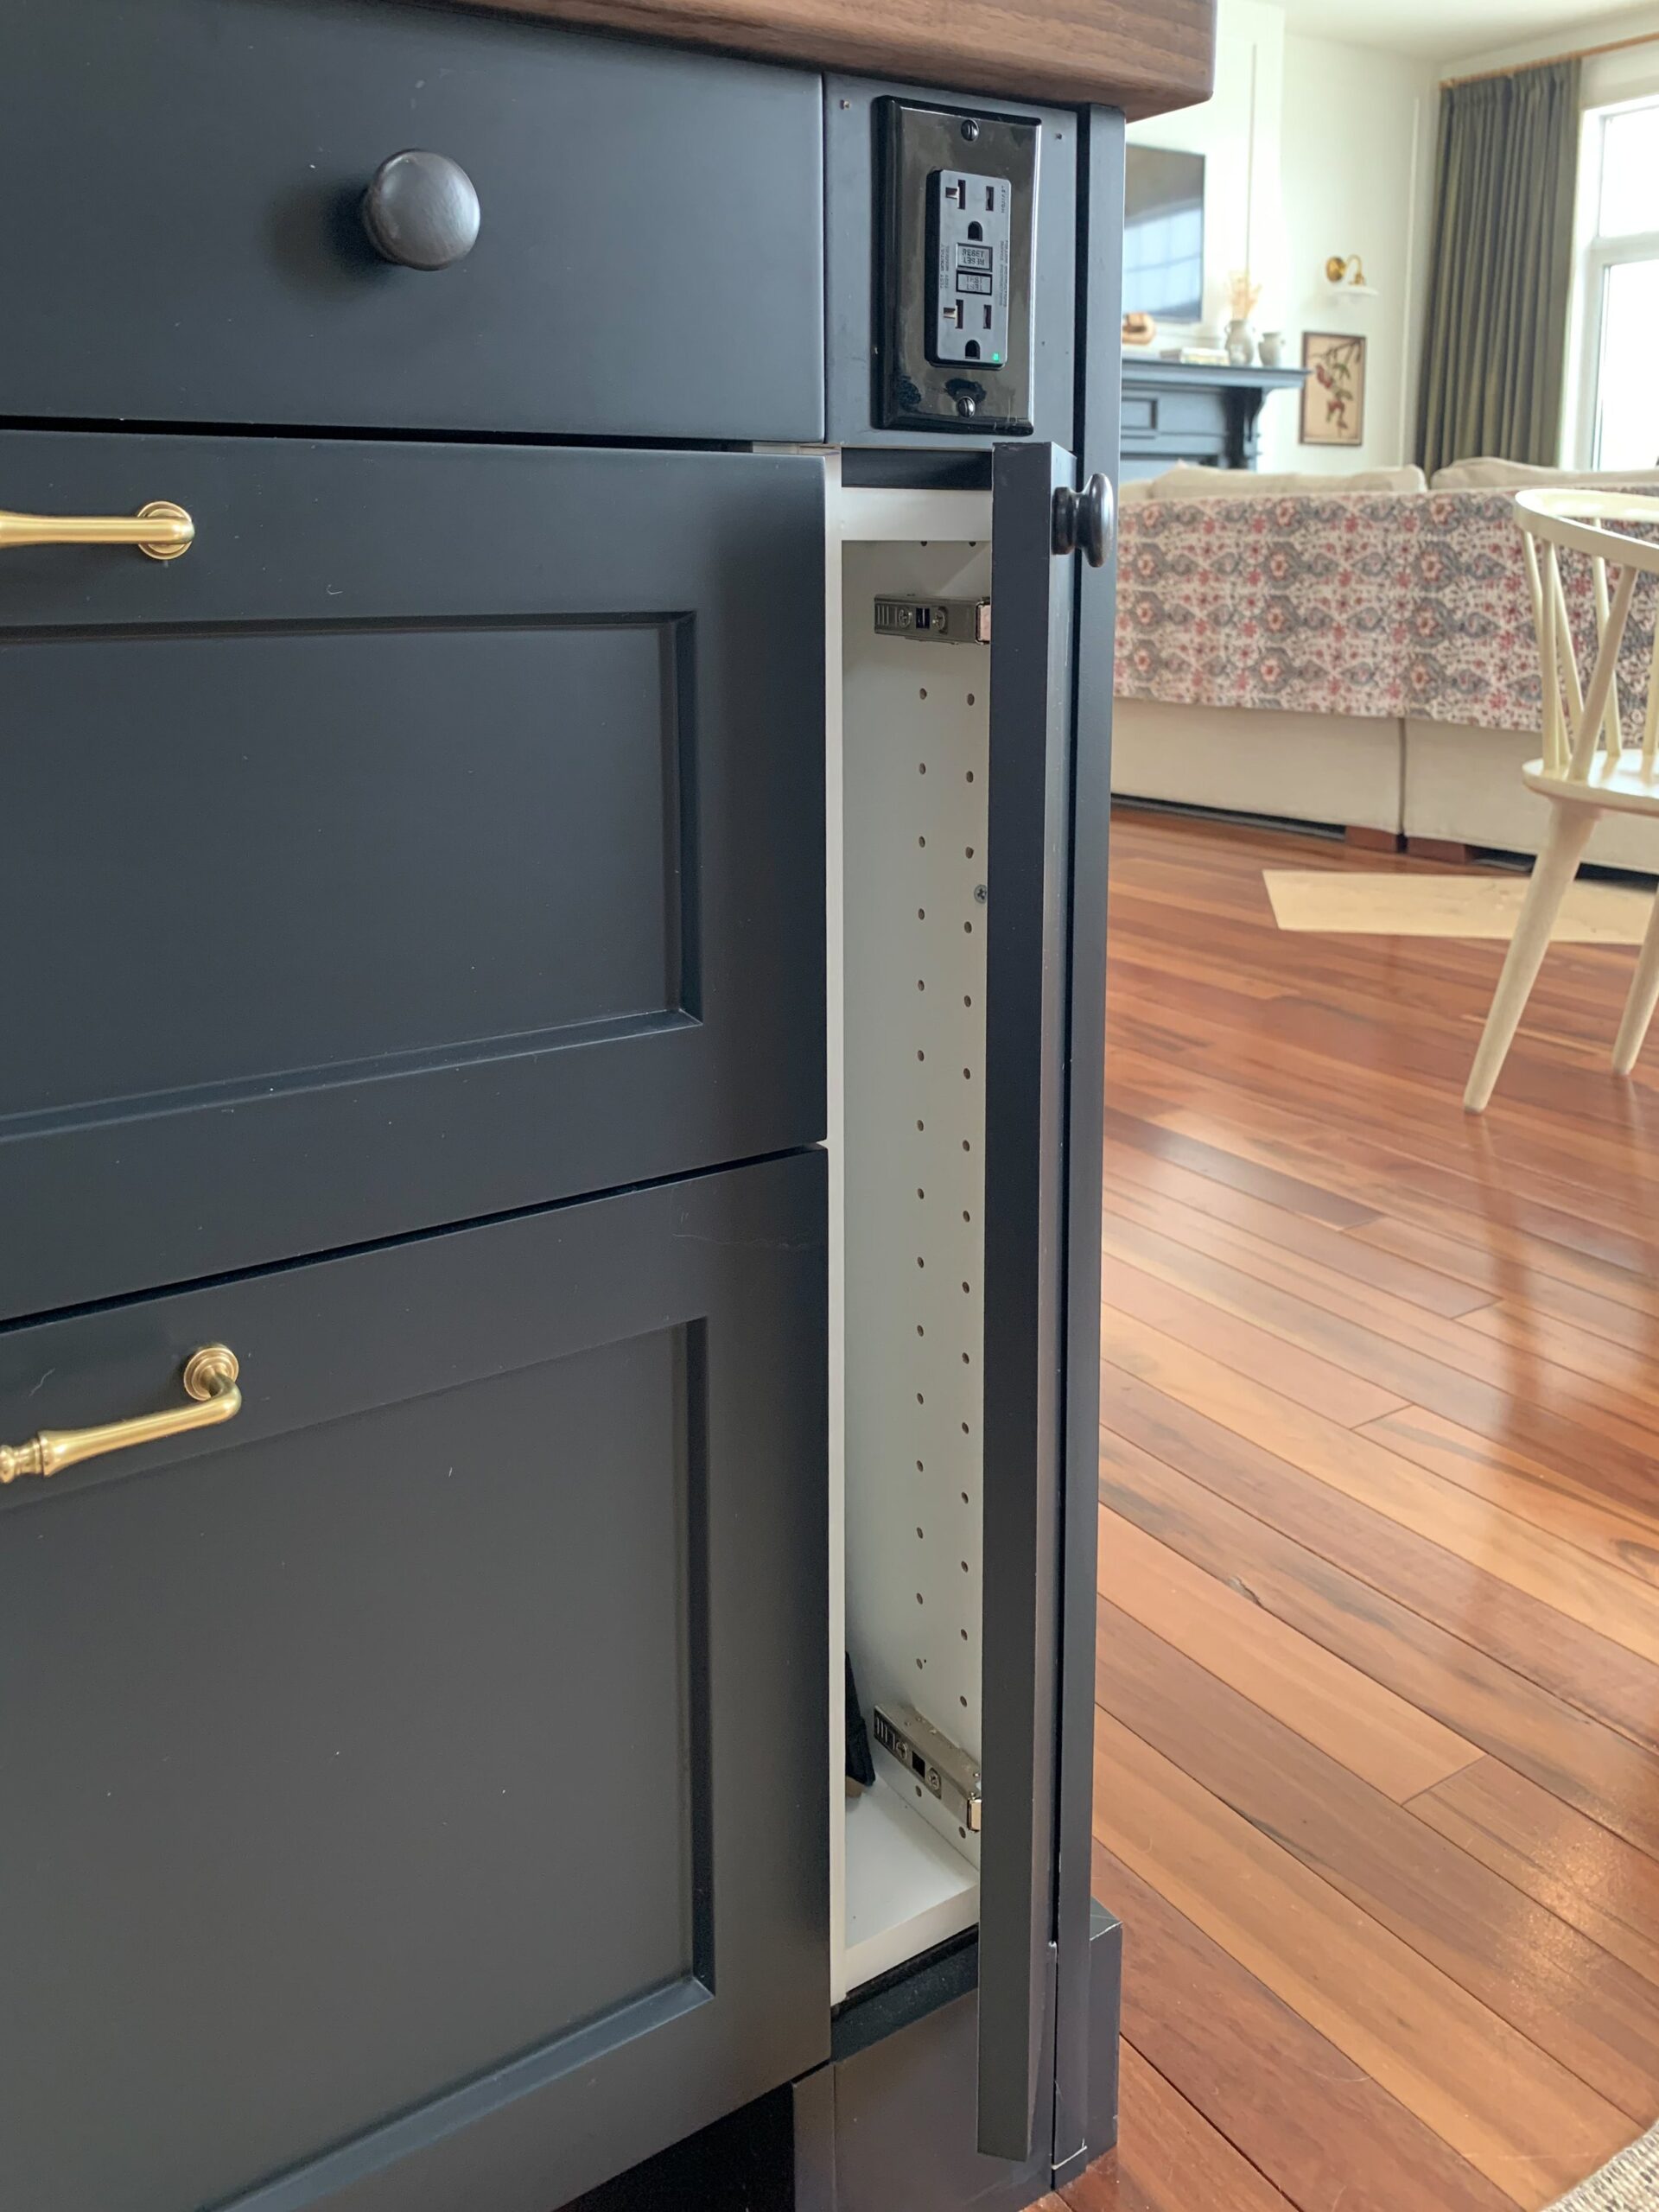
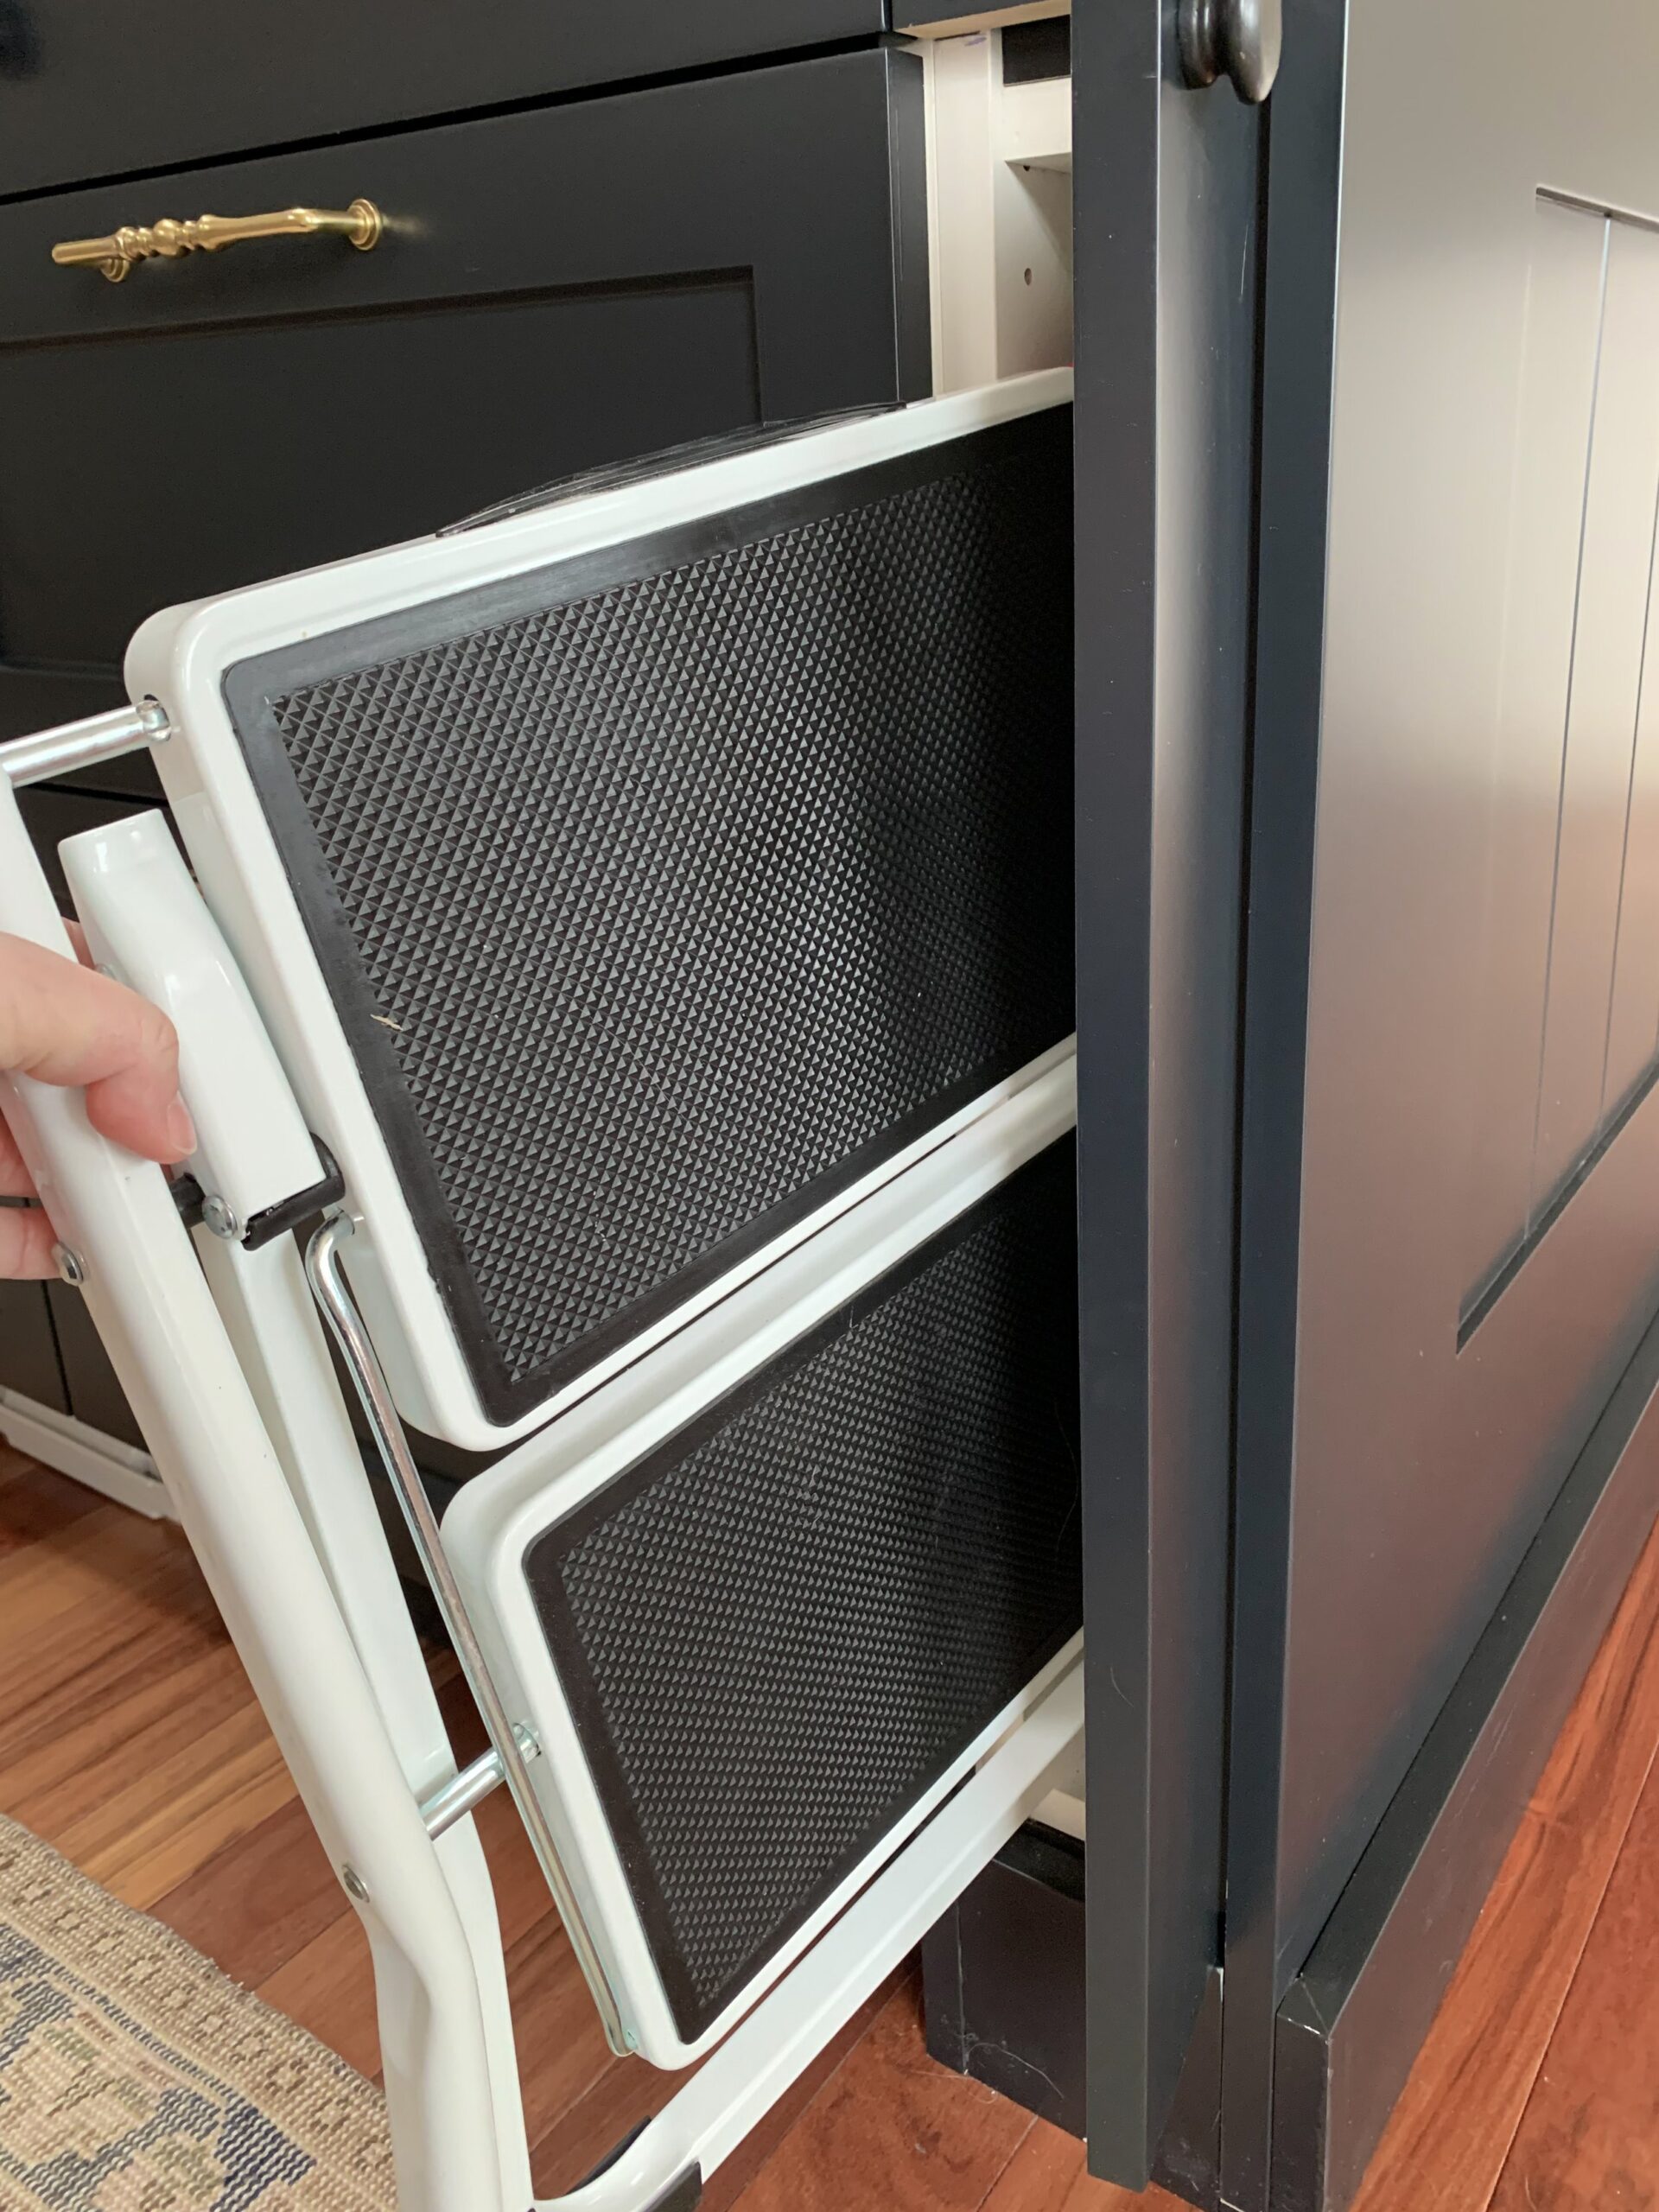
Cutting down the cabinet and making the door went relatively smoothly, and I found the skinniest stool to stash in that skinny cabinet, so I always have a stool handy to reach some of my high cabinets. We did one on either end of the island, so in the other side I keep cutting boards! These little cabinets have been so handy and I’m so glad I don’t have electrical outlets messing up my end panels!
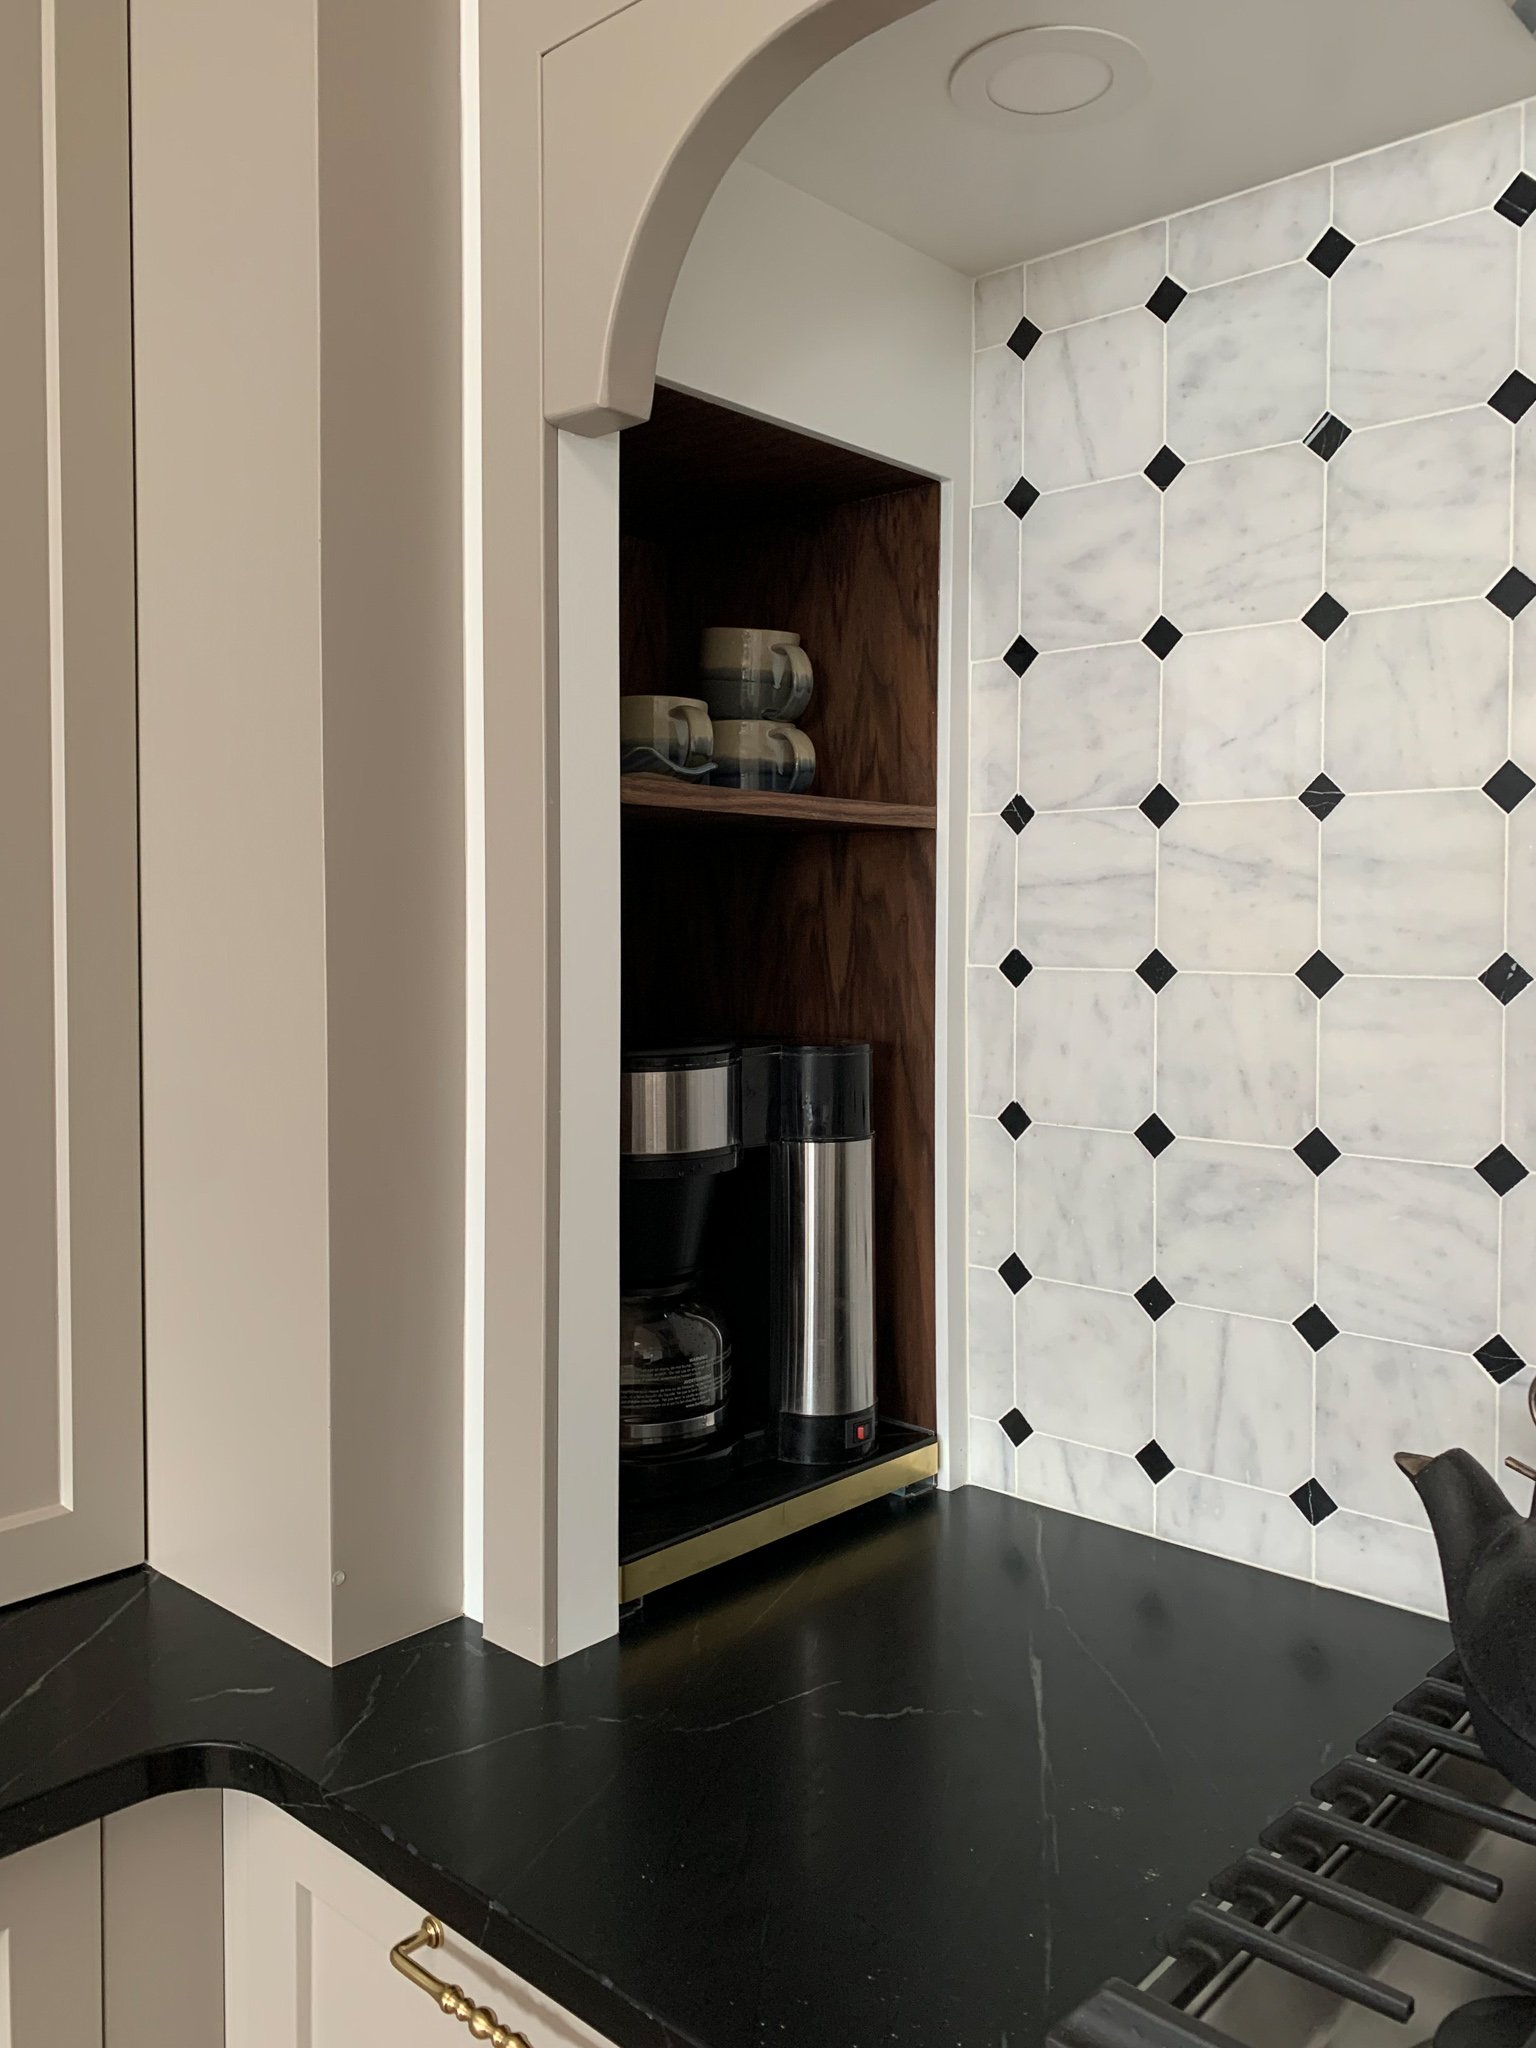
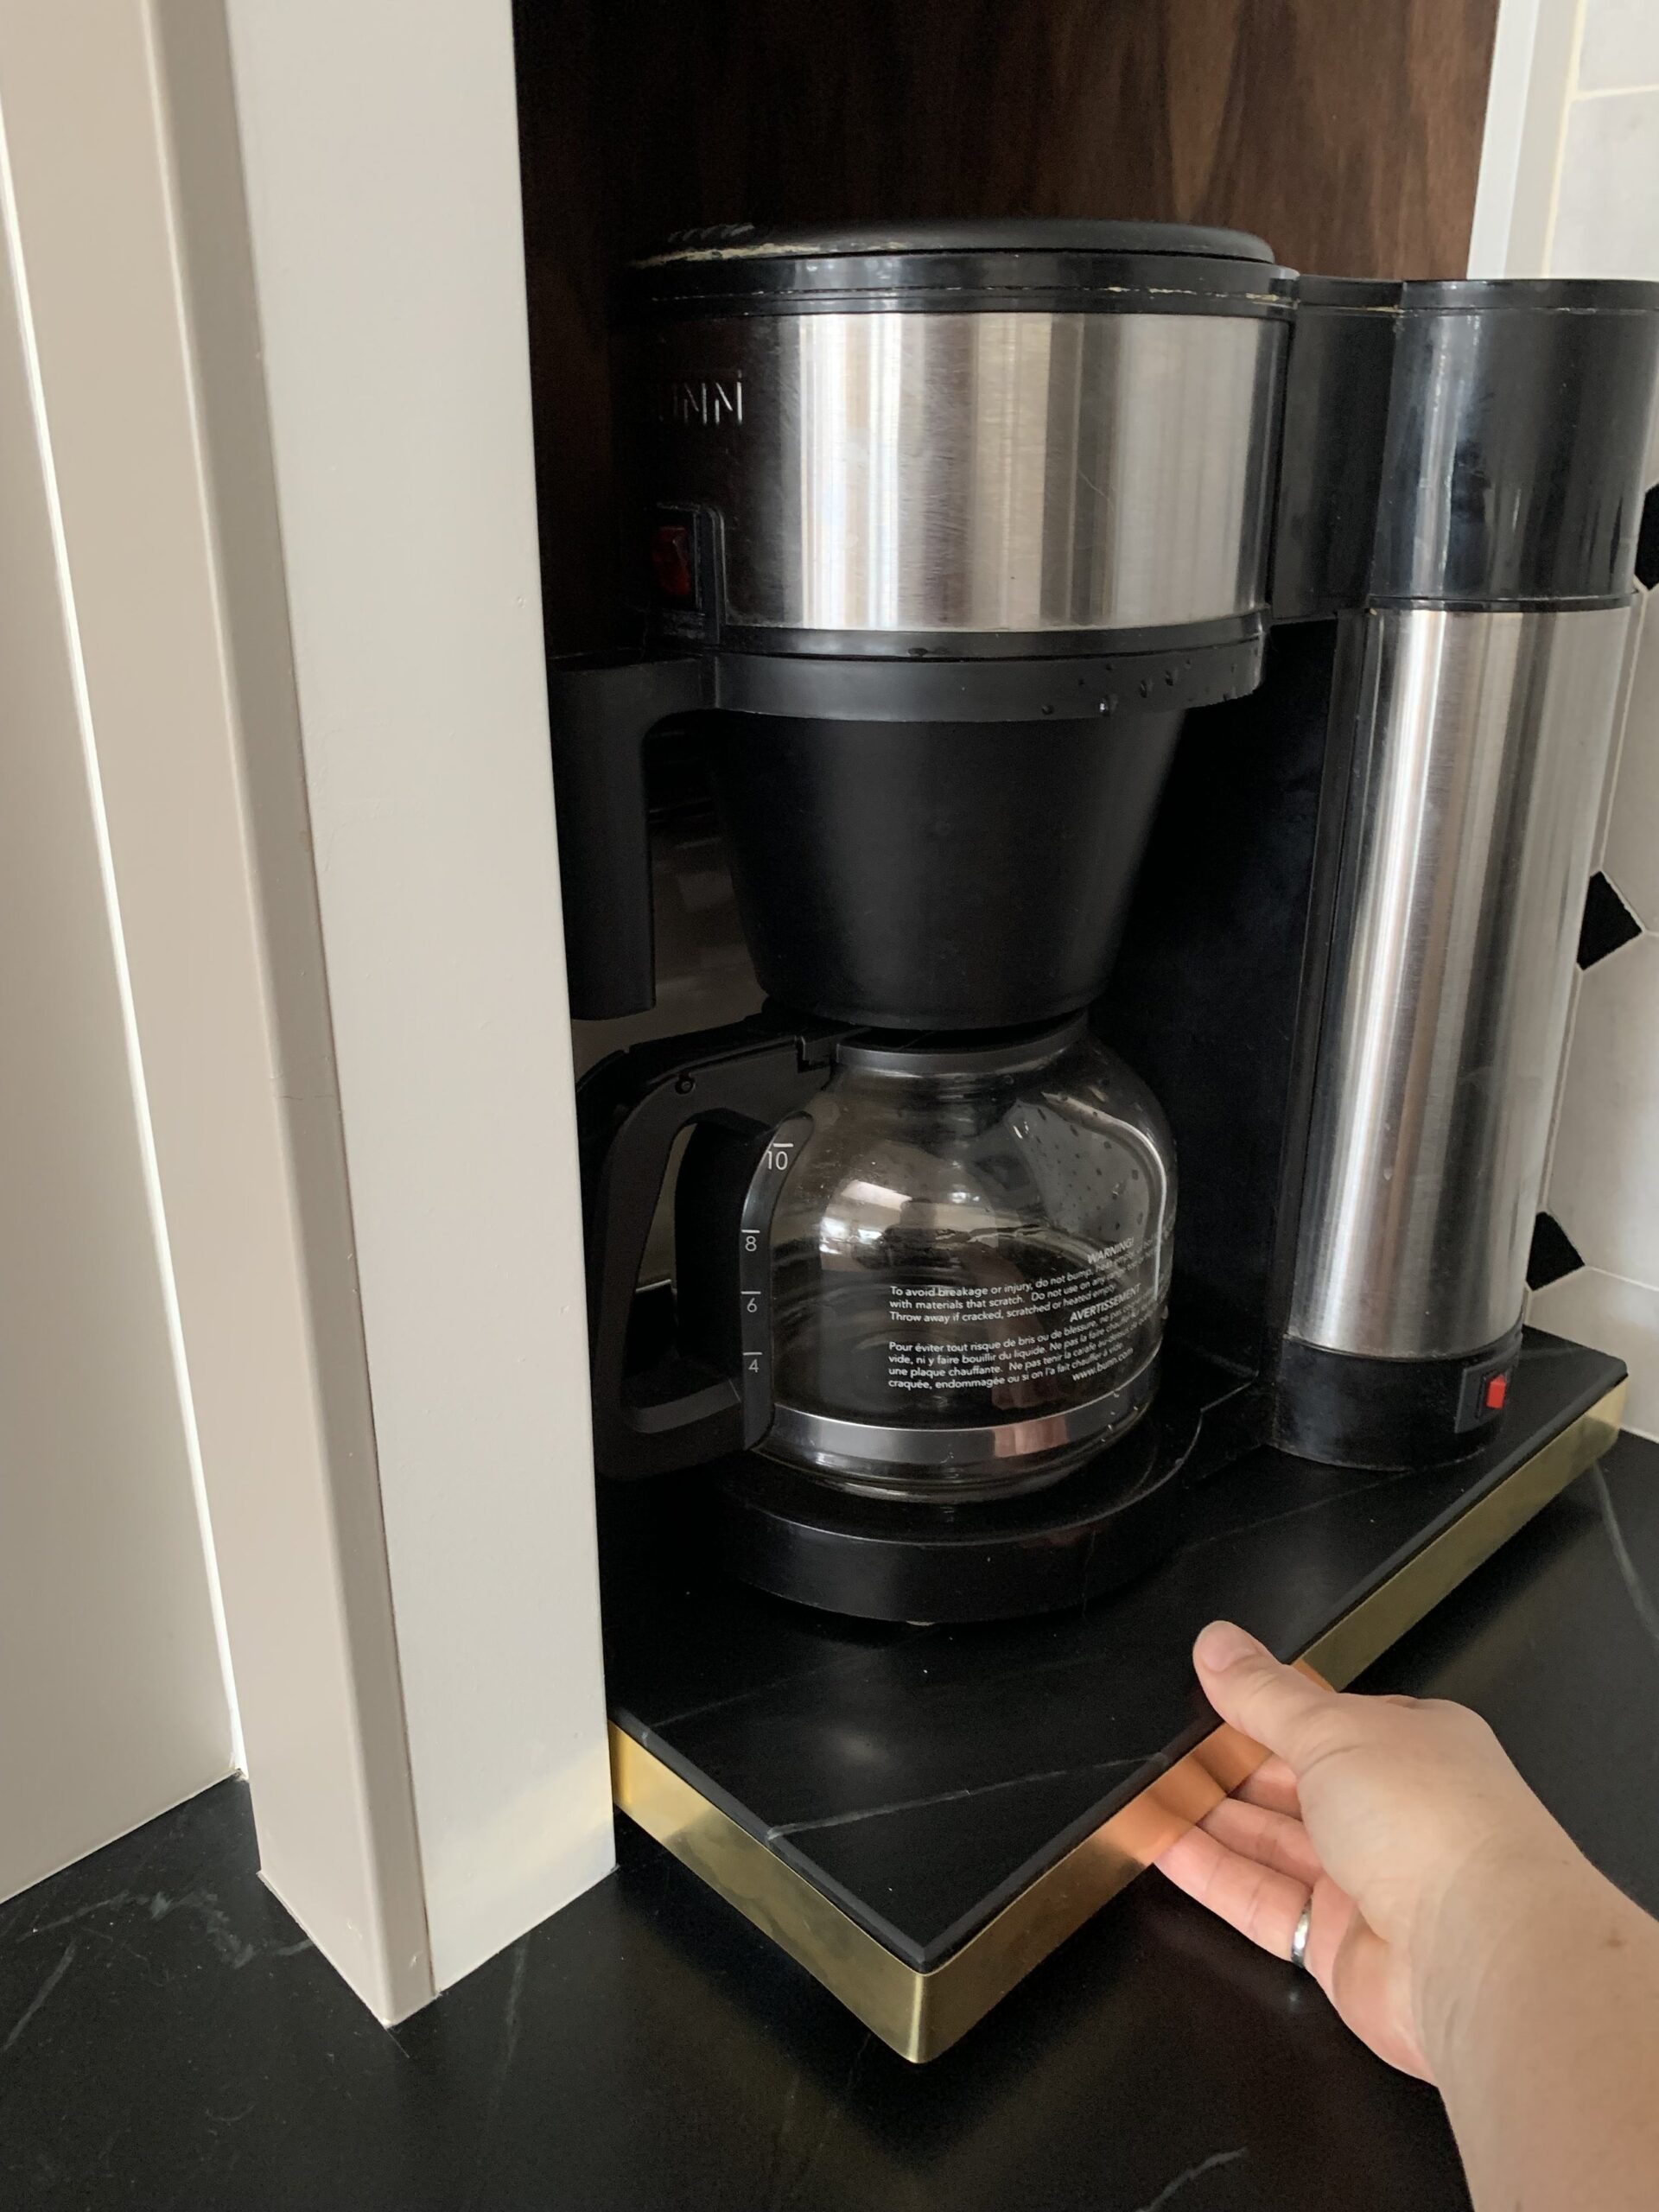
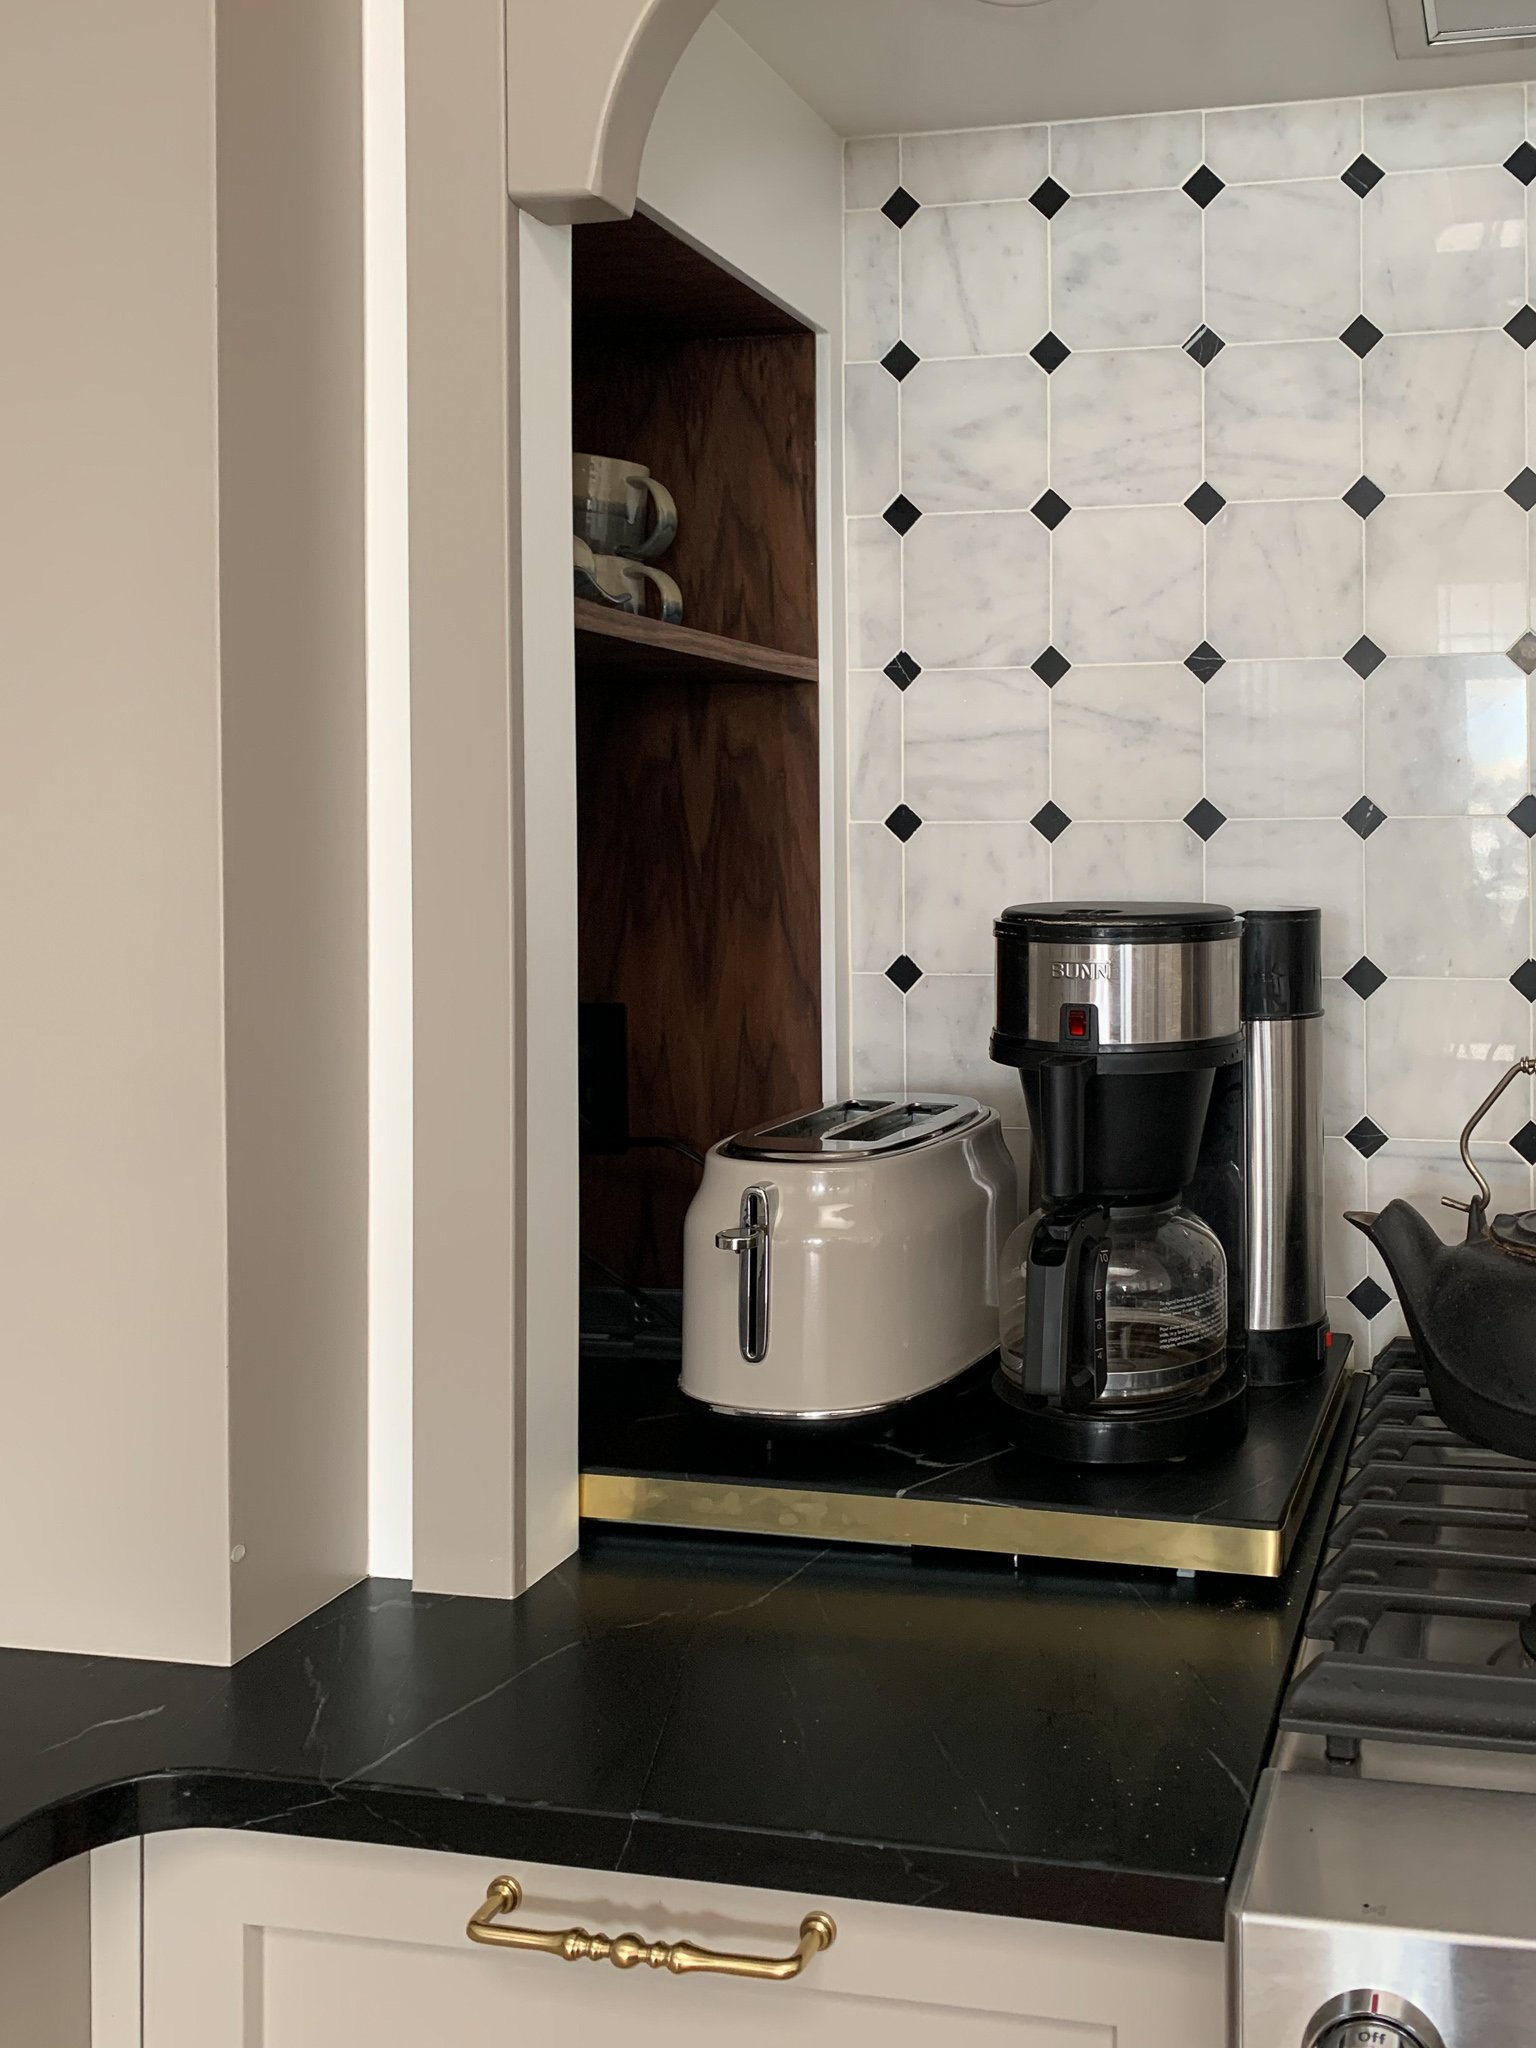
Pull out for Coffee Maker and Toaster
We used to have a corner pantry and when replacing them with cabinets, we knew that there would be an awkward space in the corner that would either be difficult to get at or wasted space altogether. I also knew I wanted a spot to stash my coffee maker that needed to stay open and could not be inside a cabinet according to our local code (more on that in this post). So, I designed a little cubby to stash away the coffee maker and toaster to slide out on drawer slides when we wanted to use it. I wasn’t sure if it would work but I figured it out and it functions just perfectly! We had a piece of stone fabricated to match the countertop and added a brass edge to hide the drawer slides. I wrote a blog post about how this was done, you can find details of that here!
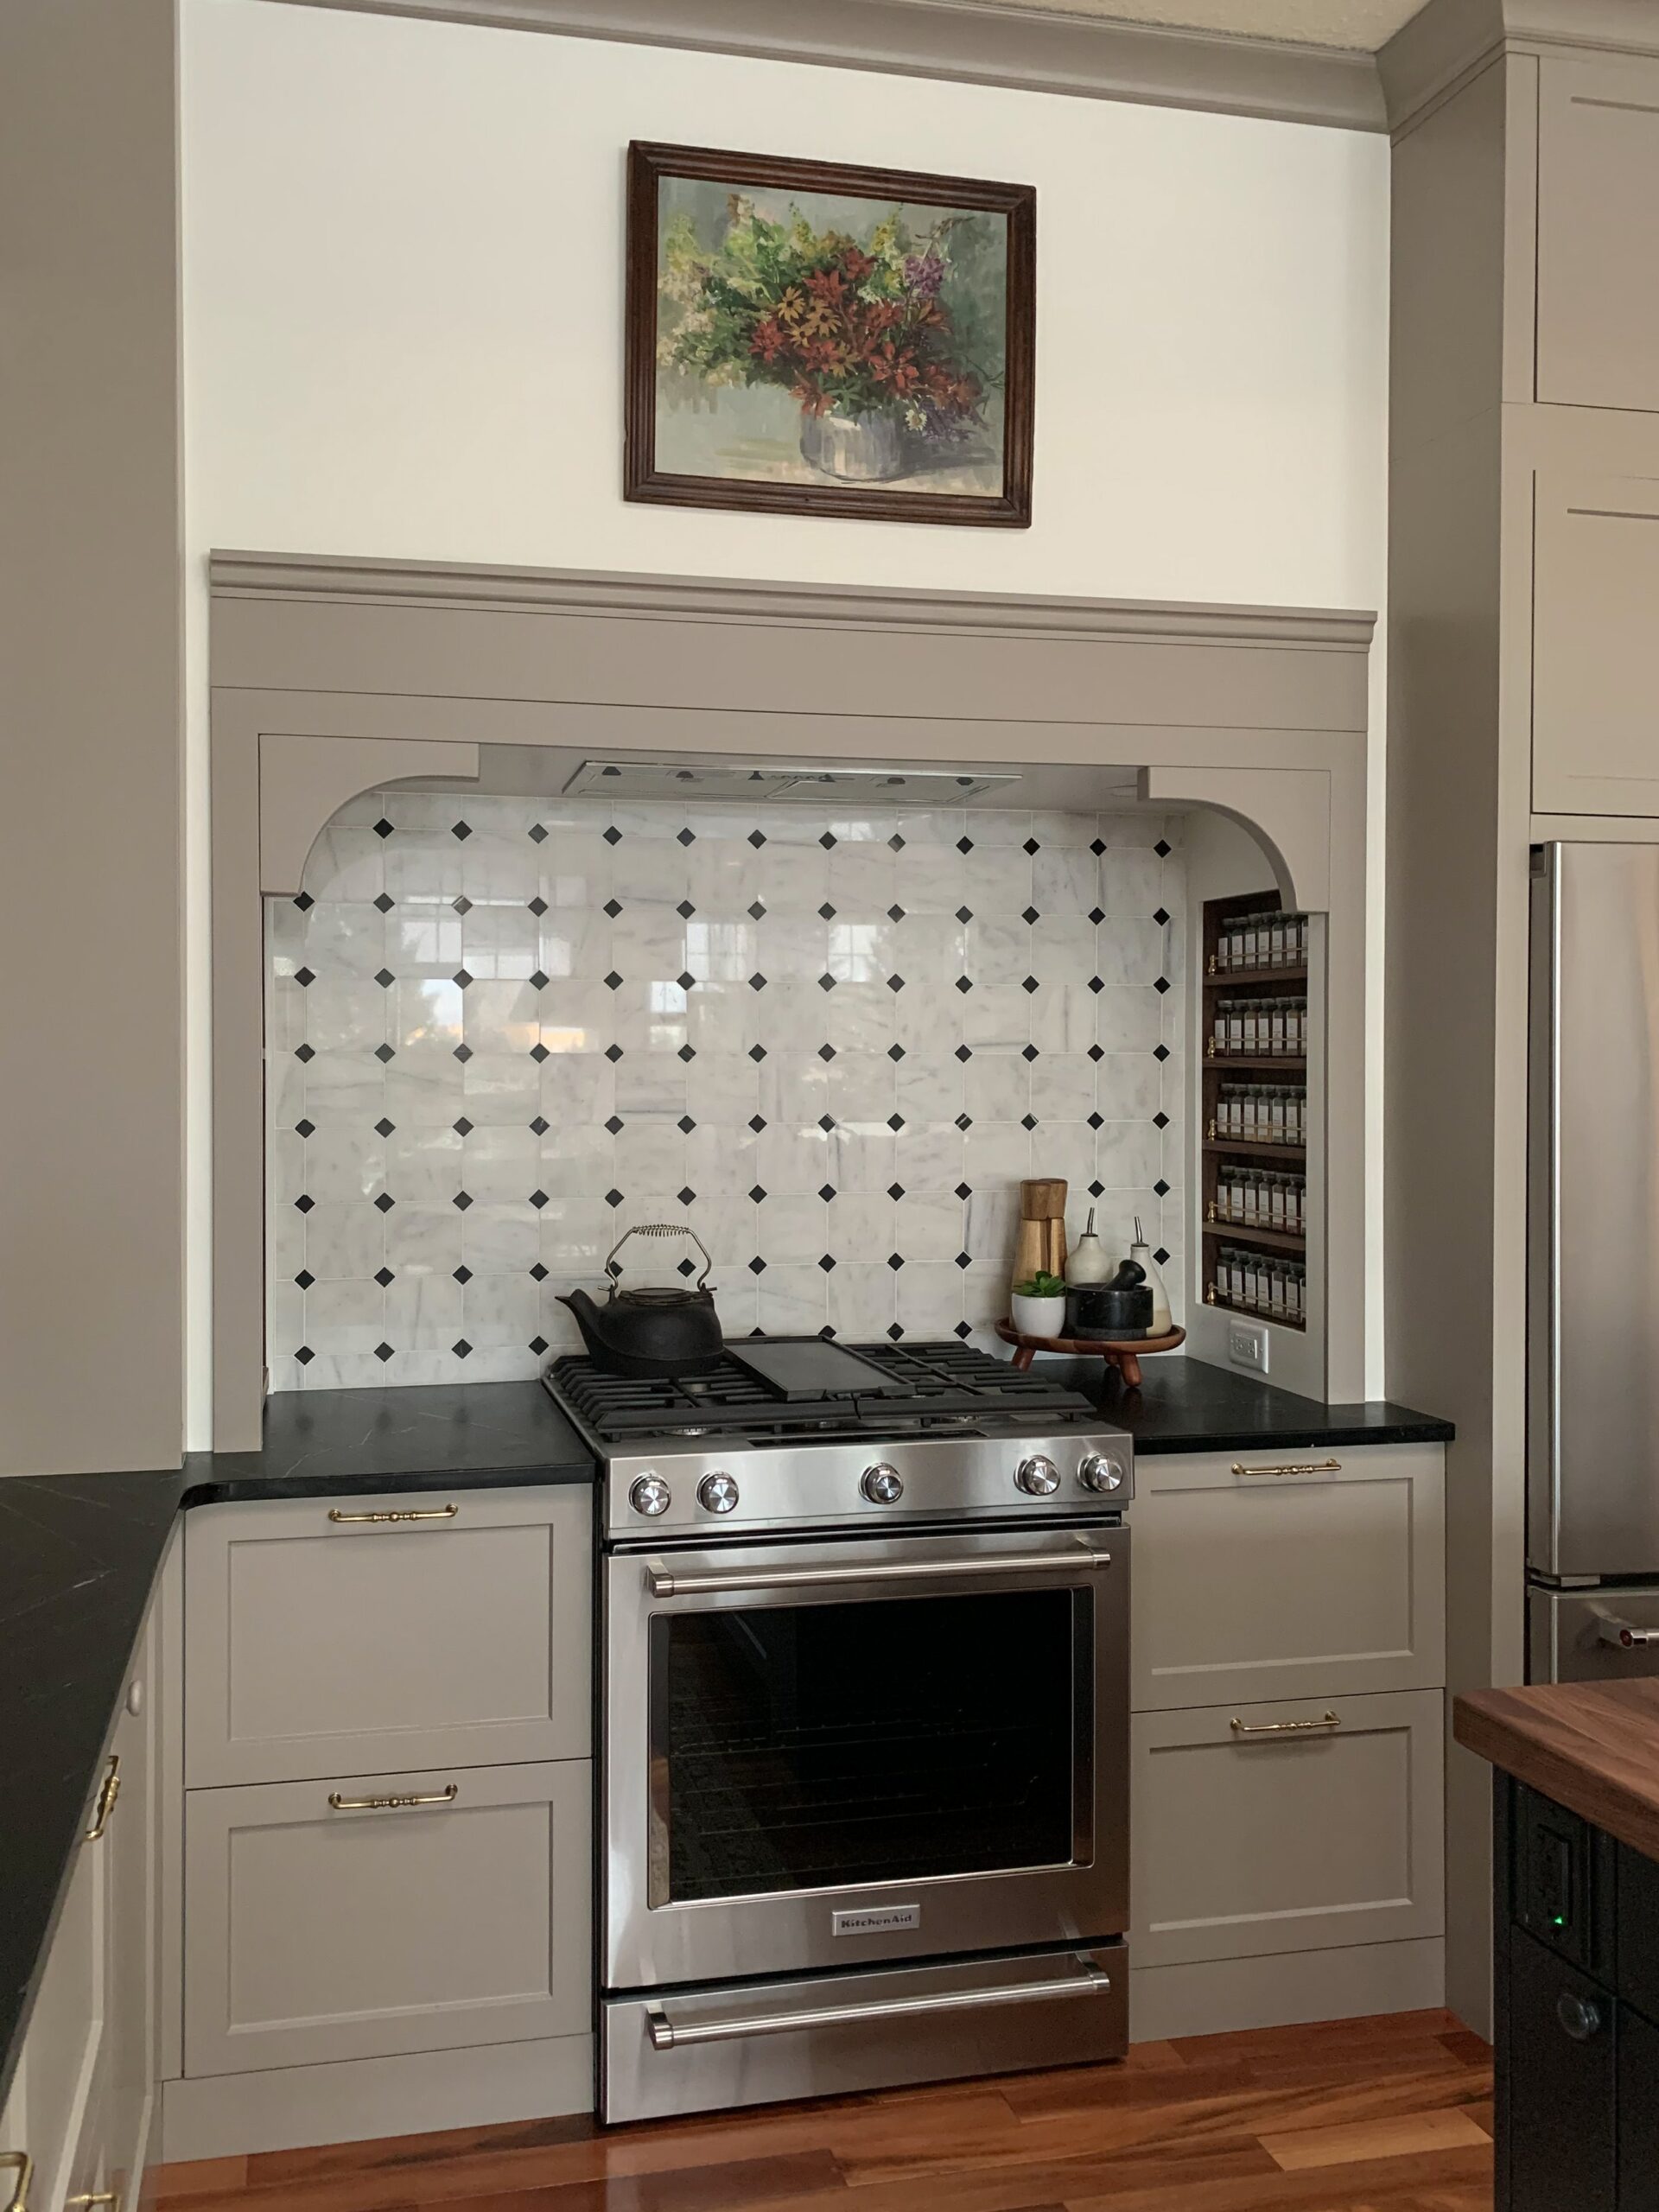
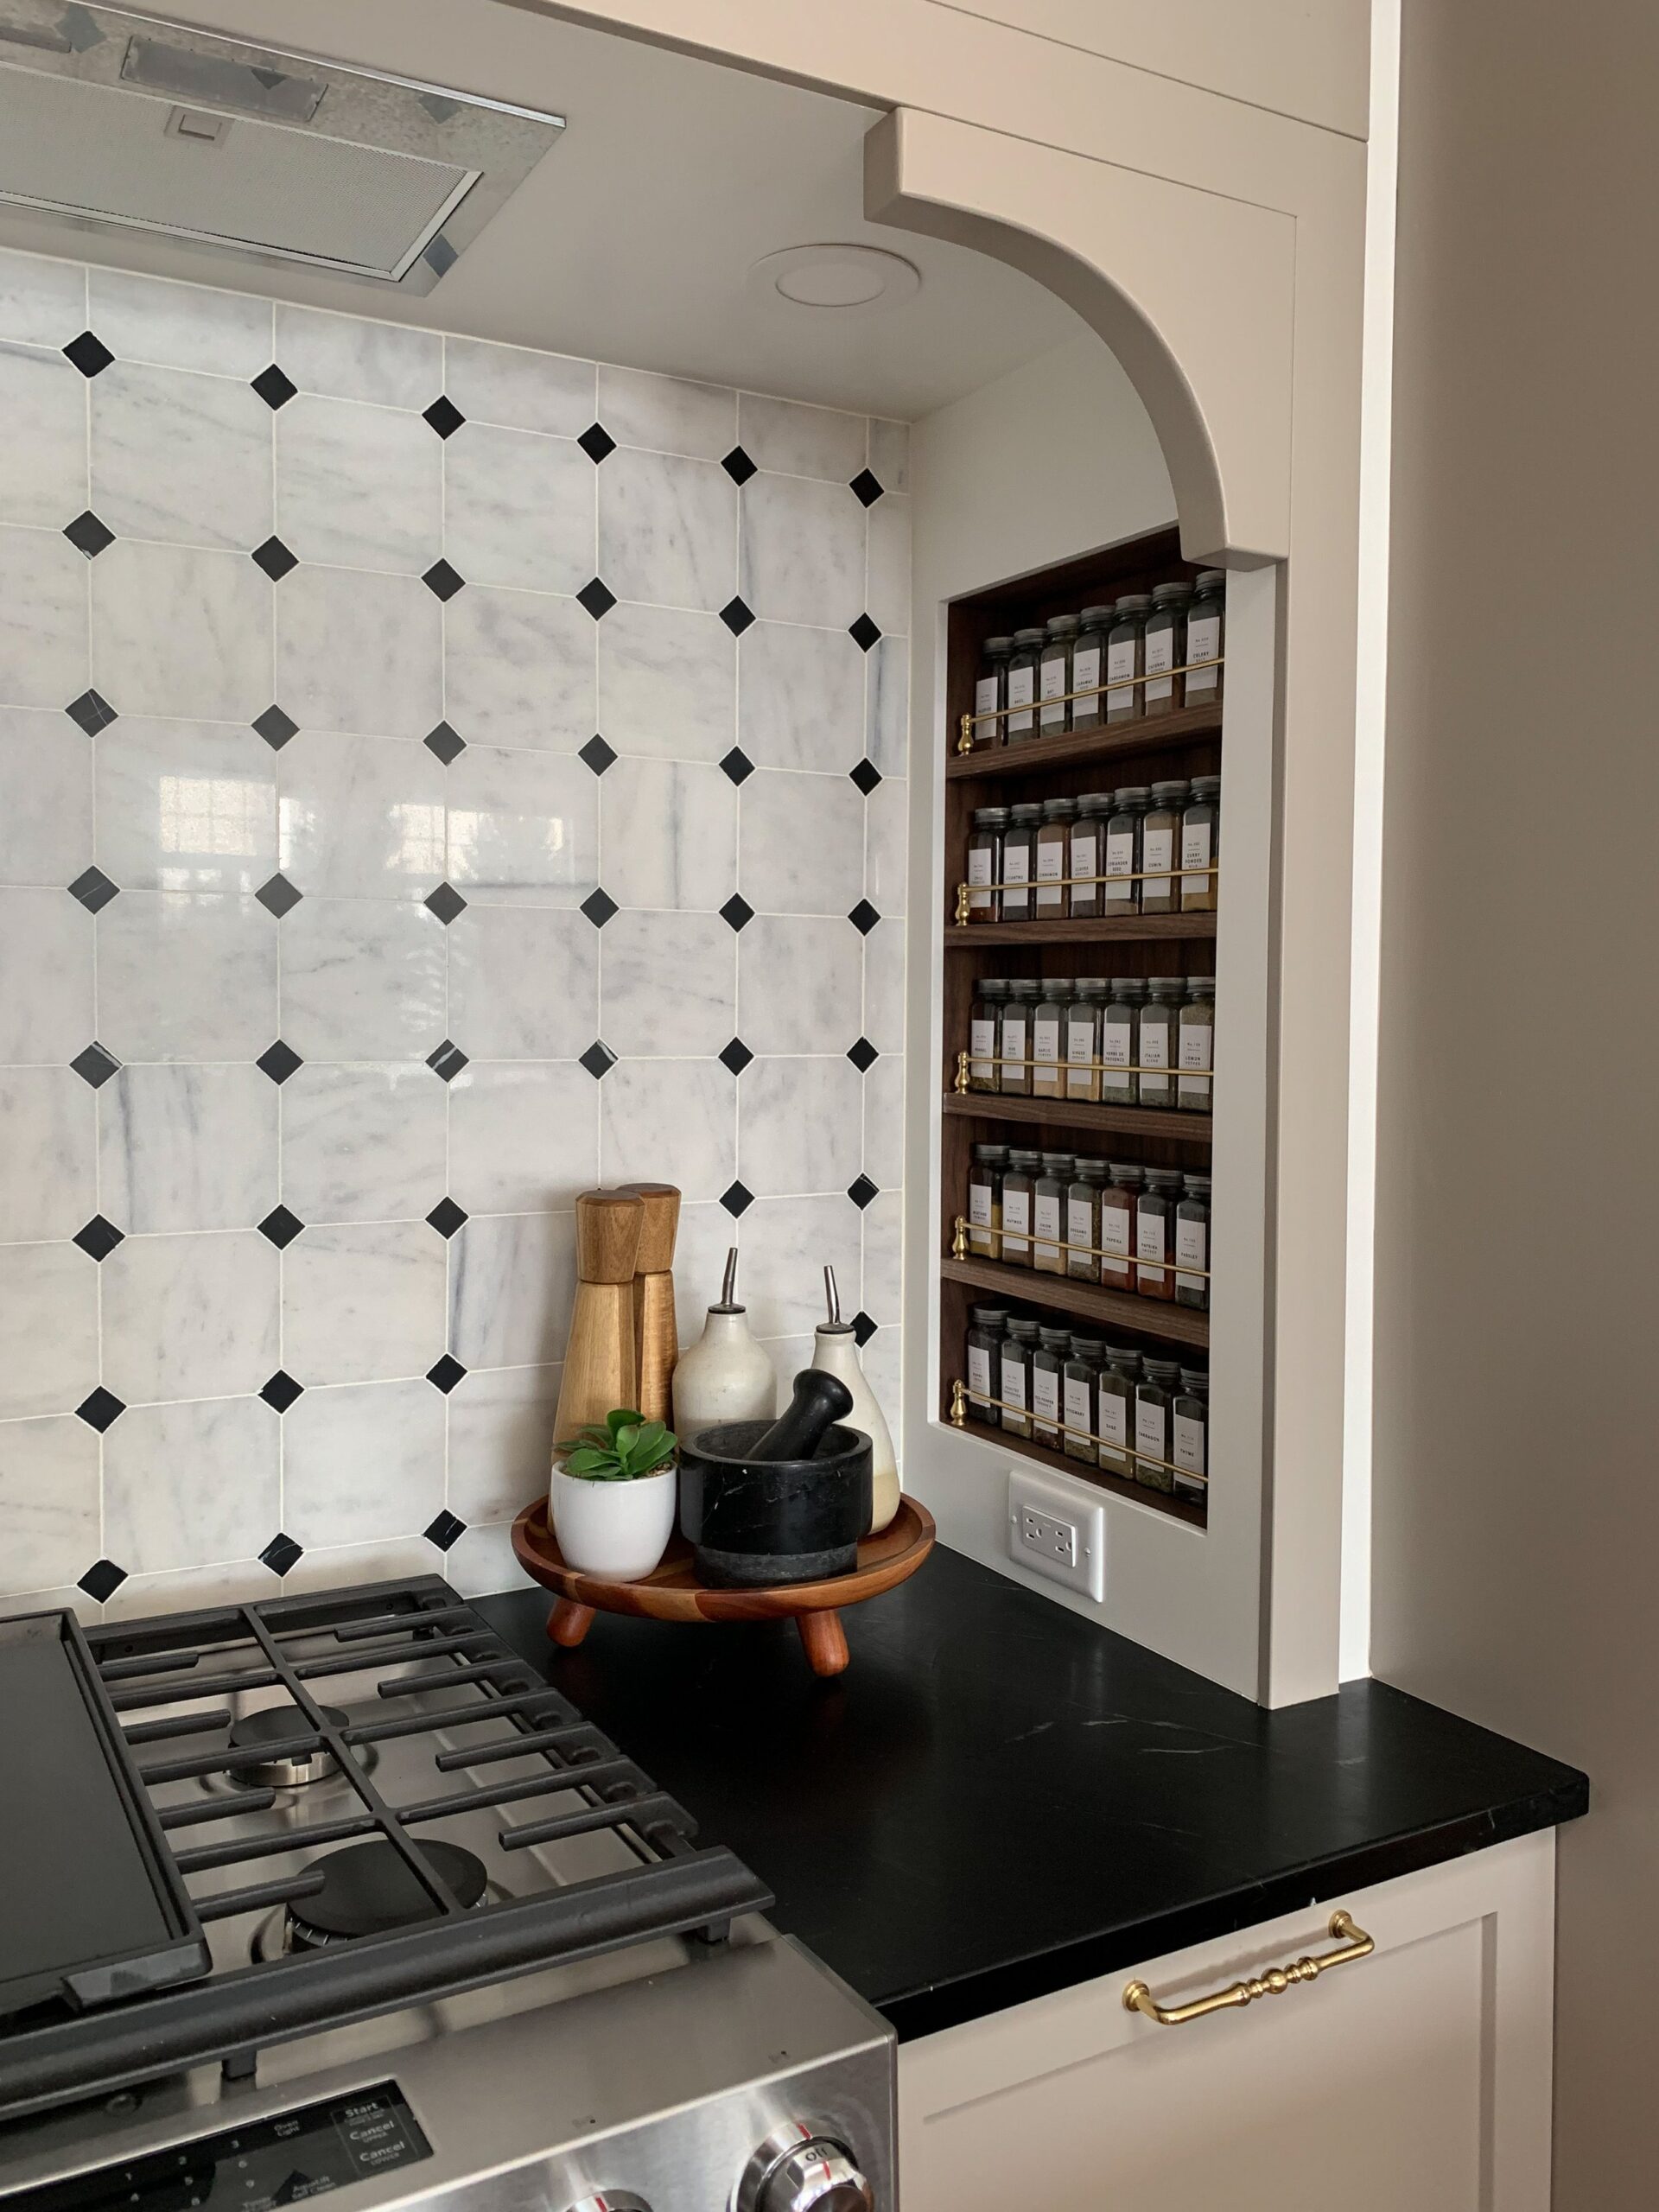
Spice rack
To balance the opening for the coffee maker on one side, I wanted something the same shape on the other side of the range nook, so I included a recessed spice rack, just deep enough to house spice bottles. I added a little brass rail to the shelves and bought all new bottles and labels so my spices would look super cute on there. (Fun fact – I sized the spice rack and shelves to perfectly fit all these bottles!)
Vent and Arched Toe Kick
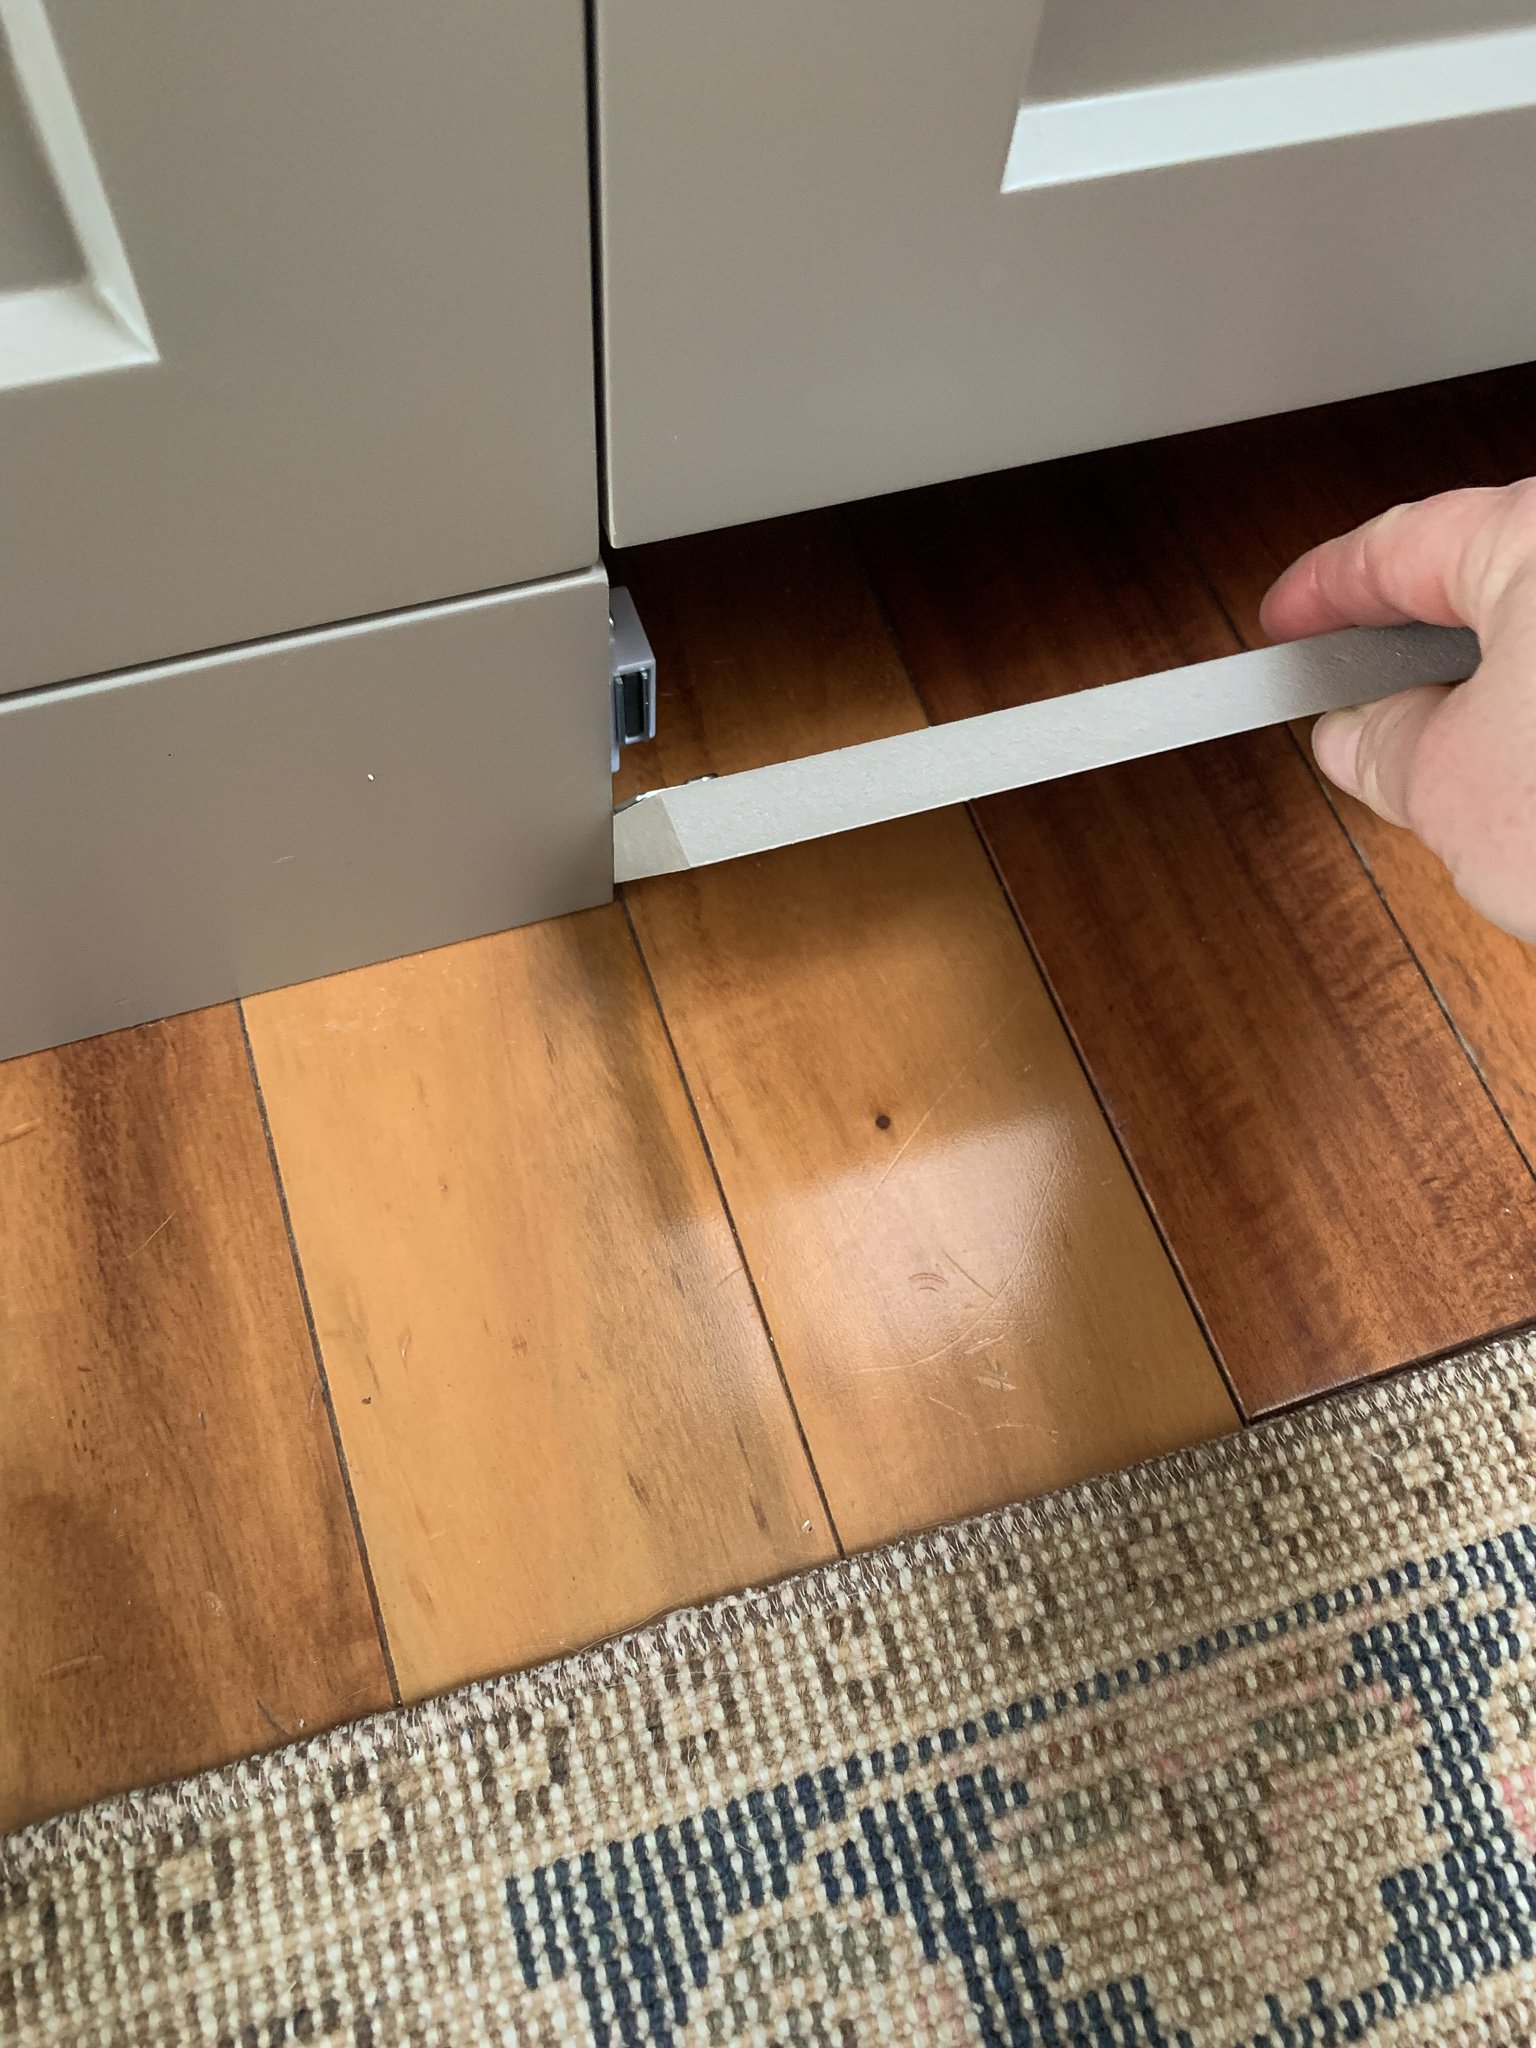
I had a vent for heating/cooling under the sink previously that needed to stay and I didn’t want to have the vent cover front and center in the toe kick area, so we asked AllStyle to make a custom arched toe kick for the sink cabinet. Then, we built our own recessed vented toe kick with a bunch of little holes to allow airflow and it’s just the cutest little vent now – if there is such a thing as a cute vent! I wrote all about our cabinet toe kicks in this post!

Microwave Cover Panel
We reused our microwave from our old kitchen but instead of reinstalling the very wide stainless steel trim kit, we asked AllStyle to make us a cover panel to match the cabinets with some cutie little vent holes cut out and I love how it came out!

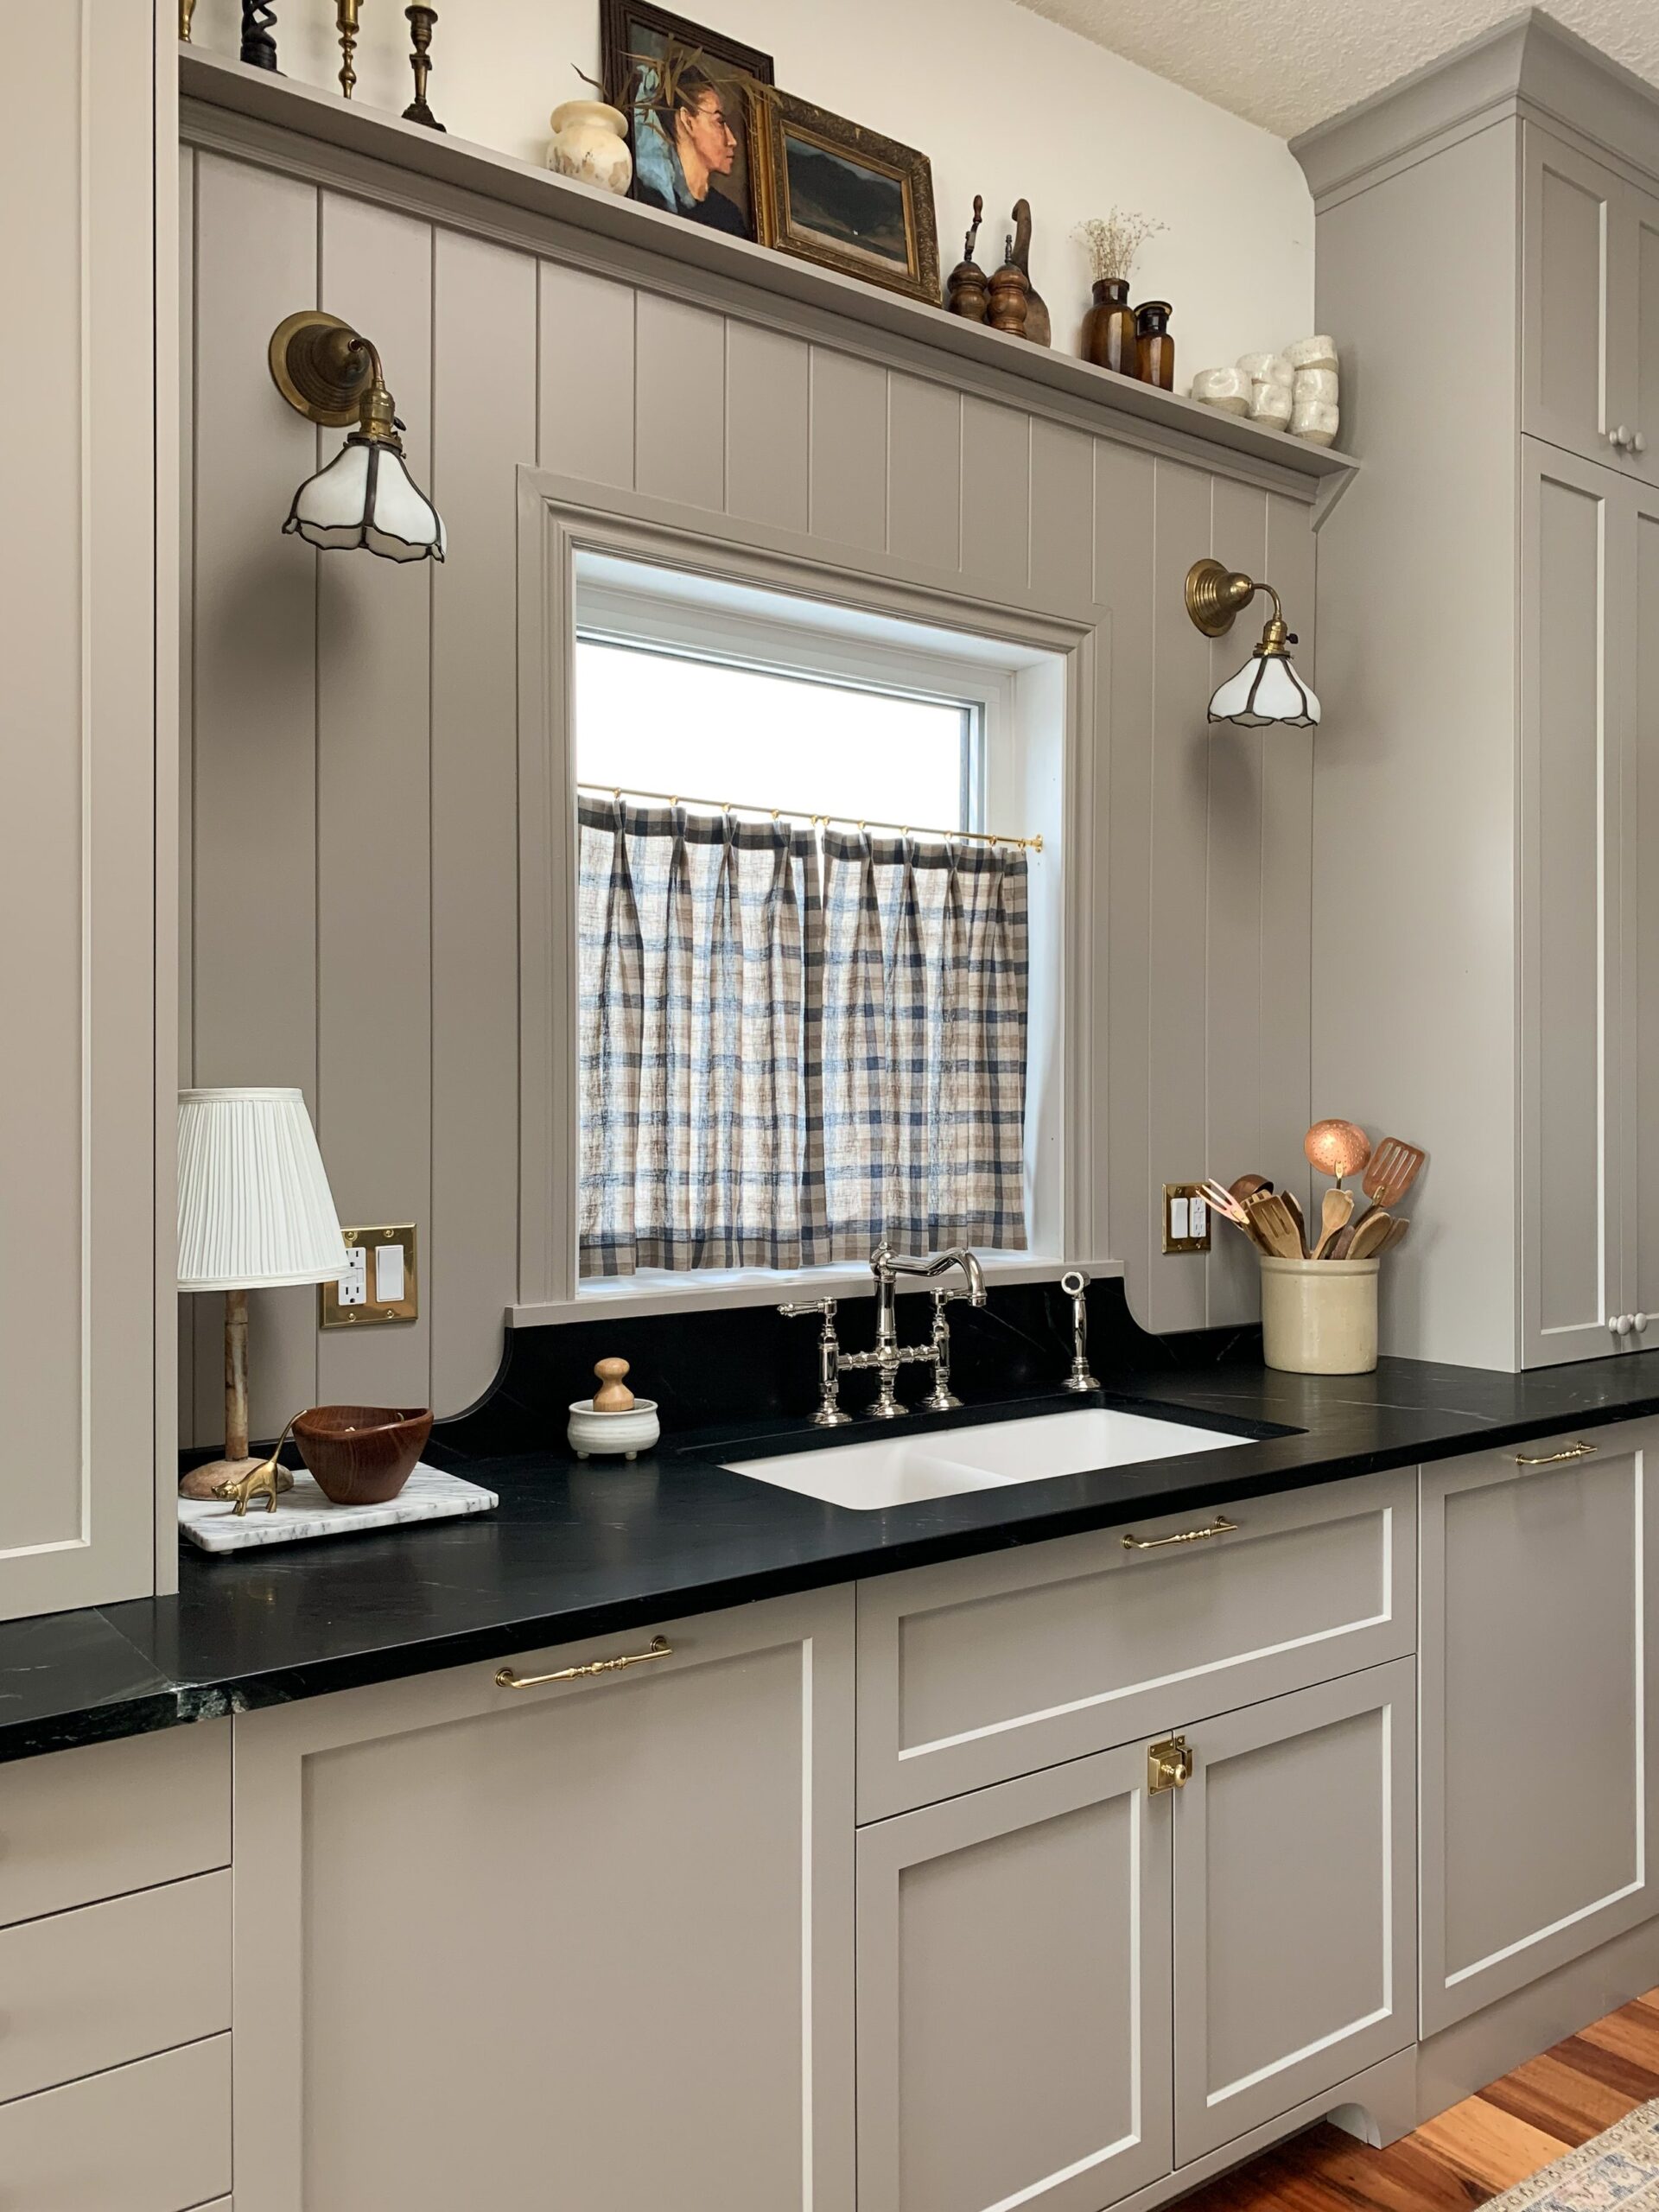
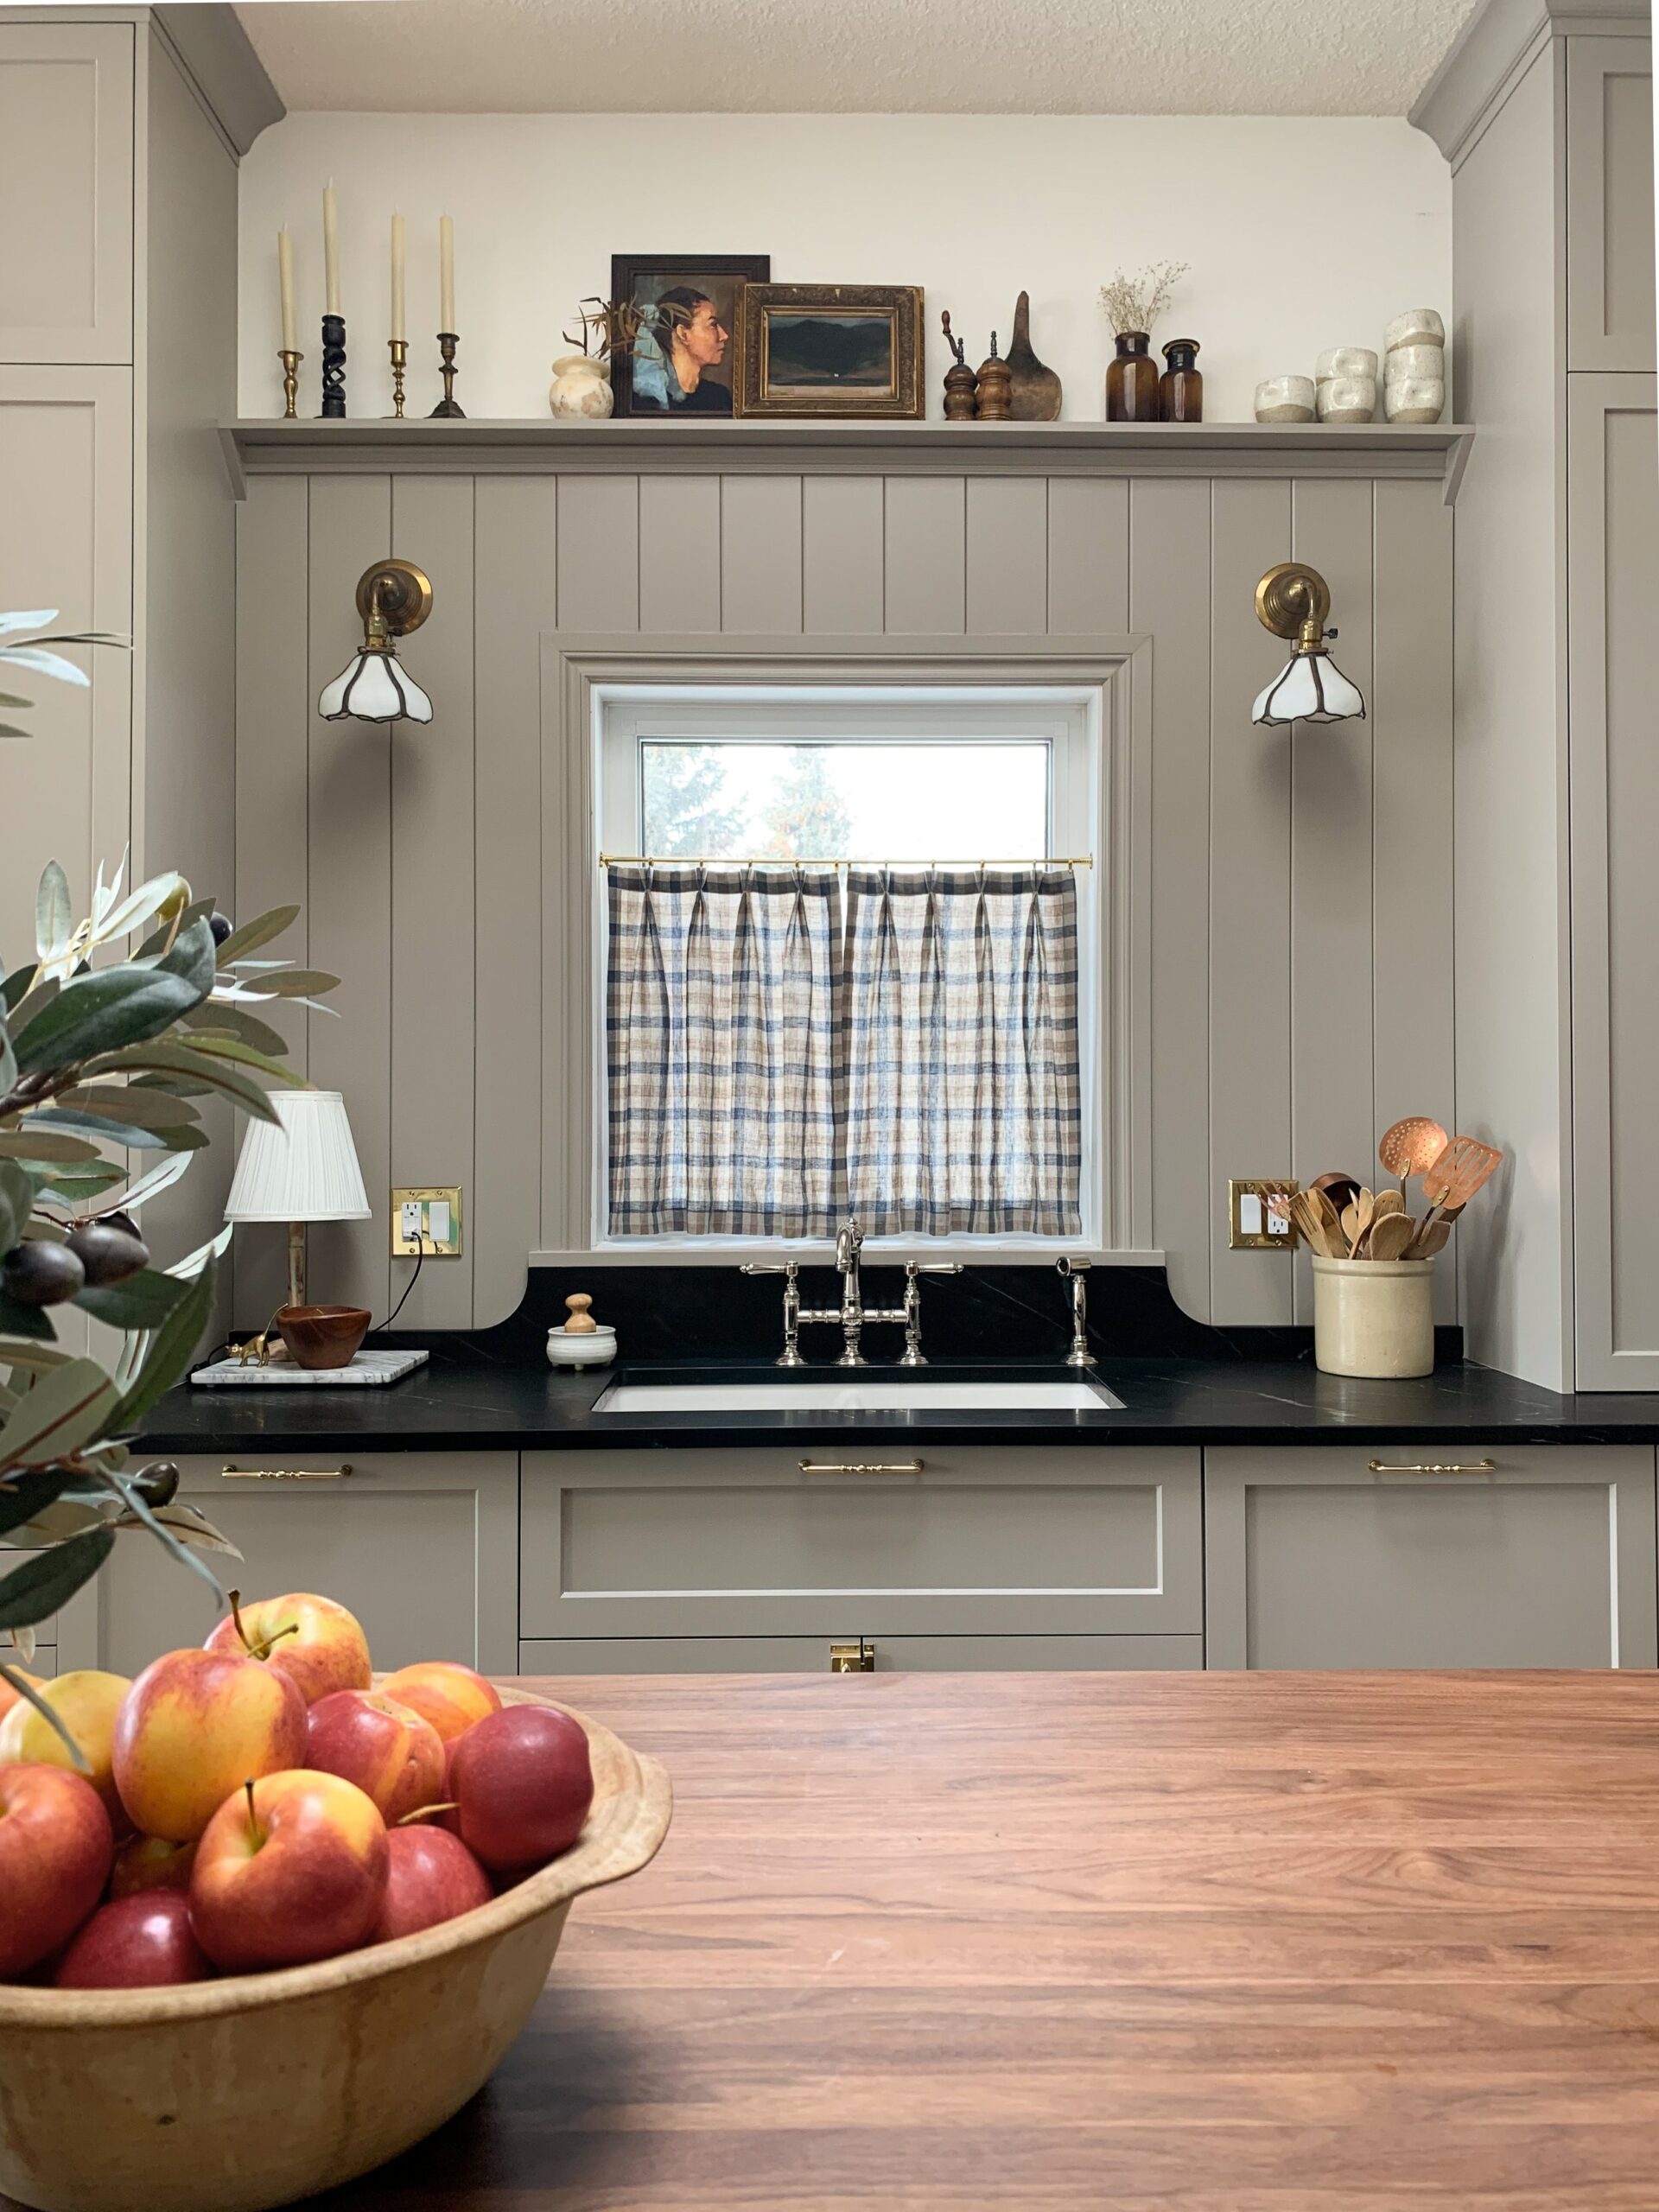
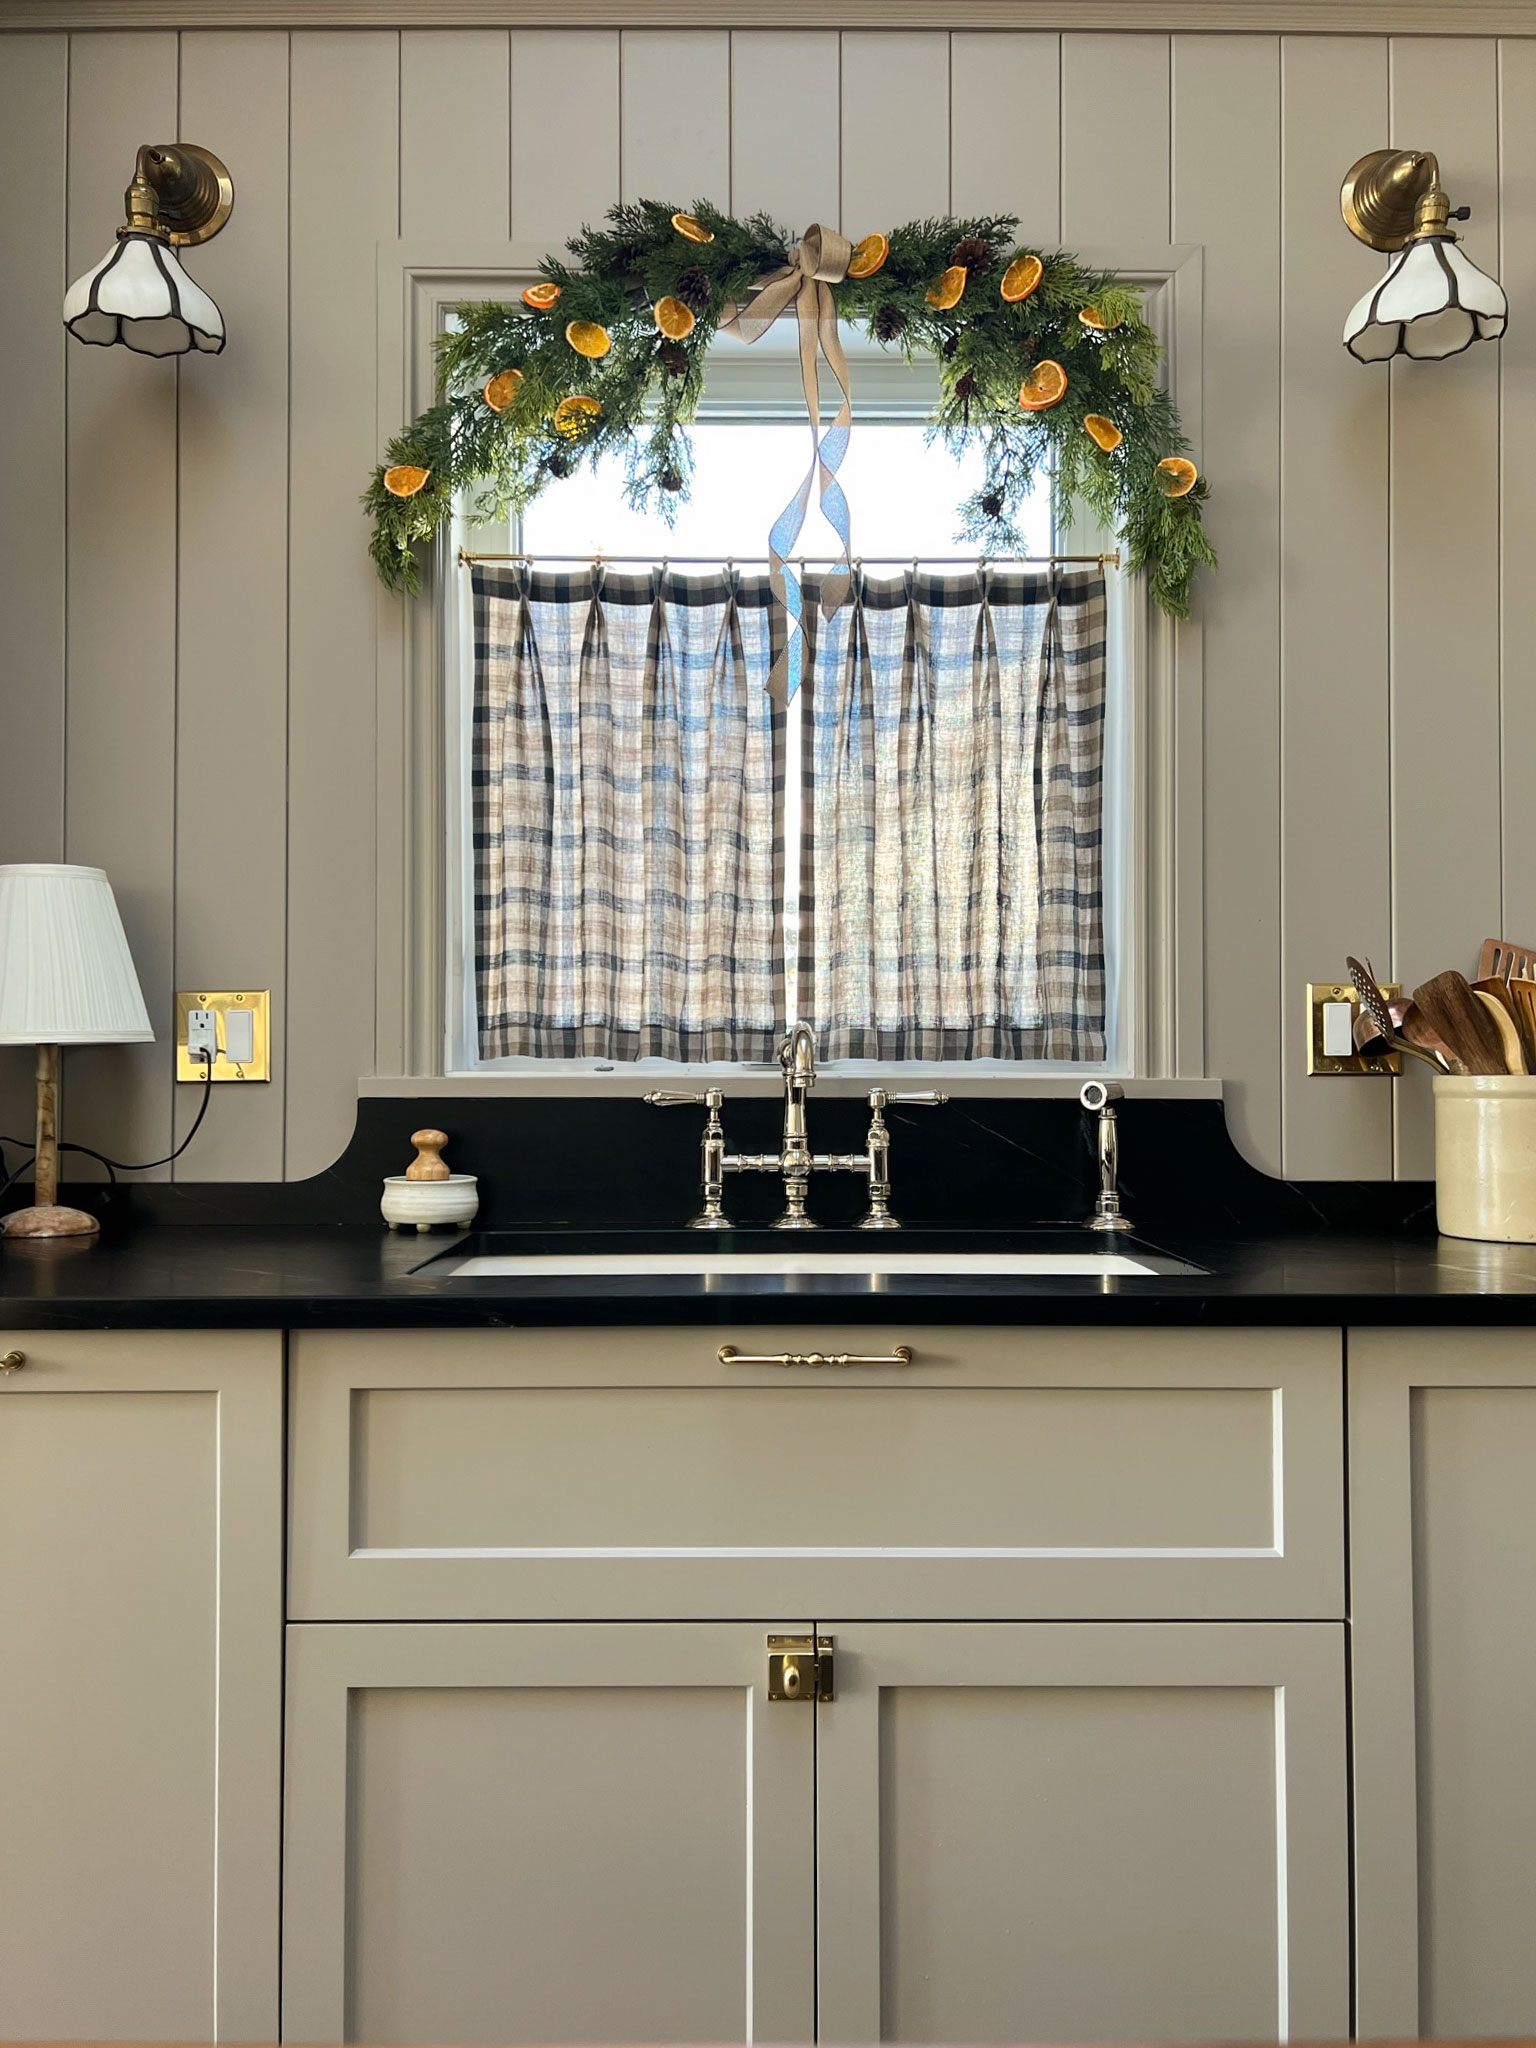
Shelf and Backsplash on the Sink Wall
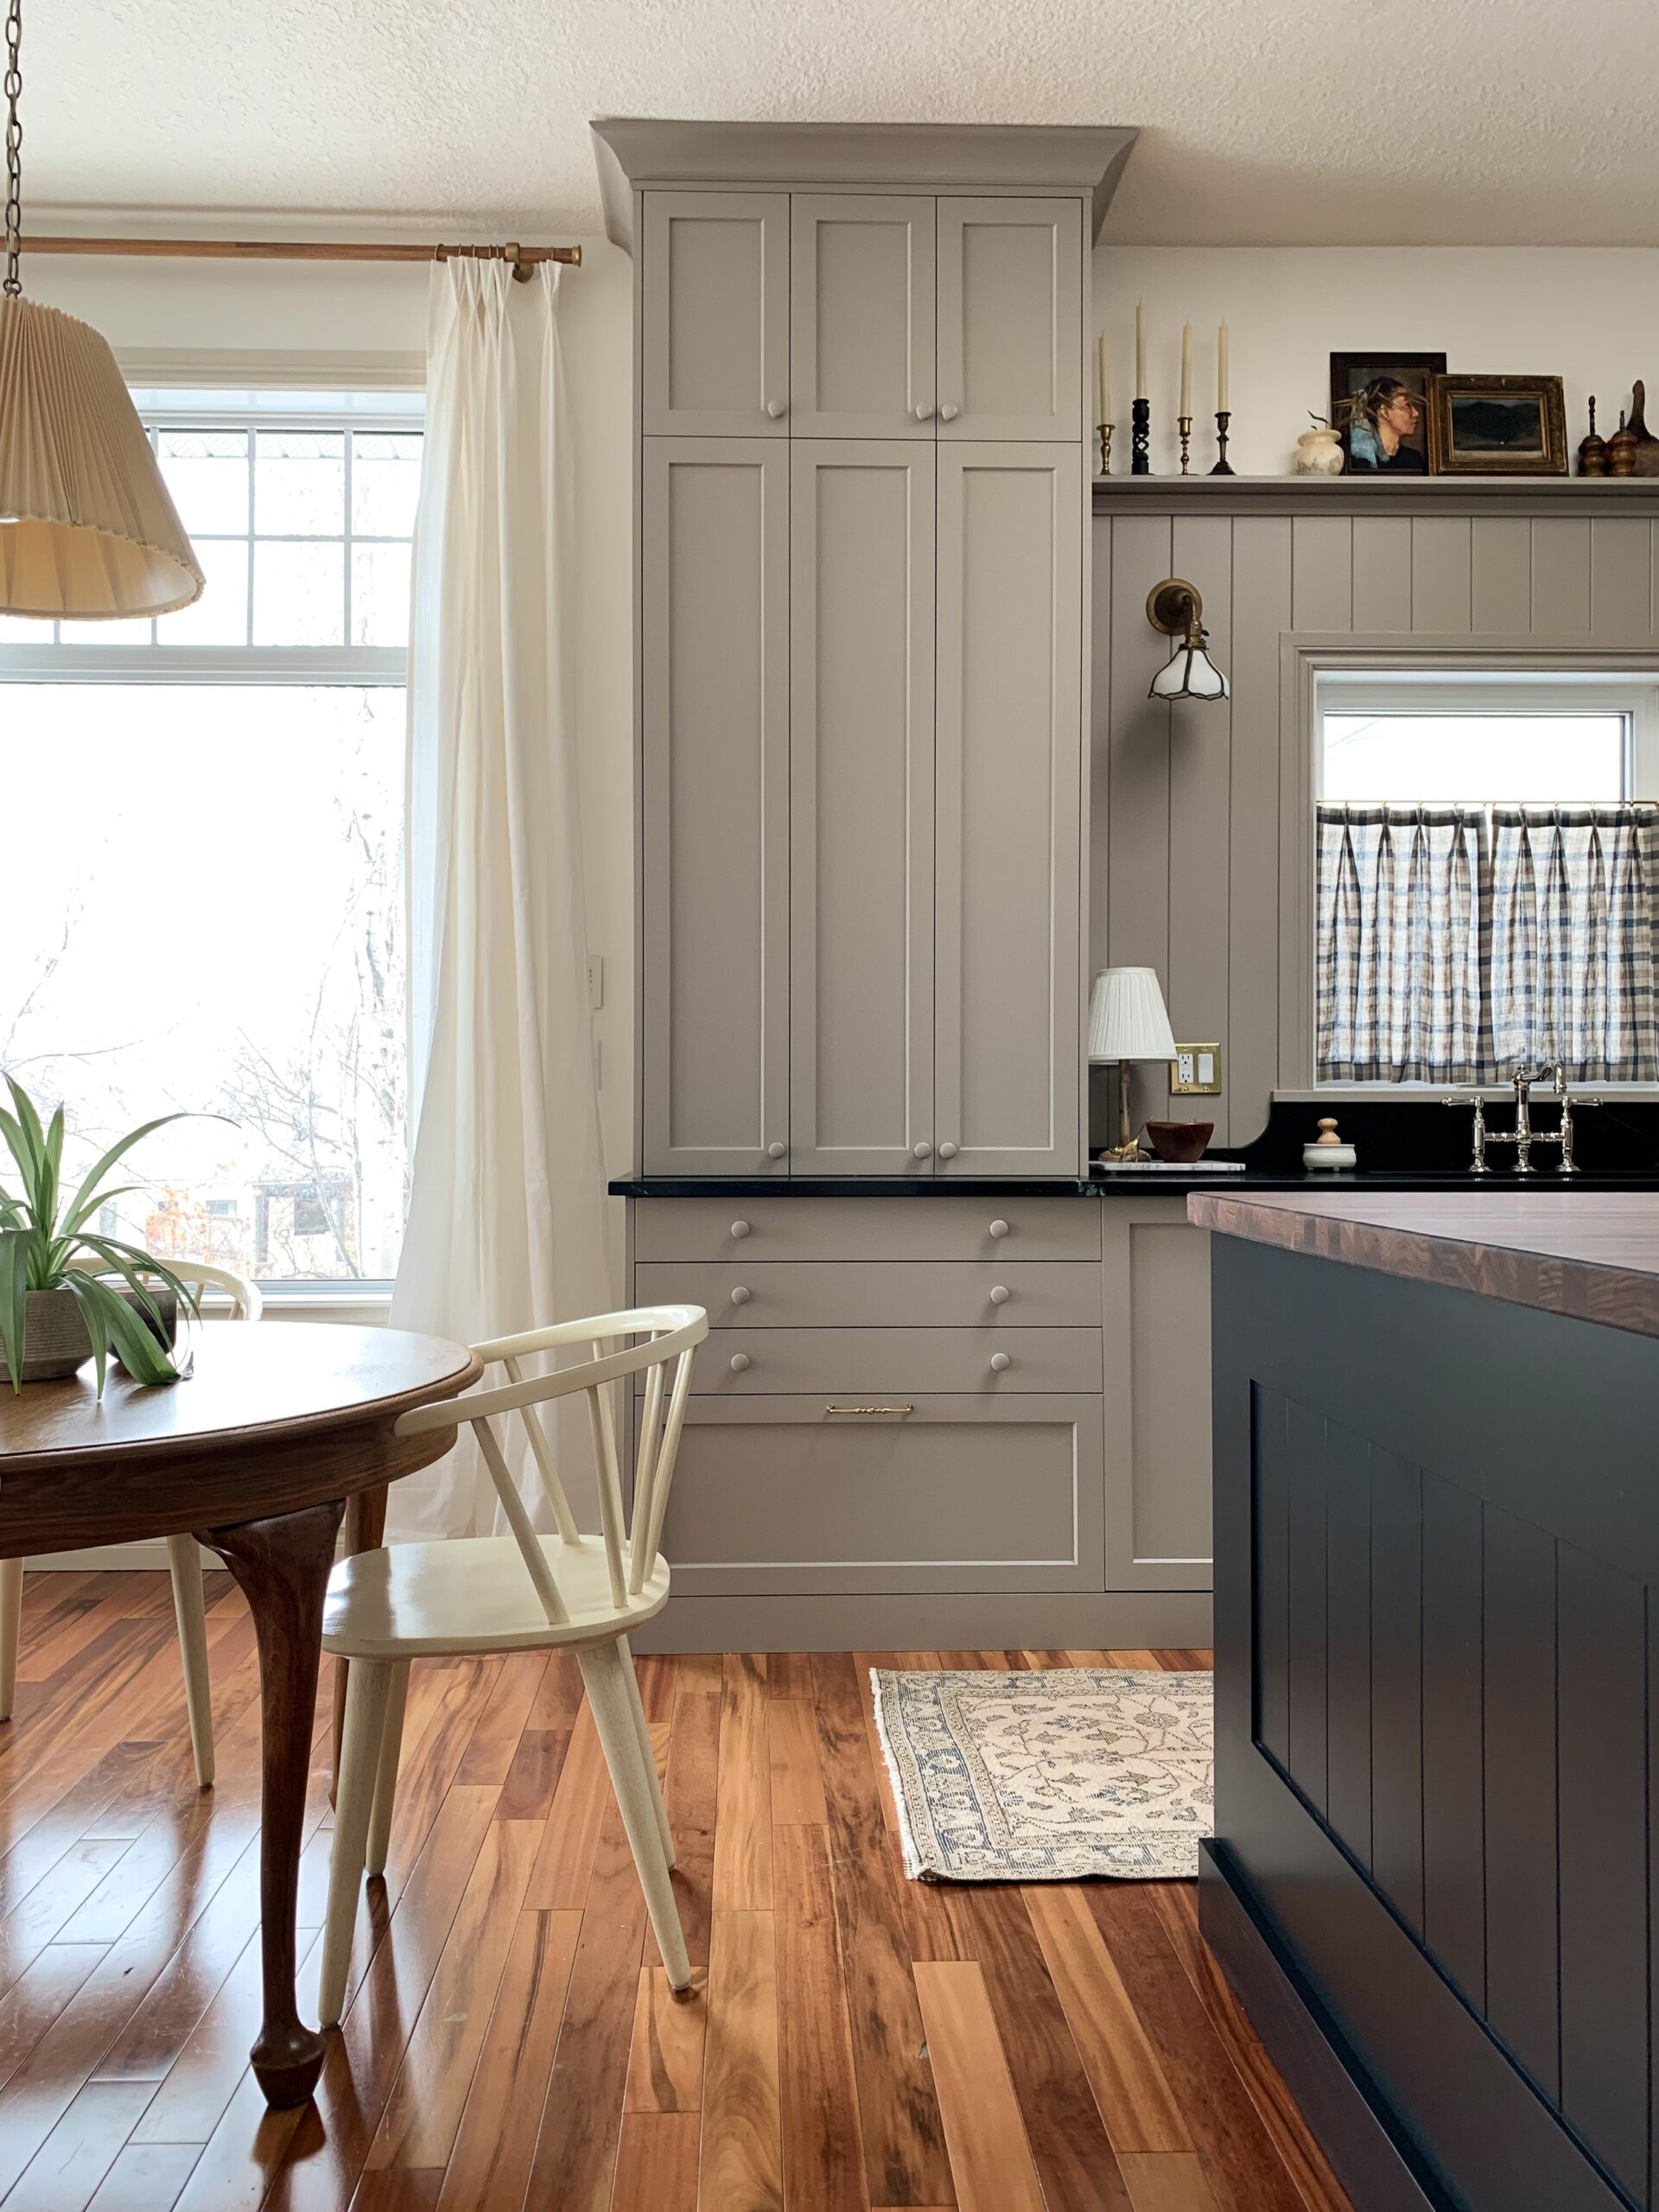
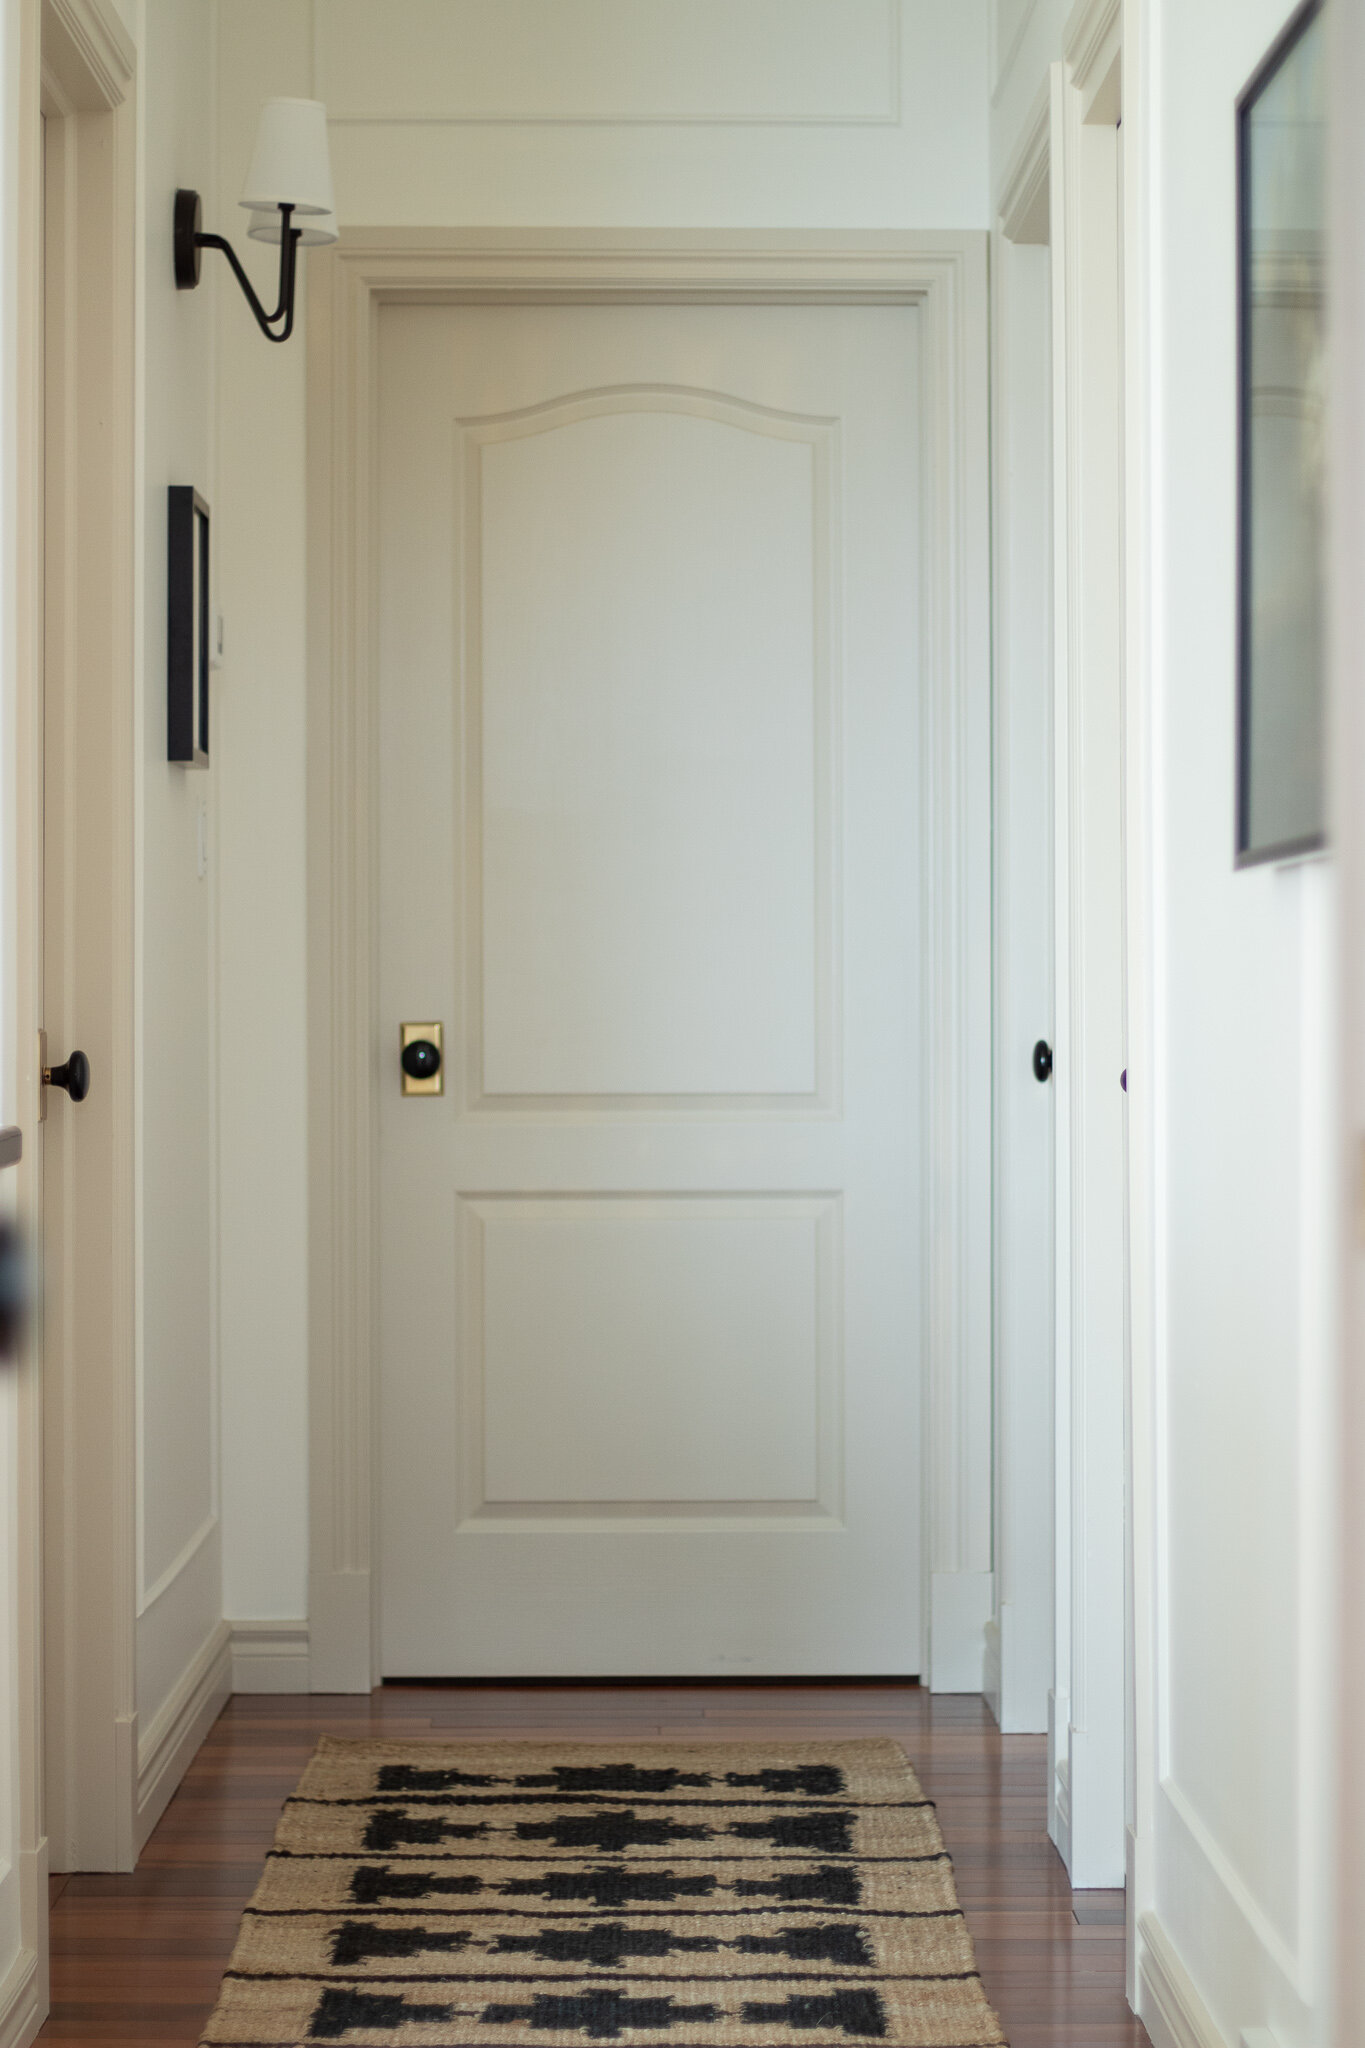
When Katie (@housewithhome) and I designed the tall countertop cabinets on either side of the window, Katie made the comment that we should consider making the window a bit bigger because it looked a little squatty next to those tall cabinets and 10’ ceilings, and she was not wrong! But Replacing the window wasn’t in the budget, so instead, I added panelling partway up the wall and a little shelf between the window and the ceiling to make use of this space and draw the eye up. This wall is maybe my favourite view in the kitchen now, and I have a spot to display some antiques and pottery, and a place for my vintage sconces.
I knew from experience that I didn’t want panelling behind my sink, that I needed something more waterproof. I asked the stone company to make me a backsplash out of soapstone that went from 2” away from the sink and curved up to meet up under my window sill. It adds just a little something and I’m so glad I asked for that instead of just a straight piece of backsplash.
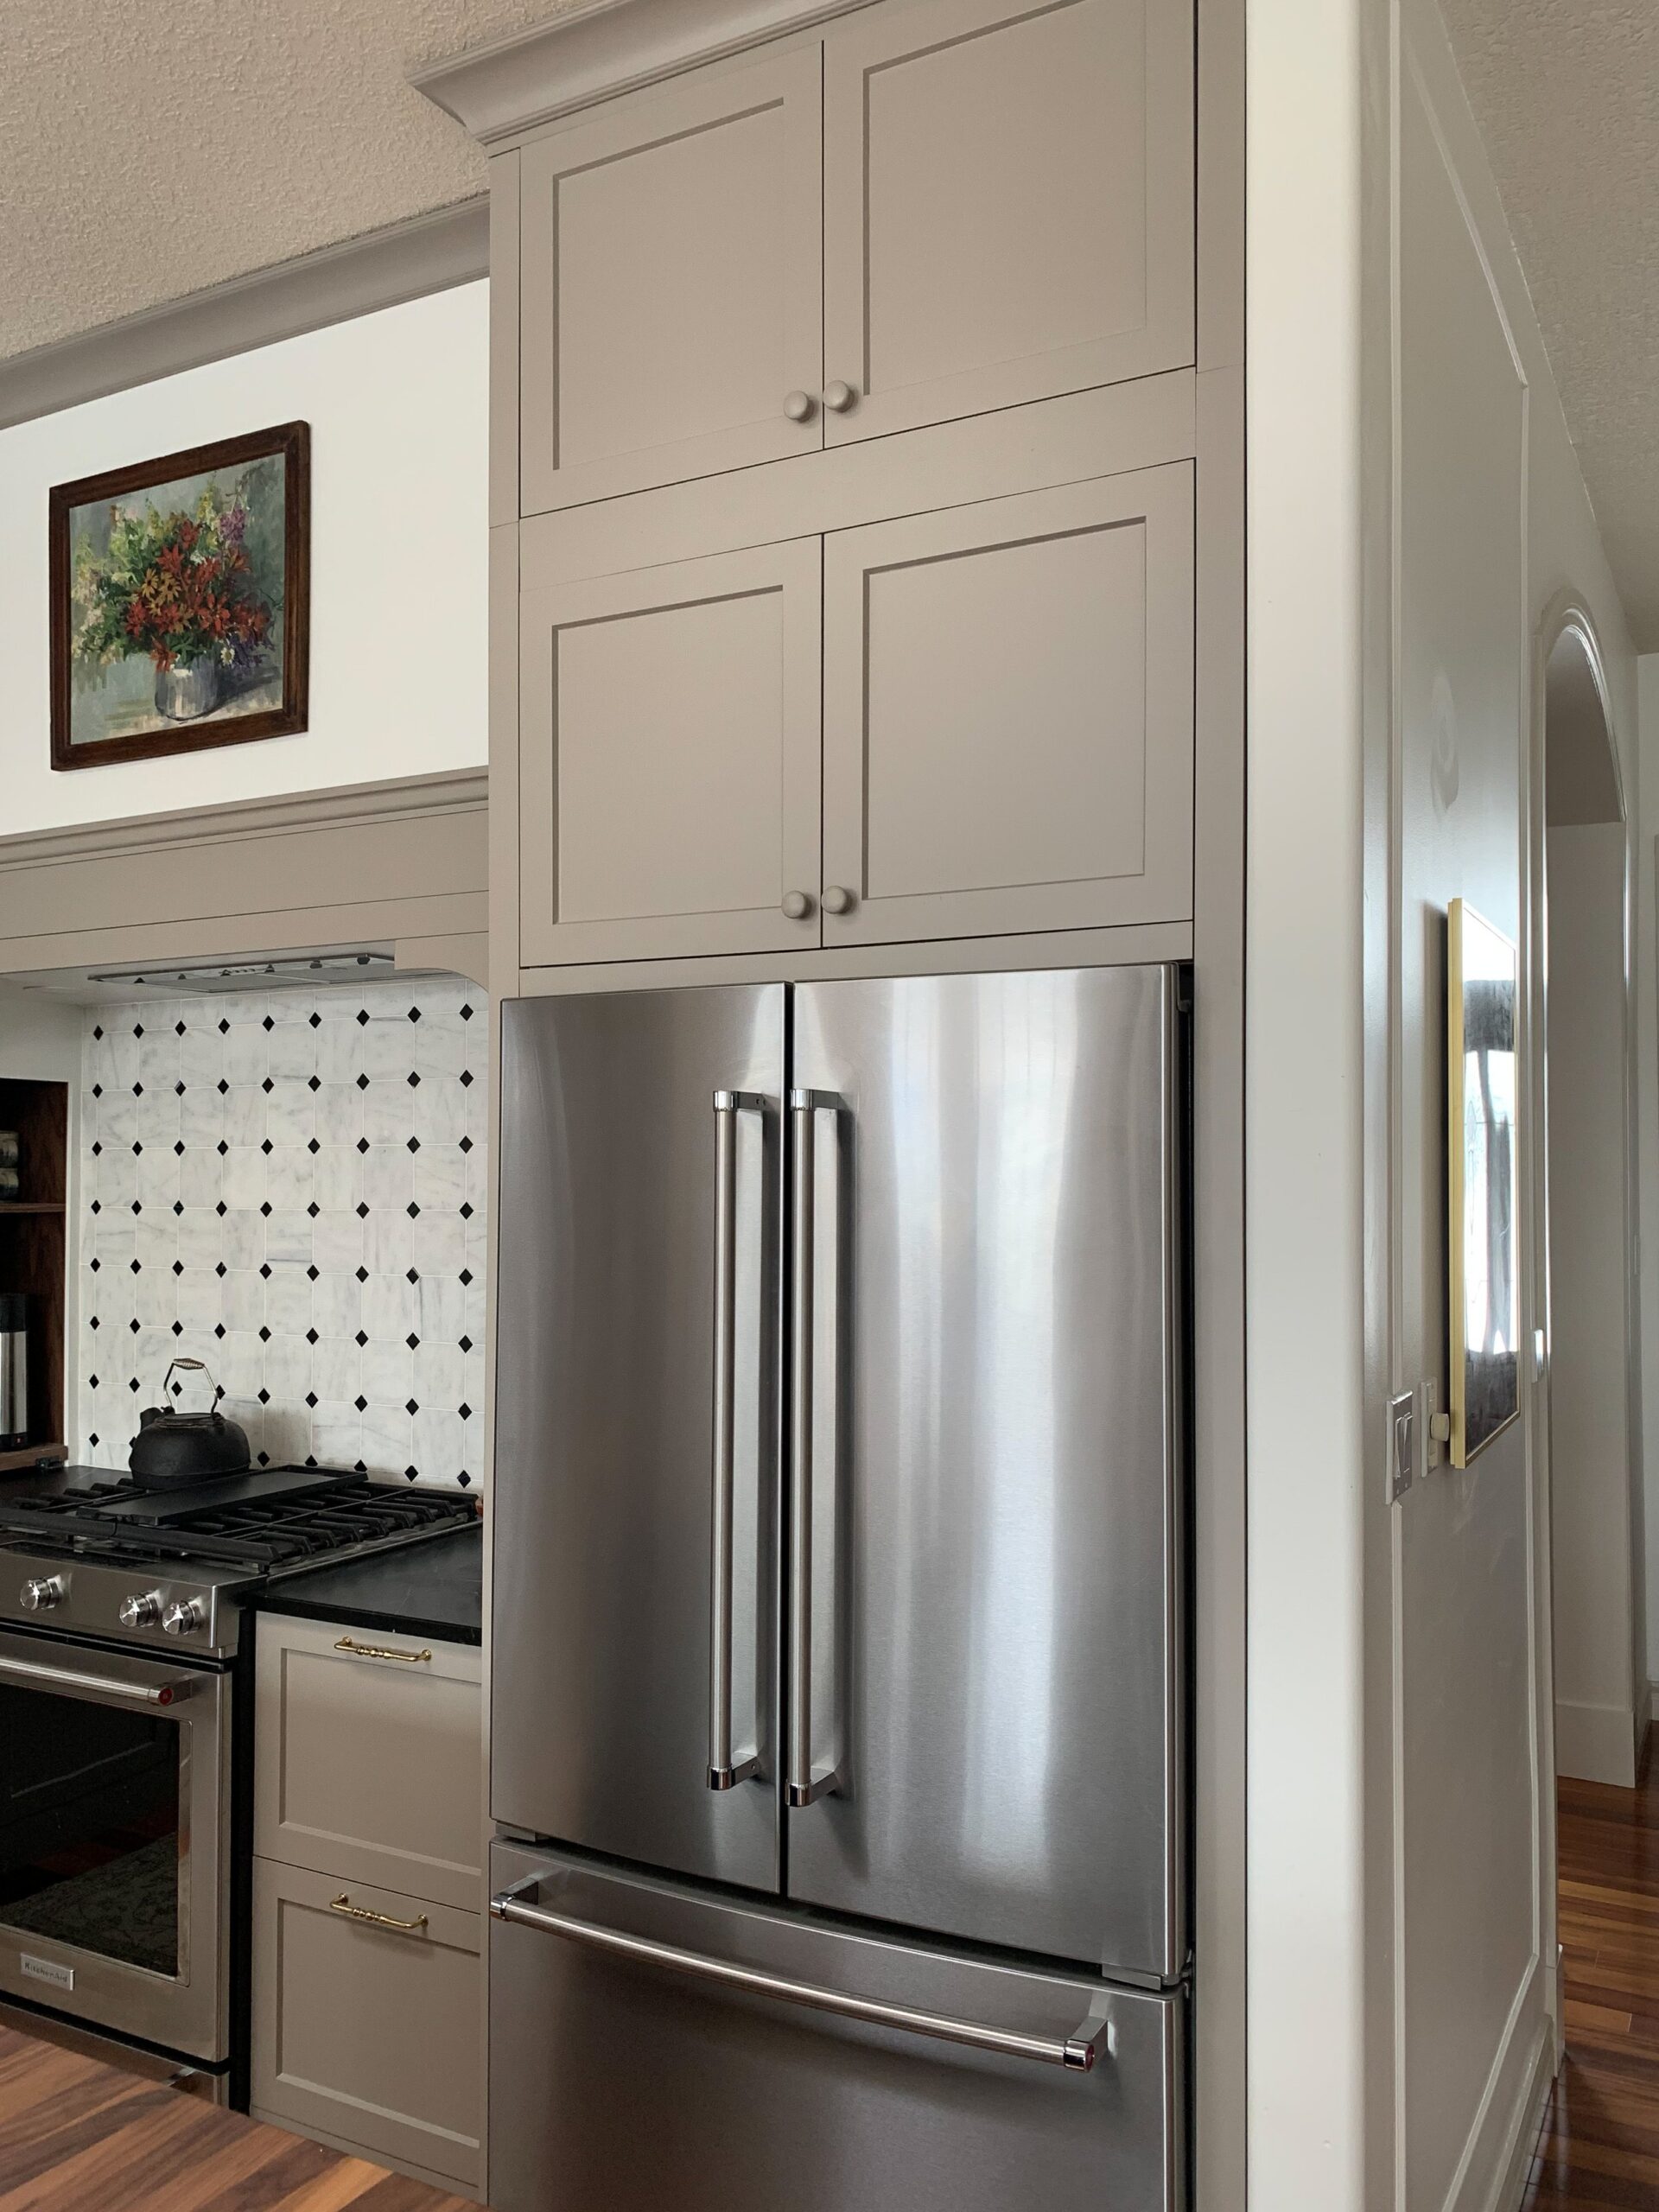
Trim Around Fridge
Instead of a skinny side panel next to the fridge, I asked AllStyle to do a 2” return on the side panels so that the fridge would look more built-in (basically, instead of having a ¾” thick side panel the sides appear to be 2” thick). Then we pulled the upper cabinets away from the wall so that the cabinets would appear to be deeper and be flush with the fridge, making it look a LOT more built-in. This was a little detail that was actually pretty finicky to do but in the end, it looks so much better than if we had gone with standard side panels and the fridge sticking out past all the cabinets.
Dishwasher Toe Kick
Often in kitchen designs (even high-end kitchens!) I’ve noticed that when a panelled dishwasher (that is a dishwasher that has a cabinet front attached to it) is used they often leave off the toe kick in front of it. It’s obvious why they do that but also, I thought there must be a solution to this visual problem! I had a good look at how my dishwasher opens and it turned out all I had to do was to angle the toe kick so the door could open, and include a couple of little magnetic clasps so the toe kick can be easily removed if the dishwasher ever needs to be pulled out. I wrote all about that and the design and construction of my toe kicks in this post!
Custom Tile and Range Hood
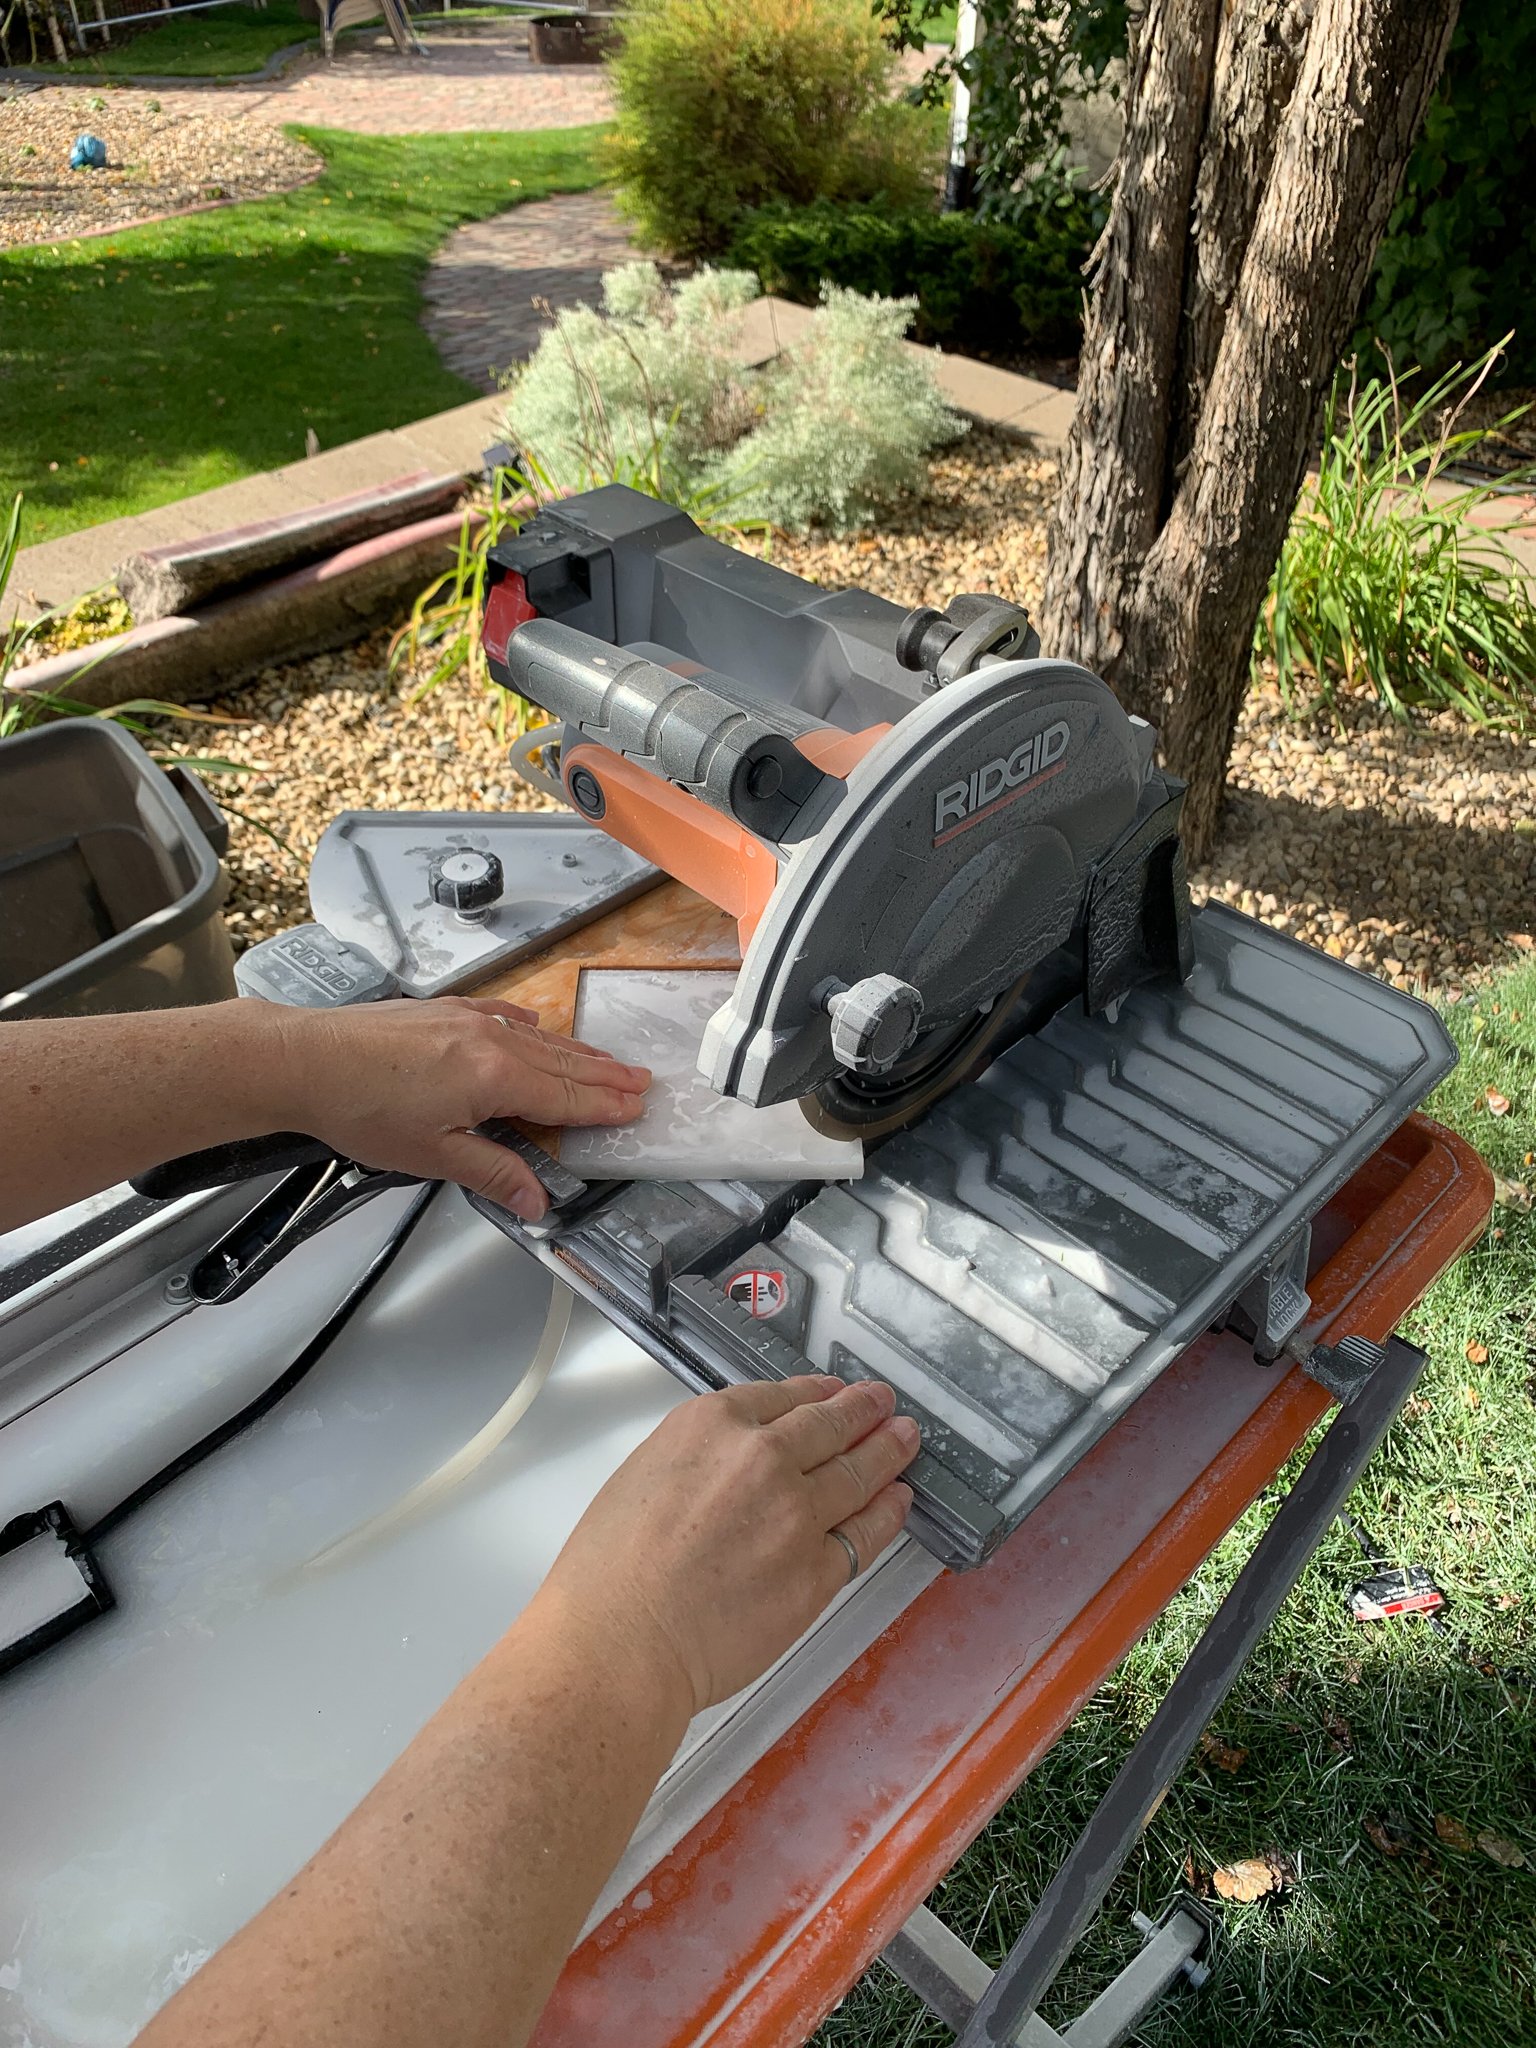
I had a very specific idea in mind for my backsplash and could not find what I wanted ANYWHERE. After a lot of going in circles, I ended up cutting it myself! I wrote a blog post on it and you can read all about how to do it here.
In the range area, I wanted a built-in hood and I went back and forth on a few styles and designs for the hood surface itself. In the end, I decided to just frame out a simple box, add some trim and corbels to build it up a bit, and leave the hood itself white. I love how the corbels changed the shape of the opening to an almost arch-like shape which is a nod to other arches in my house. It’s a traditional detail but modern in its application.
Sources
Besides the obvious Ikea cabinets that we used to build our DIY Ikea Kitchen, there are many other parts that went into this. I have plans to do more detailed blog posts about some of these details and how we did them. If you are wondering where something is from, I’ve included sources here:
Cabinet colours – perimeter Benjamin Moore Indian River, Island Benjamin Moore Jet Black
Wall/ hood Colour – Valspar Swiss Coffee
Cabinet Frames – Ikea
Cabinet Door Fronts and Panels – AllStyle Retrofit (discounted)
Island Top – Caribou Block in Walnut (Discounted)
Perimeter Counter – Black Soapstone by Dittmar
Brass handles – Emtek (gifted)
Brass latch – Emtek (gifted)
Wood Knobs – Amazon (and painted by yours truly)
Brass Rails for Spice Rack – Vintage Hardware
Spice Bottles – Amazon
Spice Labels – Amazon
Walnut plywood for spice rack and cubby – Windsor Plywood
Various trim pieces and panelling – Windsor Plywood
Faucet – by Rohl
Sink – Elkay
Vent Hood – Faber
Fridge – Kitchenaid
Stove – Kitchenaid
Dishwasher – Bosch
Microwave – (old)
Stools – vintage
Sconces – Vintage (Etsy, this shop)
Corner Cabinet Pull Out – Rev-a-Shelf
Garbage Pull Out – Rev A Shelf
Garburator – American Standard
Cafe Curtains – Handmade by my Mom! Fabric Here
Cafe Curtain Rods and Clips – Rejuvenation
Rug – Vintage (Etsy – from THIS shop)
Some Final Thoughts about our DIY Ikea Kitchen
Let me tell you, I have so many feelings about this DIY Ikea kitchen. This has definitely been the hardest thing we have ever done. My husband and I worked on it evenings and weekends and I watched so many YouTube videos trying to figure out the best way to do this or that. There are so many things we had never done before or made up and figured out as we went. We did things two and three times in order to get things right. We had lots of fights over the kitchen as one would expect, mostly over the amount of time we were working on it as I tend to be pretty driven and my husband likes to include some downtime in his life! We balance each other out that way, I think I push him to work more and he pushes me to chill more and at the end of the day, we got the kitchen done and still had a little fun along the way.
What I wanted was a kitchen that looks high-end and custom but that didn’t have the high-end/custom price tag. I also wanted to try doing things differently than I had seen before and just making this kitchen really work for our family, both aesthetically and functionally. At the beginning of this reno, I was having such a hard time sleeping as I would just run through all the upcoming details in my mind and wonder and worry about how it was all going to work out! Eventually, I got some melatonin and got some sleep but in the end, those sleepless nights were all worth it. I hope you love my baby (I mean my kitchen) as much as I do. Thanks for following along!
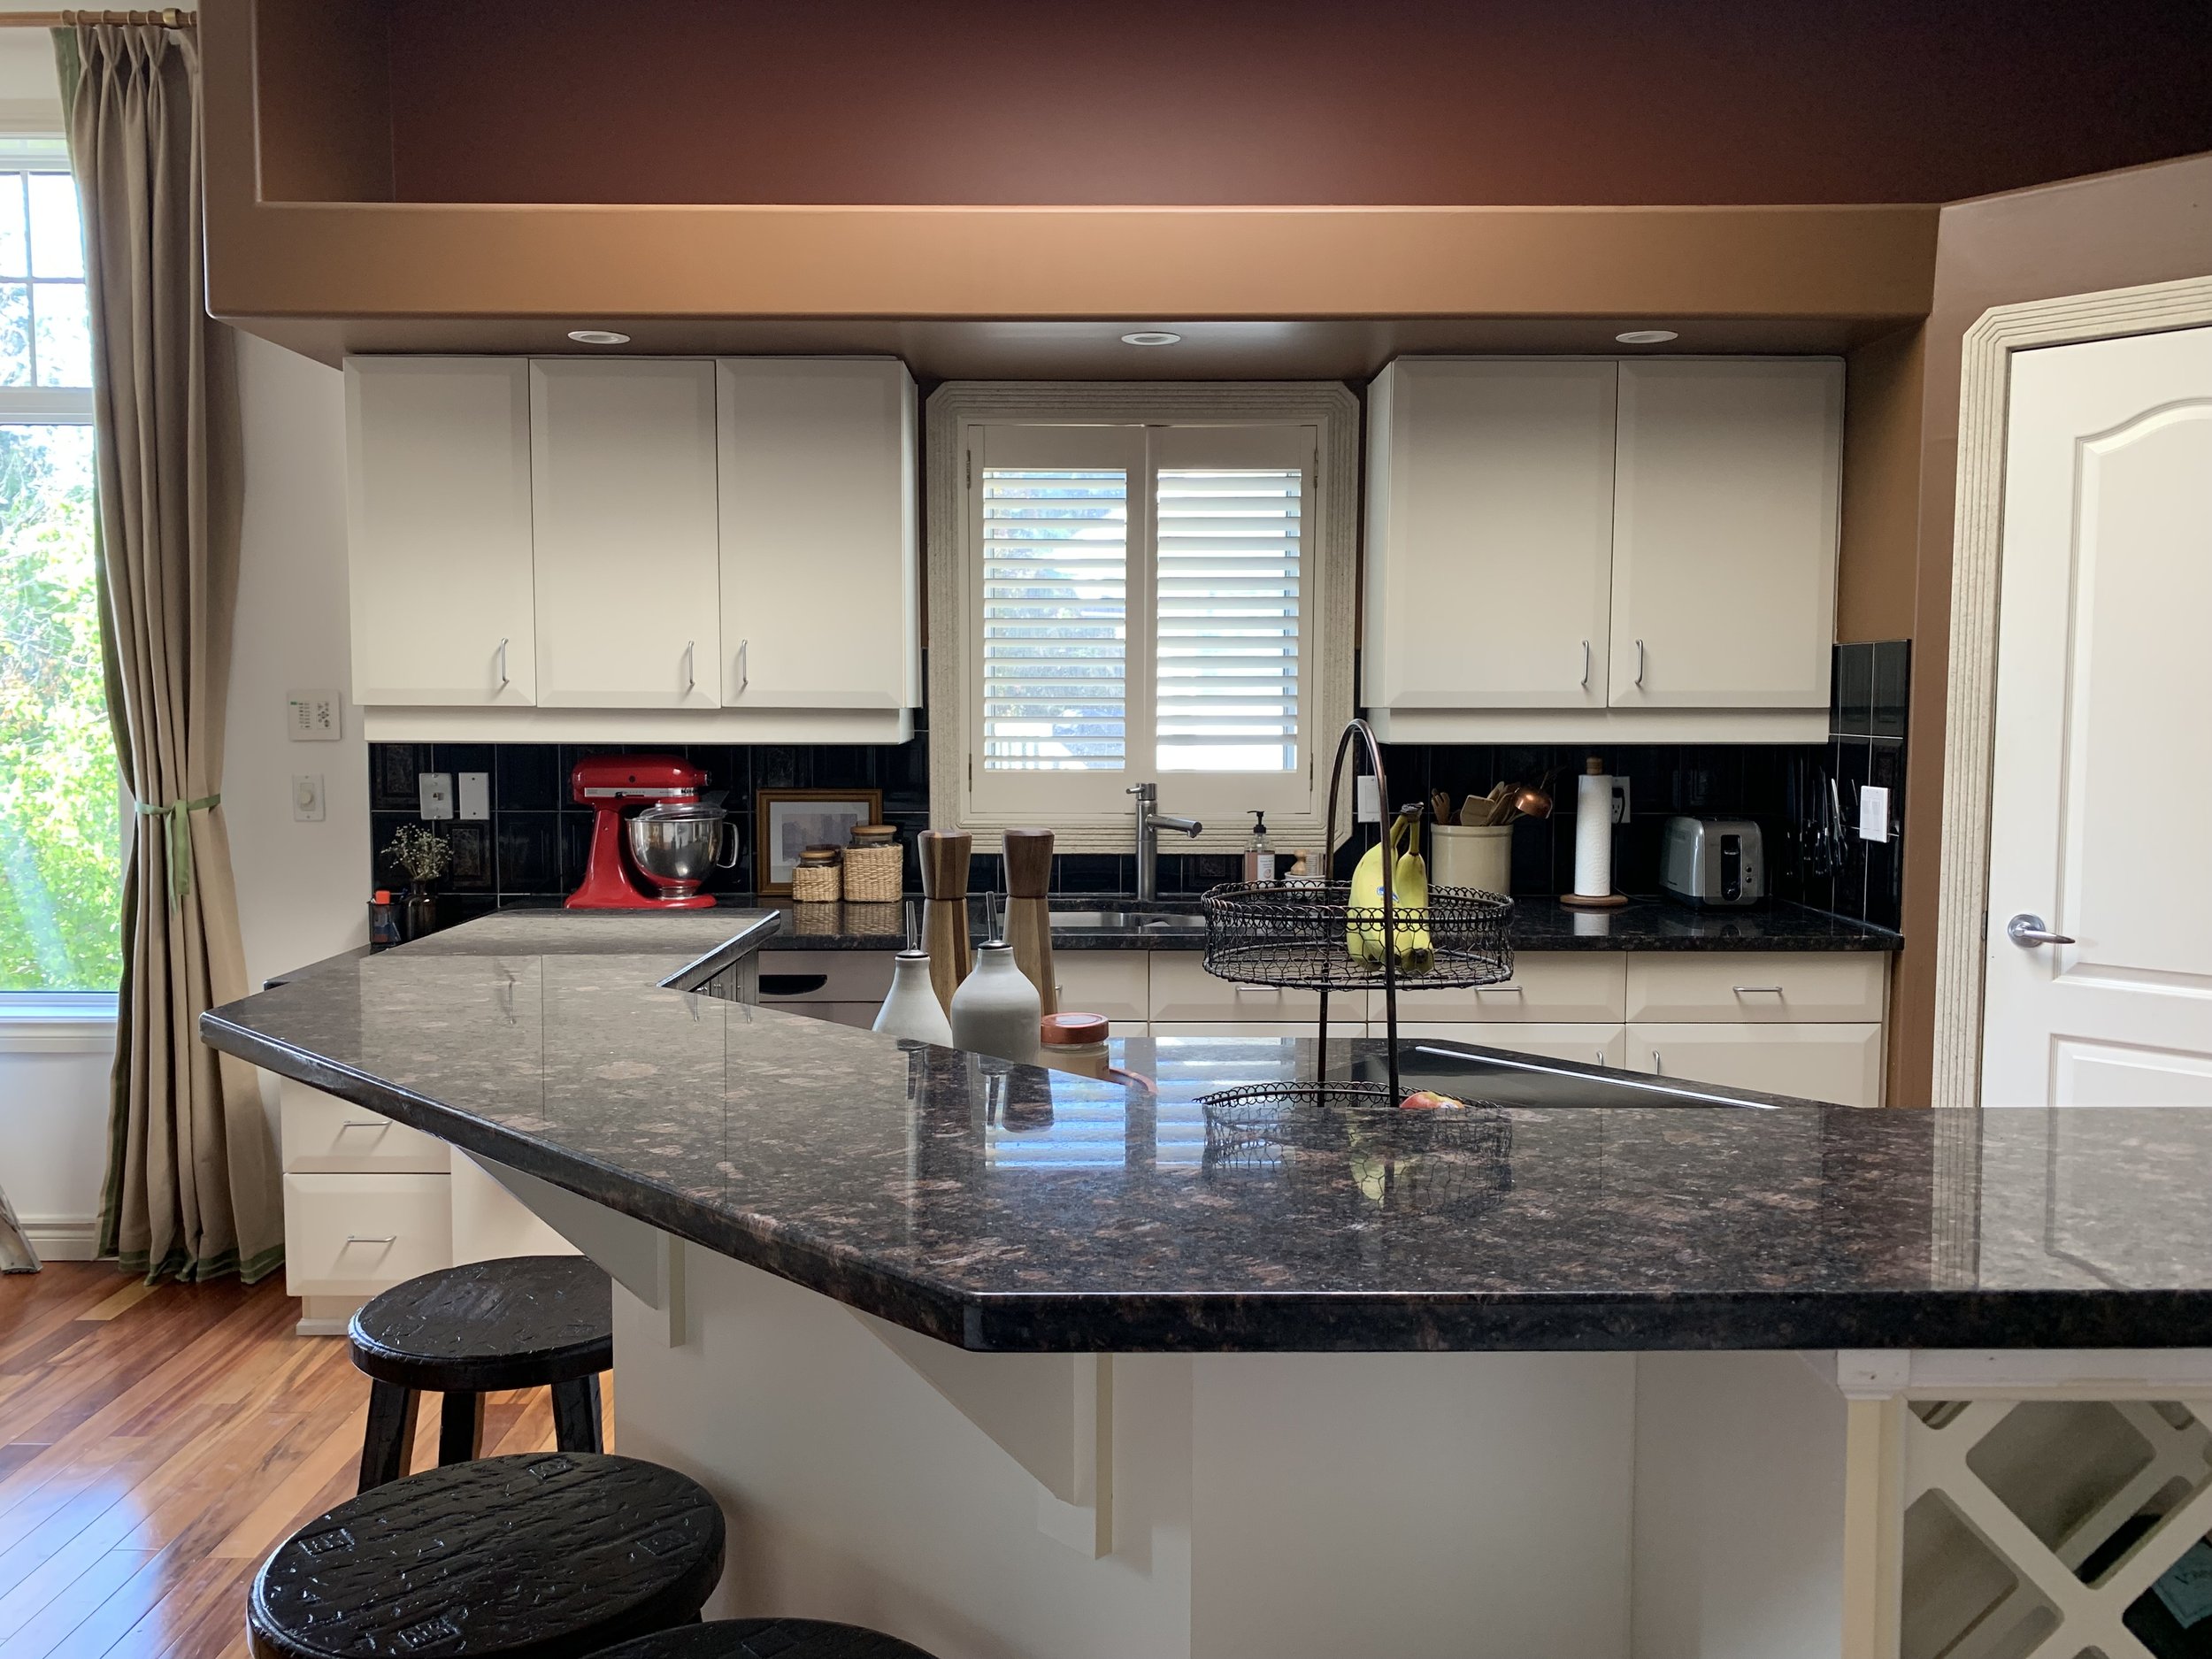
Before and After Side by Side Photos of our DIY Ikea Kitchen
Now, who doesn’t love a side-by-side before and after? Before on the left, after on the right!
You might also like:
- One Room Challenge Spring 2022 – The Guest Bathroom Reveal!
- One Room Challenge Spring 2021 – Week 8 – The Kids Bath REVEAL!
- The Kitchen Plan!
- DIY Pull-Out Tray for Appliances (Using a Stone Remnant!)
- How to Cut Your Own Octagon and Dot Tile
- DIY Wood and Brass Spice Rack
- How to Make Your Refrigerator Look Built-In
- How to Customize the Width of an Ikea Cabinet
- How to Design and Install Cabinet Toe Kicks for Your Kitchen
- 12 ways to Make an Ikea Kitchen Look Custom
Amazing! I don’t even know where to start – this is just such a beautiful kitchen. But, not only is it beautiful, it’s so thoughtfully planned out and will work so well for you, and it has so much character – to me, it really embodies what good design does – it reflects the people that live there. I love that you’ve thought out all the details – from using the brass handles on the lowers and painted knobs on the uppers, to the toe kick, to the beautiful soapstone countertop with it’s curved detail at your sink. Thank you so much for sharing this Erin – I will miss the updates!
Stunning makeover! What a terrace job! Wondering if the absence of toe kicks along cabinetry will result in lots of smudges on your cabinetry from shoes and other objects hitting at floor level. And make standing at and reaching into higher cabs somewhat uncomfortable.
That was supposed to be a TERRIFIC job!
Amazing work! I love everything!
Wow Erin! This is just stunning! It must be so rejuvenating to wake up to this every morning! Congratulations!
Bravo!!
I feel like we’ve waited so long to see this reveal and it DID NOT disappoint. Wonderfully inspiring!
Loved reading every detail of this blog post. So many of your thoughts are incredibly relatable, especially the one about balancing your partner out and trying to sleep when you have too much to think about. You have empowered me to try more Erin! Thank you!
Erin, I found you through Shavonda Gardner linking to your beautiful kitchen – and I am so blown away! Its beautiful! And your description of the process is so relatable – I tend to take on very large DIY projects that take tons of effort, while my partner questions if this is how we want to spend our weekends 🙂
Thank you so much Leslie! And thank you for noticing all those details.
Well for one, we don’t wear shoes in the house so I don’t think there will be smudges, but if there are, I’m sure they can be cleaned with some good old magic eraser! And I haven’t noticed that the flush toe kicks are uncomfortable at all, but I don’t tend to stand in front of those spots much either. And thank you!
Thank you!!
Thank you Carrie! Its been pretty awesome, especially after washing dishes in the bar sink the past 3 months!!
Thank you!
Thanks so much Brittany!!
Thank you Steph! I like to keep it real!
Haha welcome, Rachel! Yes that sounds very relatable! We have a lot of "discussions" about the next project, I like to balance out big ones like this that need my husband to be invested with little ones like painting/ decorating that I can do myself so he doesn’t get burnt out. I’ve realized that not everyone wants to do home improvement 24/7 like me (weird.)
Erin, I am blown away! You and your hubby are rockstars. What an absolutely beautiful kitchen! So, now what’s next in your house?
Hi Erin! I’m blown away by your transformation. I have an almost identical layout and was wondering if you’d be willing to share measurements? I searched your blog a bit but wasn’t able to find if you have shared this information anywhere? Even just the length of both cabinet walls? Thank you for such great inspiration. I can’t wait to update our orange oak and dirty pink tiled kitchen.
Thank you so much! The kitchen is 16′ x 11′, the L-shape. I hope that helps!
I love you kitchen! It is very inspirational! Can you share what sheen you used for the paint on the cabinets? Thank you!
The cabinets were painted using Lacquer by the Cabinet door front company. It is similar to a semi-gloss.
You should be an engineer. The fridge surround, the toe kick as a cabinet door. That dishwasher toe kick design should be patented.
I actually am an engineer, haha! I have been practicing bridge engineering for 25 years and just left my job for content creation!